How Do I Map a Network Drive in Windows 11/10/8/7?
What is drive mapping?
Drive mapping allows a user to access a shared storage area on another computer as if it were a local drive, using a drive letter (A-Z) to access files stored on another computer. This is done over a network, making it appear as if the files are stored locally. The files themselves are still stored on the other computer.
A mapped drive allows access to shared resources on a local network, FTP servers, or websites, but files become inaccessible when the network is down or the remote computer is turned off.
- Preparation: turn on network recovery
- How to map a network drive in Windows 7/8/10/11 easily
- FAQs about mapping a network drive
- Further reading: backup to mapped network drive
Preparation: turn on network recovery
To map a network drive on your Windows PC, enable network discovery by going to Settings > Network & Internet > Network discovery, turning it on, and saving changes. Then, go to File Explorer, click on "This PC" or "Computer," right-click on "Network," select "Map network drive," choose a drive letter, and enter the UNC path or browse for the network location. Finally, click "Finish" to complete the mapping process.
1. To access the Network and Sharing Center, open the Control Panel and click on the "Network and Sharing Center" option.
2. Click on Change advanced sharing settings.
3. Make sure the "Private" section has the following options selected.
- Turn on network discovery
- Turn on automatic setup of network connected devices
- Turn on file and printer sharing;
- Allow Windows to manage homegroup connections (recommended).
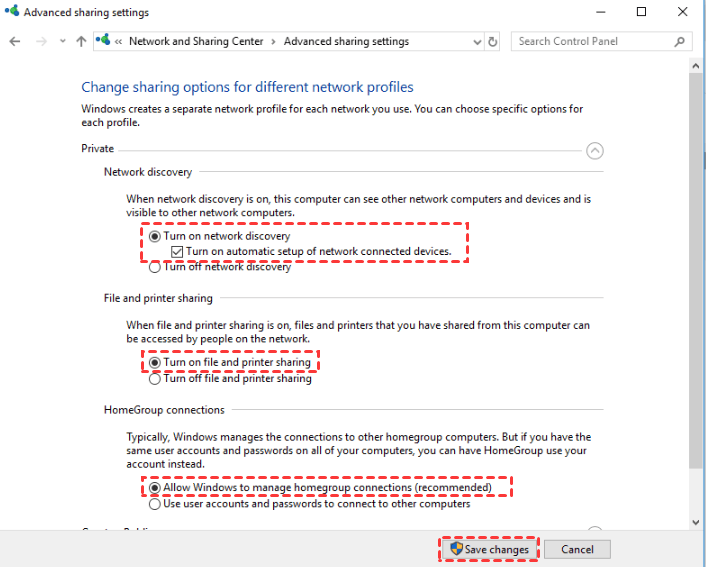
4. Click on Save changes and exit the Control Panel.
How to map a network drive in Windows 7/8/10/11 easily
Looking for a way to map a network drive on your computer? I'll show you how to do it in Windows 7, 8, 10 and 11 respectively.
- Map a network drive in Windows 7
- Map a network drive on Windows 8
- Map a network drive on Windows 10
- Map a network drive in Windows 11
Map a network drive in Windows 7
To map a network drive in Windows 7, follow these steps: right-click on the "Computer" icon and select "Map network drive" from the context menu, choose a drive letter from the dropdown list, enter the UNC path for the network location in the "Folder" field, and optionally select the "Reconnect at sign-in" checkbox to have the network drive reconnected every time you log in to Windows.
Step 1. To map a network drive, open Windows Explorer or My Computer, click on the "Tools" menu, and select "Map network drive".

Step 2. In the "Map Network Drive" window, select an available drive letter from the "Drive" list.

Step 3. In the Folder box, enter the name of the folder you want to map or click the Browse button to locate it. If the target device is encrypted, provide the correct username and password.

Step 4. To permanently map a network drive, select the "Reconnect at logon" option and click "Finish".

Step 5. When you access the Computer again, you will see that a new drive with the letter you assigned is listed there and you can access it at anytime.

Map a network drive on Windows 8
Windows 8 has made significant changes in its appearance, but the basic operations remain similar to Windows 7. To map a network drive in Windows 8, follow these steps:
Step 1. Click the File Explorer icon from your taskbar.
Step 2. To map a network drive in Windows, right click the "Network" from the left navigation bars and select "Map network drive".

Map a network drive on Windows 10
To map a network drive in Windows 10, go to File Explorer, click on "This PC" or "Computer" and then click on "Map network drive" in the toolbar. In the Map Network Drive window, select a drive letter and enter the UNC path of the network location you want to map. You can also choose to reconnect at login and to reconnect every time you log in to the computer. Finally, click on "Finish" to complete the mapping process.
Step 1. To access the "This PC" interface, open File Explorer from the taskbar.
Step 2. In the "Map Network Drive" window, select the drive letter you want to map to the network location, and then enter the UNC path to the network location in the "Folder" box. Click "Finish" to complete the mapping. The network location will now be available in the "This PC" folder.

Map a network drive in Windows 11
Windows 11 is the newest Windows OS released in October 2021. To map a network drive in Windows 11, follow these steps:
Step 1. To access File Explorer, open the Start menu, right click on it and select "File Explorer" from the context menu. If you have a shortcut to File Explorer in your taskbar, you can also click on it directly. Alternatively, you can use the Windows key + E shortcut to open File Explorer.
Step 2. To map a network drive in Windows 8, go to the File Explorer ribbon, click on the "More" button (three dots) and then select "Map network drive".

FAQs about mapping a network drive
1. What is map network drive used for?
Mapping a network drive is a useful feature that allows users to easily access files and folders on a remote server or computer, making it seem like they are local, and simplifying file management and application interactions.
2. What to do if you are unable to map a network drive?
If you're having trouble mapping a network drive, you can try the following:
- The folder name is spelled correctly.
- The folder was already set up for sharing on the remote computer. The remote computer was already set up for sharing the folder.
- The remote computer has turned on network discovery.
- You input the correct username and password.
- The network connections are proper.
3. How to disconnect a mapped network drive?
To remove a mapped network drive, right click the drive in the left pane and select "Disconnect" or "Disconnect network drive".
Further reading: backup to mapped network drive
The main purpose of mapping network drives is primarily for file sharing, but it also serves another practical function: backing up data. This is where a reliable backup software comes in, such as Qiling Disk Master Standard, which can aid in efficiently backing up your data.
- Qiling Disk Master allows users to create backups of their computer's operating system, internal and external hard drives, and important files or folders, providing a safeguard against data loss.
- You can backup data to an external HDD/SSD, USB flash drive, NAS, or a cloud service.
- The backup process will run in the background without interrupting your work.
Download Qiling Disk Master to have a try!
To backup your data to a mapped network drive, you can choose a backup type and select the mapped drive as the target location, storing the backed up data on another computer or NAS device, ensuring data safety even if your computer can't boot.

Bottom line
Mapping network drives in Windows 7, 8, 10, and 11 is a straightforward process that allows easy access to shared files on other computers in the same LAN, making it a convenient method for file sharing between computers at home or in a small enterprise.
The mapped network drive can be treated as a local hard drive, allowing you to back up your data to it. Qiling Disk Master also enables you to back up files to a mapped network drive, in addition to other devices like external hard drives, USB flash drives, and more.
Related Articles
- Easiest Way to Backup Network Drive to Local Drive in Windows 10
- Sync Folder to Network Drive in Windows 7/8/10 | 3 Ways
- How to Backup Windows 10 to NAS like Synology for FREE?
- Alternative to Windows Easy Transfer Windows 10
Refer to this article to get the best alternative to Windows Easy Transfer Windows 10 when you meet the problem of Windows Easy Transfer not available in Windows 10. - How to Create System Repair Disk on USB for Windows 7/8/10?
Want to create system repair disc on USB but do not know how? Read this guide to learn the easiest method. - Free Method: Create Windows To Go USB Drive Successfully
If you need to create Windows to go USB drive and take your own OS everywhere, you can turn to Qiling Disk Master Standard. This freeware allows you to create Windows 10, Windows 8 and Windows 7 portable USB stick in simple steps.