Extend C Drive in Windows Server 2012 Safely
Windows Server 2012 C drive can run out of space because of updates, logs, profiles, and applications. Extending C drive gives the system more working space when cleanup is not enough.
Understand the problem
Disk Management can extend C drive only when unallocated space is directly after it. Server disks often have recovery, data, or reserved partitions between C drive and free space.
- Confirm the exact disk, partition, drive letter, file system, and capacity before changing anything.
- Back up or recover important files before formatting, deleting, converting, resizing, or recreating partitions.
- For boot-related changes, check BIOS or UEFI mode, boot order, and system partition status before editing disk layout.
Use Windows built-in tools
Use built-in tools when unallocated space is adjacent to C drive.
- Open Disk Management and check the location of unallocated space.
- If unallocated space is directly to the right of C drive, right-click C drive and choose Extend Volume.
- If Extend Volume is greyed out, do not delete a data partition before backup.
- Clean temporary files and old update cache only after confirming server applications do not depend on them.
- Schedule partition changes during low-traffic time.
Use Qiling tools for guided steps
 Qiling Disk Master
Resize or move Server 2012 partitions with preview after backing up important data.
Function. Resize or move the partition with preview
Step 1. Back up important files from the Server 2012 C drive. Close running programs, pause large file transfers, and make sure the computer has stable power.
Step 2. Open Qiling Disk Master. In the disk map, select the Server 2012 C drive by drive letter, capacity, and position, then click Resize/Move.
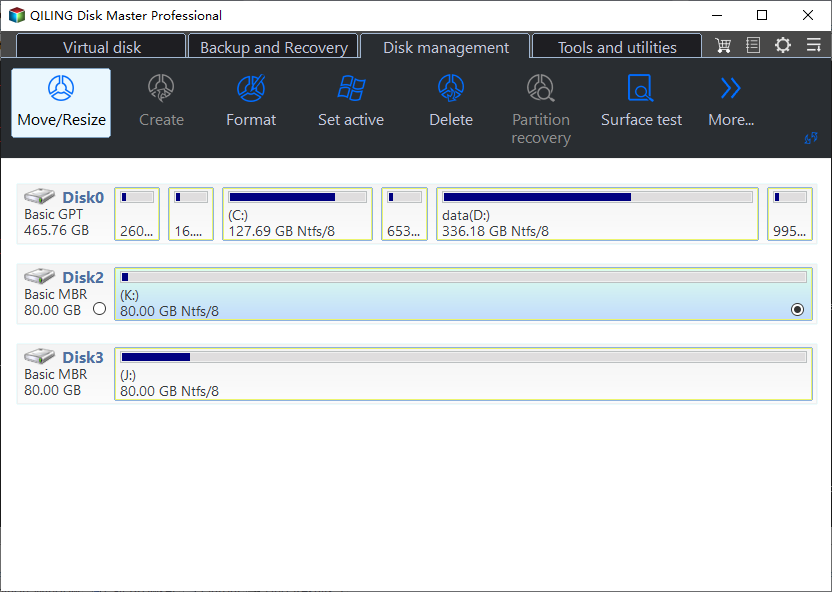
Step 3. Drag the partition border or enter the new size to extend C drive into adjacent or movable unallocated space. If unallocated space is on the wrong side, move the neighboring partition first so the final layout is correct.
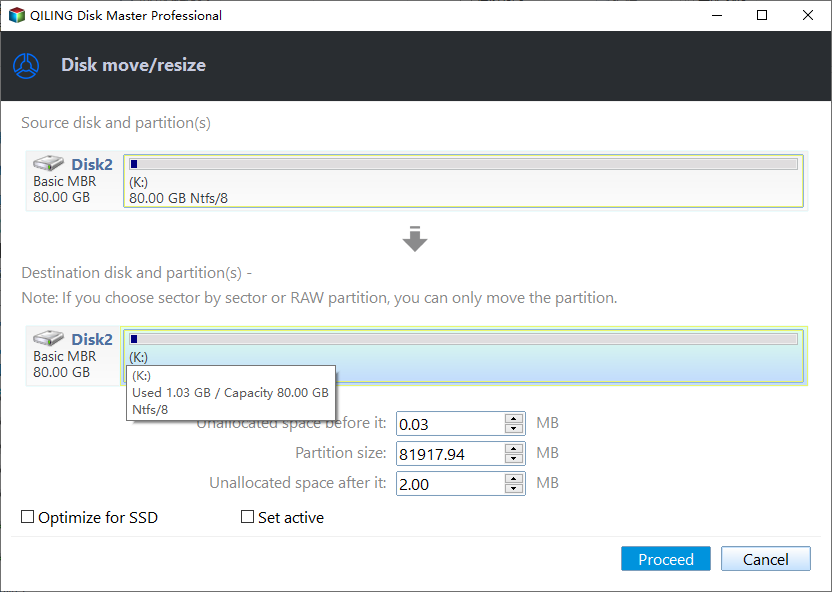
Step 4. Review the pending operations in the disk map. Confirm that only the intended partition will be changed.
Step 5. Click Proceed to apply the changes. Do not interrupt the process while the partition is being moved or resized.
Step 6. When the task finishes, reopen Disk Management and File Explorer. Confirm the final capacity, drive letter, and file access.
Check the result
Confirm C drive has more free space, Windows Update works, services start normally, and event logs show no storage-related errors.
Related Articles
-
C Drive Getting Full on Server 2012 R2
Troubleshoot server C drive growth before extending it. -
Extend Volume Greyed Out in Server 2016
Fix greyed-out Extend Volume when free space is not adjacent. -
Extend Server C Drive with DiskPart or Qiling
Extend Server C drive by checking adjacent space, DiskPart limits, and preview-based resizing.
Products
Articles & Tutorials
- Data Recovery
- Data Backup
- File Recovery
- File Backup
- File synchronize
- System Backup and Restore
- Disk and Partition Clone
- Technical articles
- Disk Master Help
- Windows Deleted File and Disk Recovery Tutorials
- Windows File and Data Recovery Tutorials
- More Windows Tutorials for Install, Security, Files, and PC Tips
- Windows Boot, Repair, and Recovery Environment Tutorials
- Windows Backup Tutorials
- Windows Restore Tutorials
- Windows Clone and Migration Tutorials
- Windows Server Backup, Recovery, and Management Tutorials
- Windows Disk, Partition, and Storage Management Tutorials