How to Shrink Volume in Windows Server 2016 Safely
Shrinking a Server 2016 volume releases unallocated space for another partition. Schedule maintenance, stop active database or file workloads, and back up the server before changing a production disk.
Method 1. Shrink a volume in Disk Management
Step 1. Sign in as an administrator. Press Win + R, type diskmgmt.msc, and press Enter to open Disk Management.
Step 2. Locate the disk and volume you want to shrink. Check the drive letter, capacity, and volume label carefully so you do not change the wrong server partition.
Step 3. Right-click the target volume and choose Shrink Volume. Wait while Windows queries available shrink space.
Step 4. In Enter the amount of space to shrink in MB, type the amount you want to release. Leave enough free space on the original volume for applications, logs, updates, and temporary files.
Step 5. Click Shrink. After the operation finishes, check that the unallocated space appears on the right side of the shrunk volume.
Step 6. Use the resulting unallocated space only after confirming the final layout. If you need to create a new volume, right-click the unallocated space and use New Simple Volume.
Method 2. Shrink a Server volume with preview
 Qiling Disk Master Server
Resize a server volume with a preview so you can confirm the exact partition layout before applying changes.
Step 1. Back up the affected volume to a separate destination. If the volume stores databases, shared folders, or application data, pause related services or schedule the operation during maintenance time.
Step 2. Open Qiling Disk Master Server. In the disk map, locate the intended data volume by drive letter, capacity, and position on the disk.
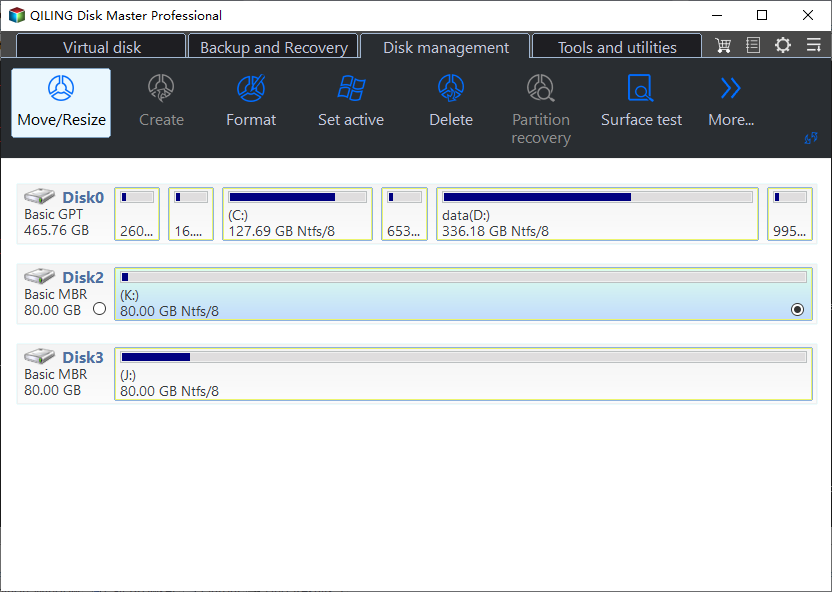
Step 3. Right-click the target volume and choose Resize/Move Partition. This function is used to change the selected volume size.
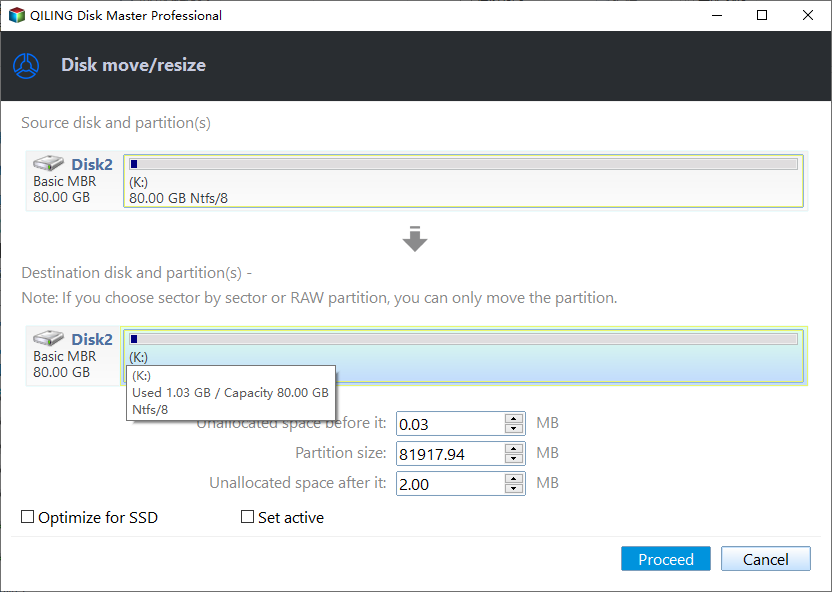
Step 4. Drag the partition border inward or enter a smaller partition size to release unallocated space. Keep enough free space inside the original volume for server workloads.
Step 5. Review the disk map preview. Confirm the unallocated space appears in the expected location and no unrelated server volume is selected.
Step 6. Click Proceed to apply the pending resize operation. Keep the server powered on and do not interrupt the process.
Step 7. After completion, open File Explorer and Disk Management to confirm the new volume size and the unallocated space. Restart paused services and verify permissions, shared paths, and application access.
Conclusion
Use Disk Management for straightforward cases. If Windows cannot shrink enough space, address immovable files or use a preview-based tool after a verified backup.
Related Articles
-
Extend Volume Greyed Out in Windows Server 2016
Find out why Extend Volume is unavailable and how to adjust server partitions safely. -
Extend Primary Partition in Windows Server 2008 R2
Extend a server primary partition with built-in tools or a preview-based partition manager.
Products
Articles & Tutorials
- Data Recovery
- Data Backup
- File Recovery
- File Backup
- File synchronize
- System Backup and Restore
- Disk and Partition Clone
- Technical articles
- Disk Master Help
- Windows Deleted File and Disk Recovery Tutorials
- Windows File and Data Recovery Tutorials
- More Windows Tutorials for Install, Security, Files, and PC Tips
- Windows Boot, Repair, and Recovery Environment Tutorials
- Windows Backup Tutorials
- Windows Restore Tutorials
- Windows Clone and Migration Tutorials
- Windows Server Backup, Recovery, and Management Tutorials
- Windows Disk, Partition, and Storage Management Tutorials