How to Clone Windows 10, 11 to NVMe SSD (Step by Step Guide)
What is NVMe?
NVMe, short for Non-Volatile Memory express, is the new standard host controller interface for connecting solid-state drives (SSD). It was first introduced in 2011 and now is built in as standard in many computers. Due to its high speed and low latency, many users would like to clone their boot drives to NVMe SSDs to improve their computers' performance.
This article will show you how to clone your Windows 10/11 OS to an NVMe SSD. Booting Windows from an NVMe SSD is now super fast as Microsoft has optimized Windows to take full advantage of the new technology.
Actually, NVMe is becoming the new industry standard for servers, laptop or desktop PCs, and even next-gen gaming consoles. So you can choose to clone SSD to NVMe M.2 in Windows 7, 8, 8.1, or Windows Server 2008 (R2), 2012 (R2), and 2016 as all the systems are supported.
Newer systems since Windows 8.1 have an NVMe driver built-in (such as Windows 11 and Windows Server 2016), whereas, if you want to use an NVME drive in Windows 7 or other older systems you will need to download an NVMe driver from the SSD manufacturers’ website first.
Requirements to boot from an NVMe SSD
If you want to use an NVMe SSD as a boot drive, you need to make sure your computer meets the requirements below:
- Newer computer hardware. Though NVMe is compatible with older computers, it works better with Skylake chipset or later.
- An M.2 PCI-E x4 slot. If your motherboard was launched a long time ago and can't meet the condition, you may need a PCIe x4 adaptor.
- UEFI firmware. Booting from an NVMe SSD is only supported on systems that support UEFI.
- UEFI boot mode. If your computer is booting in Legacy boot mode, please change Legacy to UEFI mode in BIOS after you have transferred Windows 10/11 to the NVMe drive.
Specialized NVMe SSD cloning software
When you decide to clone HDD to NVMe or clone SATA SSD to NVMe, choosing the right specialist drive cloning software will save you lots of time and effort. Here we recommend you Qiling Disk Master Professional, because it has a range of excellent features to make the process smooth and ensure the SSD’s performance.
★ It offers the ‘Disk Clone’ feature to help you clone a larger HDD to a smaller SSD as long as the new SSD is larger than the data you want to transfer.
★ It is embedded with the ‘System Clone’ feature which allows you to migrate only the OS to an NVMe SSD.
★ As NVMe drives only work with UEFI boot mode, your NVMe SSD will have to be initialized in the GPT partition style if you want to use it to boot your computer. Qiling Disk Master is able to clone from a GPT disk to GPT disk or clone from an MBR disk to GPT disk while ensuring the destination GPT disk is bootable.
How to clone Windows 10/11 to an NVMe drive without reinstalling
Before you migrate Windows 10/11 to NVMe SSD, please keep in mind that all of the data on the target NVMe SSD will be overwritten – so you better backup any important data first. And this software applies to cloning HDD to NVMe and cloning SSD to NVMe (eg: clone SATA SSD to M.2 NVMe SSD) in simple steps.
Now download Qiling Disk Master and follow the steps below to clone Windows 10/11 from SATA to NVMe.
1. Connect your NVMe SSD to the M.2 PCI-E x4 slot and boot your computer.
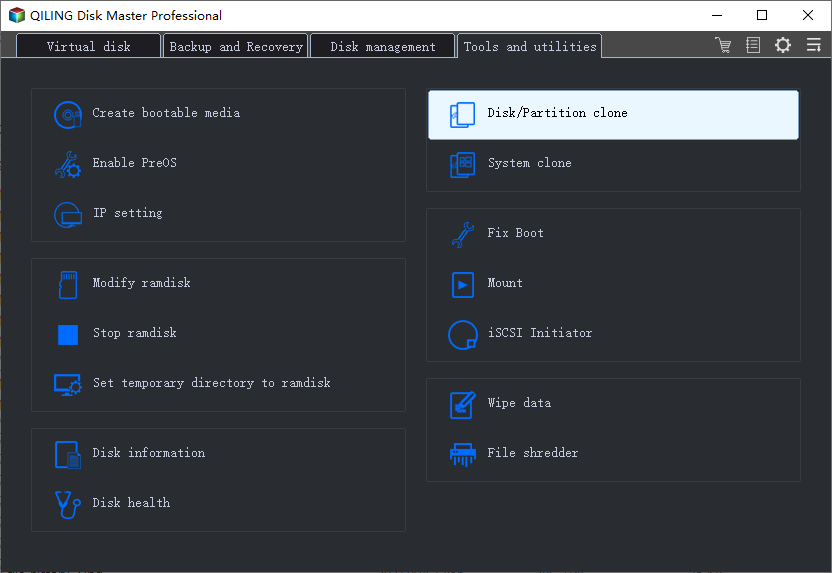
2. Install and launch this disk clone software. Under Clone tab, select Disk Clone to clone hard drive to NVMe.
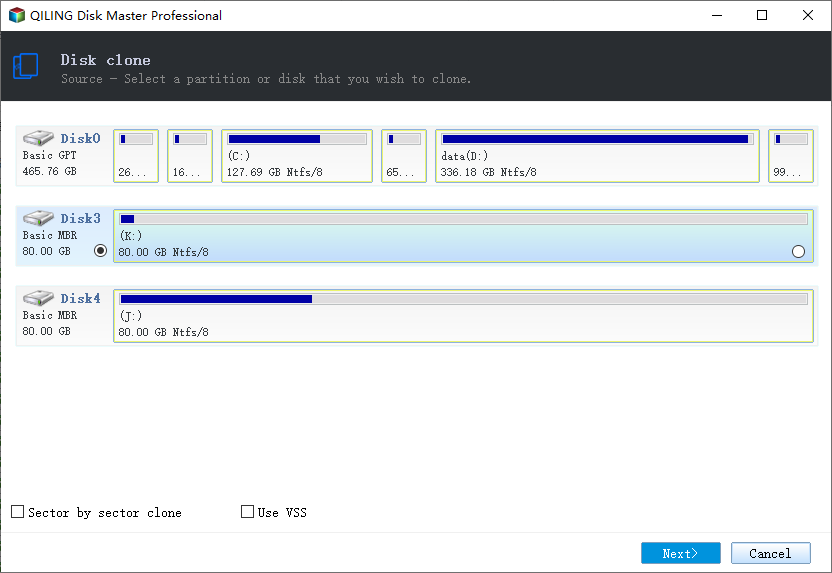
3. Click on the current boot drive to select it as the source disk and then select the NVMe SSD as the destination disk.
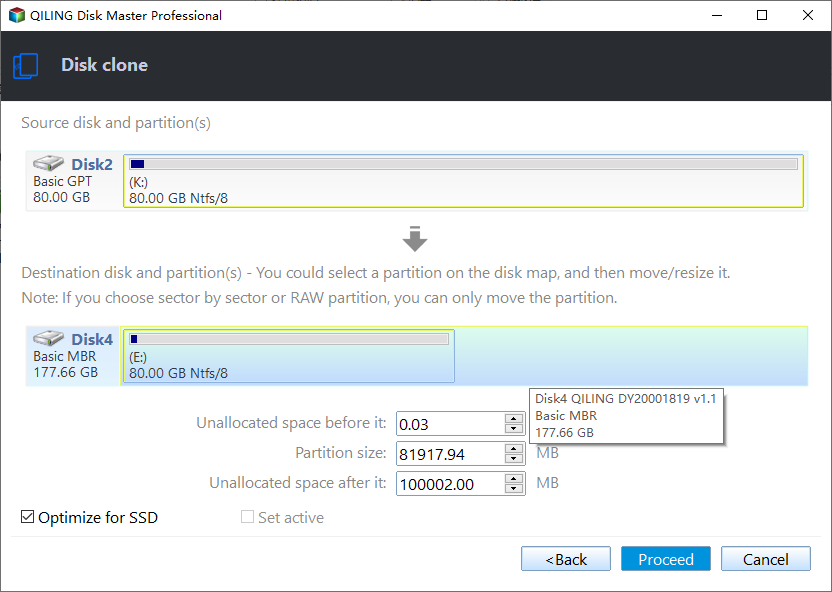
4. Check the SSD Alignment option which will fix any SSD alignment issues you could face and then click on Proceed to begin the process of HDD or SSD to NVMe SSD clone.
The cloning process is running in the background, you will still be able to use your computer as normal. Just wait patiently until the process finishes.
💡 Tips:
- To only move OS to an NVMe SSD, you can choose "System Clone" in Step 2.
- If you want to clone operating system to an NVMe SSD without loading Windows, you may turn to "Create Bootable Media" feature. That is also suitable when system refuses to boot normally.
- If you want to clone Windows 10 to new computer, you need to be sure the hardware on both computers is very similar. Otherwise, you may encounter boot error after cloning.
- If you want to perform disk clone or system migration on multiple computers conveniently, you could upgrade to Technician or Technician Plus version to create a portable version of Qiling Disk Master on removable device, then connect it to any target computer for direct use.
Bonus tip: how to clone NVMe SSD with only one slot
If you want to clone NVMe to NVMe SSD but your computer has only one slot, there are three methods for your reference:
1. Use an M.2 to PCIe adapter to connect the second drive and then follow the same steps above.
2. Clone Windows 10/11 to an external hard drive, replace the old NVMe SSD with the new one, and then clone system to new NVMe SSD with a bootable USB.
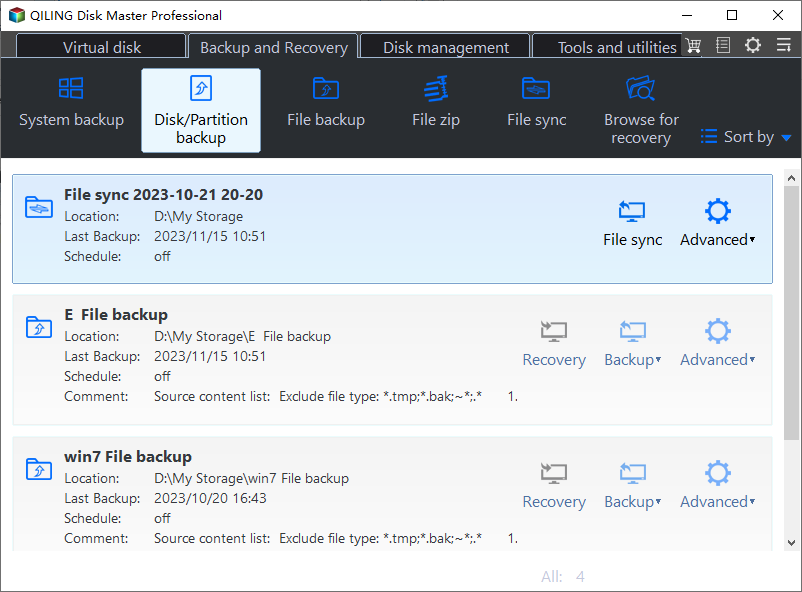
3. Qiling Disk Master also works as a backup manager with powerful backup and restore features. Therefore, you can:
- Backup the original SSD to an external drive (connected via USB port).
- Replace old NVMe with new NVMe.
- Restore the system to the new NVMe drive through a bootable USB.
Boot from the cloned NVMe SSD
If you don't know how to boot from the cloned NVMe SSD or want to check if it's bootable, please refer to the following steps.
1. Shut down your computer completely.
2. Restart your computer and press the specified key to enter the BIOS. The key is usually F2, Del, ESC, F10, etc.
3. Go to the Boot option and set the cloned NVMe SSD as the first boot device. Then, keep the changes you made and boot from it.
If your computer boots successfully from the cloned SSD, you will be able to enjoy the fast speeds and performance it offers! Then, you can consider wiping the old drive for reuse.
Frequently asked questions about SSD to NVMe Clone
1. Can I install Windows 10 on NVMe SSD?
As mentioned earlier, if you want to clone HDD or SSD to NVMe and boot from it, there are some basic requirements that need to be satisfied. They are: Newer computer hardware, M.2 PCI-E x4 slot, UEFI firmware and UEFI boot mode.
2. Can I put m 2 SATA to m2 NVMe?
The answer may be different due to the key of your SATA protocle. If the SATA protocol has the M key and/or B key, you can put it to NVMe. If it does not have either the M or B key, but others instead, you cannot.
3. Is NVMe and M 2 the same?
The NVMe and M2 is not exactly the same. For NVMe, it's a protocol with faster transfer speed, 5 or 6 times than traditional SATA protocol. For M2, it's a more modern type of internally mounted expansion card using SATA or PCIe interface.
Conclusion
Many users would like to clone Windows 10 to NVMe SSD for its high speed and low latency. To simplify the process, specialist disk cloning software Qiling Disk Master could be a big help. It enables you to clone HDD or SSD to NVMe SSD with several clicks, or even transfer the operating system only.
In addition, it's still a remarkable backup and restore software, which can help you protect your disk and data on it by creating a disk backup on external hard drive. Once something bad happens, you can restore the disk image to new hard drive and use it to replace the old disk.
Related Articles
- Best Way to Move Windows Server SSD without Reinstalling System
Here comes the best way to move Windows Server 2003, 2008, 2012, 2016, 2019, SBS or Home Server 2011 to SSD and boot the system from successfully. - SSD Clone VS Fresh Install, Which Is Better?
SSD clone vs fresh install, what is the difference between them and which one is better? You can find the answer from here. - Freeware: SSD to SSD Clone in Windows 11, 10, 8, 7
With the Qiling Disk Master, you can perform SSD to SSD clone for free in Windows 11, 10, 8, 7. Only several clicks can make it done. - How to Clone C Drive to SSD/HDD in Windows 10/8/7 Easily?
Do you want to clone C drive for migrating the Windows OS to a new SSD/HDD? If so, try this way to save your time and effort without reinstalling!


