Top 2 Ways to Fix Cannot Install or Upgrade to Windows 11
- Why Cannot Install or Upgrade to Windows 11?
- Minimum Requirments of Windows 11
- How to Fix Cannot Install or Upgrade to Windows 11
- How to Solve System Unbootable due to Cannot Install or Upgrade to Windows 11
- Part 1. Make a System Image File
- Part 2. Create a Bootable Media
- Part 3. Restore Backup to Unbootable Computer with Bootable Media
- Summary
Why Cannot Install or Upgrade to Windows 11?
If you're trying to install Windows 11 Insider Preview but getting the error message "This PC can't run Windows 11", it's likely because your system doesn't have two security settings turned on: Secure Boot and TPM 2.0. These features, which are often built into modern computers and processing chips from Intel and AMD, are required for Windows 11 installation.
Minimum Requirments of Windows 11
While the most common reasons for not being able to install Windows 11 include not enabling TPM 2.0 and Secure Boot, you can also check your system for other installation conditions based on the minimum requirements of Windows 11 installation.
- Processor: 1 GHz or faster with 2 or more cores on a compatible 64-bit processor or System on a Chip (SoC).
- RAM: 4 gigabytes (GB)
- Storage: 64 GB or larger storage device
- System firmware: UEFI, Secure Boot capable
- TPM: Trusted Platform Module (TPM) version 2.0
- Graphics card: Compatible with DirectX 12 or later with WDDM 2.0 driver
- Display: A high definition display with a screen size greater than 9 inches diagonally, using 8 bits per color channel, resulting in a 24-bit color depth, which supports 16,777,216 possible colors.
- Internet connection and Microsoft accounts: Windows 11 Home edition requires internet connectivity and a Microsoft account to complete device setup on first use, and to perform updates and download certain features.
How to Fix Cannot Install or Upgrade to Windows 11
To enable Secure Boot and TPM 2.0 to solve the problem of not being able to install or upgrade to Windows 11, follow the steps outlined in the article, which can be completed through graphic tutorials.
Fix 1: Enable Secure Boot
Secure Boot can prevent malware from launching when you start your computer. When enabled, only Microsoft-certified drivers are loaded. Windows 11 requires Secure Boot to be enabled for the latest version to run, and if it's not, you can't install or upgrade to Windows 11. To enable Secure Boot, follow the graphic tutorial below.
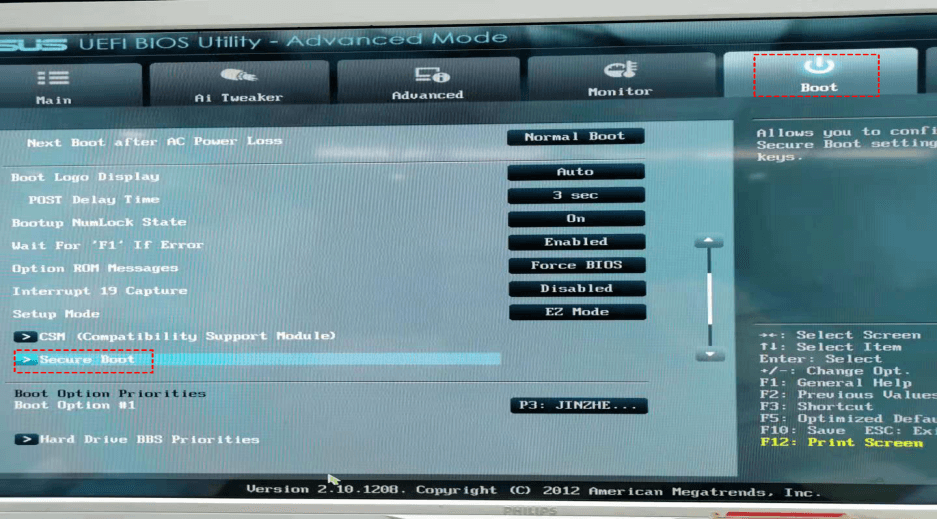
Step 1. Restart the computer and press the appropriate key (usually Del, F2, or F12) to enter the BIOS, then click Boot > Secure Boot.
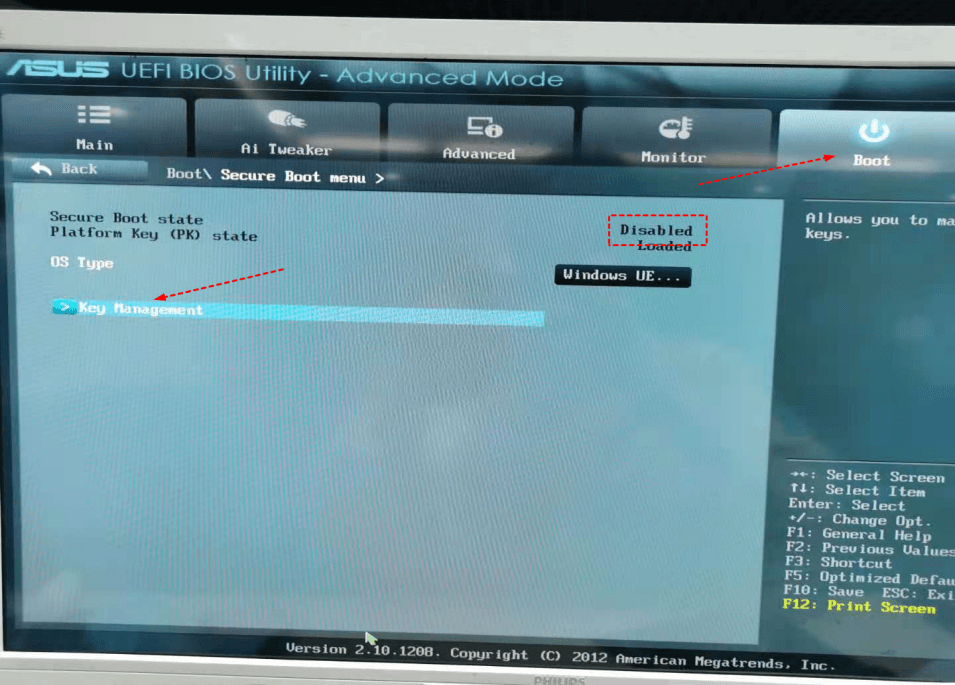
Step 2. You can see the Secure Boot is disabled, and select Key Management.
Step 3. Choose Install default Secure Boot keys to enable secure boot.

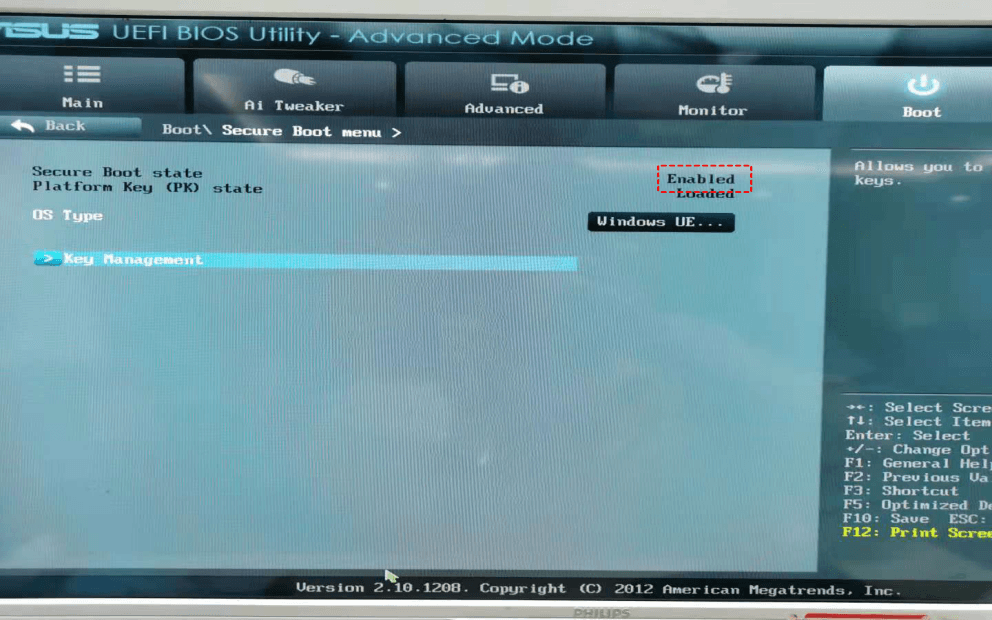
Step 4. Return to the previous column. And you will see the Secure Boot has been enabled.
Fix 2: Enable TPM 2.0
TPM (Trusted Platform Module) is a computer chip that provides hardware-based security functionalities, but it requires CPU and BIOS/UEFI firmware support. If you don't enable TPM 2.0, you may encounter issues installing or upgrading to Windows 11. To check if TPM is enabled on your computer, you can follow the graphic tutorial to check TPM and enable TPM 2.0 in BIOS.
How to Check the TPM 2.0 on Your Computer
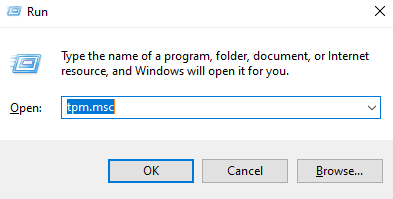
Step 1. Press Win+R together to open the Run window, then type tpm.msc and click OK.
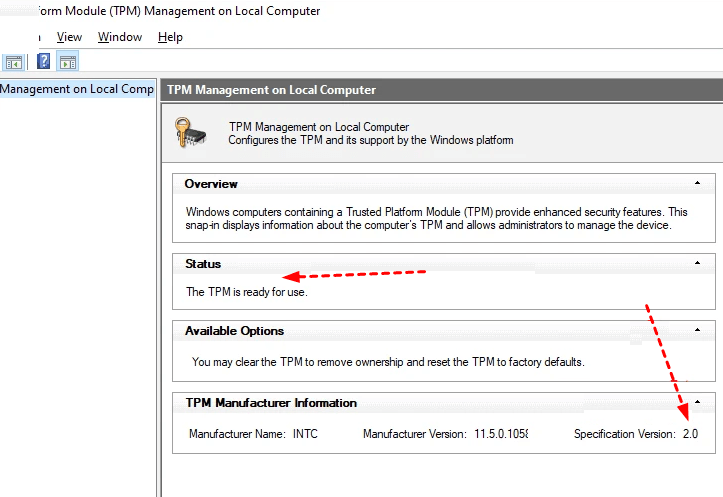
Step 2. If the TPM management window shows that the TPM is ready for use, it indicates that the TPM is enabled, and you can verify its version for the TPM manufacturer information.
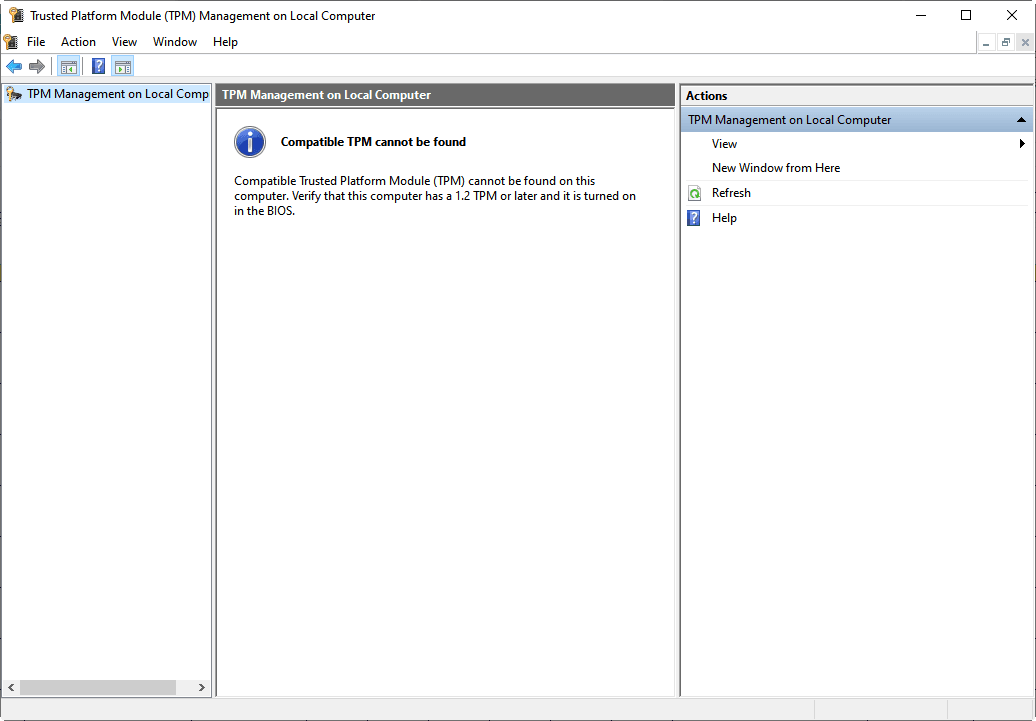
Step 3. If the TPM version is compatible but disabled, the computer will prompt "Compatible TPM can't be found." To resolve this, you can follow the steps in the next part to enable the TPM in the BIOS.
How to Enable TPM2.0 in BIOS
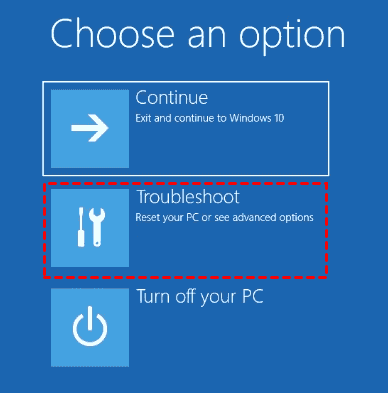
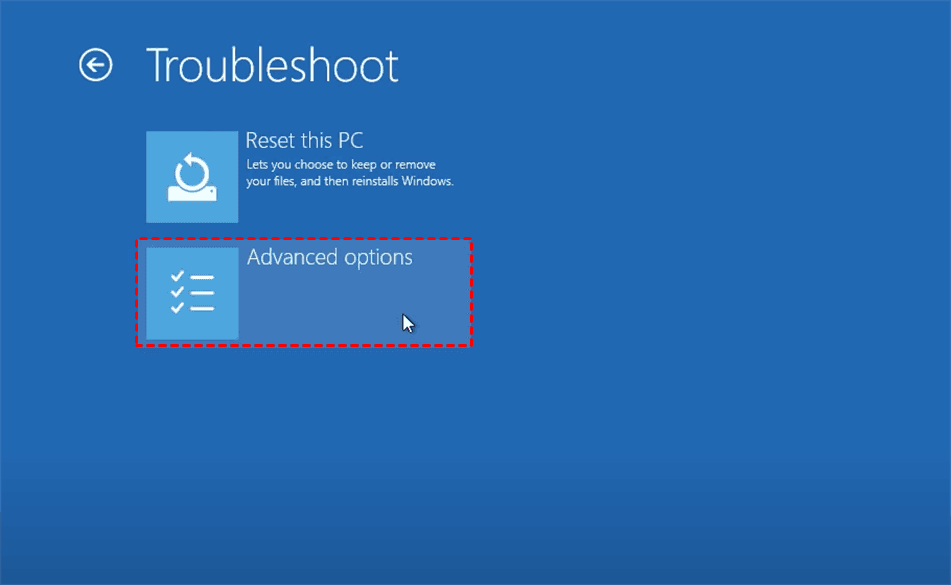
Step 1. To access the Windows Advanced Options menu quickly, press the Shift key while clicking Power > Restart and select Troubleshoot.
Step 2. Choose Advanced Options.
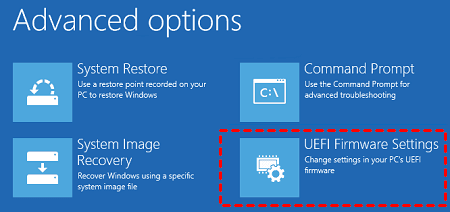
Step 3. Choose UEFI Firmware Settings to enter the BIOS.
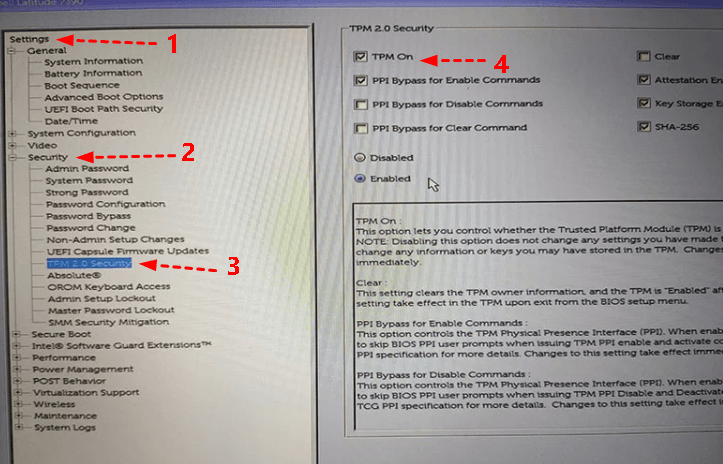
Step 4. Click Settings > Security > TPM 2.0 Security, then tick the TPM On option.
How to Solve System Unbootable due to Cannot Install or Upgrade to Windows 11
If you encounter issues during a Windows 11 installation or upgrade, you can create a system image using Qiling Disk Master on a working PC and then restore it to the failed computer, helping you recover your system.
Qiling Disk Master is a safe and reliable software that offers backup, restore, and clone functions. In case of a system crash, it allows users to create a bootable media with Qiling Disk Master Professional, enabling them to boot the faulty computer into WinPE and perform a system restore as usual.
AceBackup is a popular backup software that supports various types of backups, including file backup, system backup, disk backup, and partition backup, allowing users to backup any items they desire. Additionally, it enables users to restore system backups, bringing their computer back to a functional state. Furthermore, its Universal Restore feature facilitates instant recovery of a crashed system on different hardware, providing a convenient solution for system recovery and hardware migration.
- Migrate system to a machine with dissimilar hardware installed.
- Real-Virtual-to-real and real-to-virtual computer migration is used for system recovery, testing, and other purposes, allowing for the transfer of a system's state from one physical machine to another, or from a physical machine to a virtual environment, and vice versa. This process enables the preservation of system configuration, data, and applications, making it an essential tool for disaster recovery, testing, and development.
- You don't need to reinstall your operating system if you change the hardware on your computer. The OS can adapt to the new hardware configuration, allowing you to upgrade or replace components without the need for a full system reinstallation.
To solve the system unbootable with Qiling Disk Master Professional, you can follow these steps. Firstly, you need to boot the system using the Qiling Disk Master Professional software.
Part 1. Make a System Image File
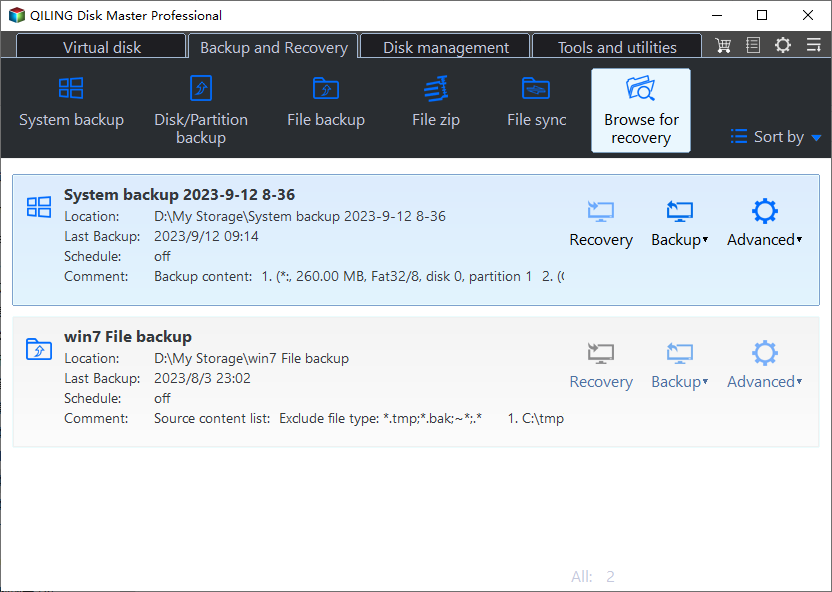
Download Qiling Disk Master Professional, To create a system backup, navigate to the Backup section, select System Backup, choose a target location, and then click Proceed.
Part 2. Create a Bootable Media
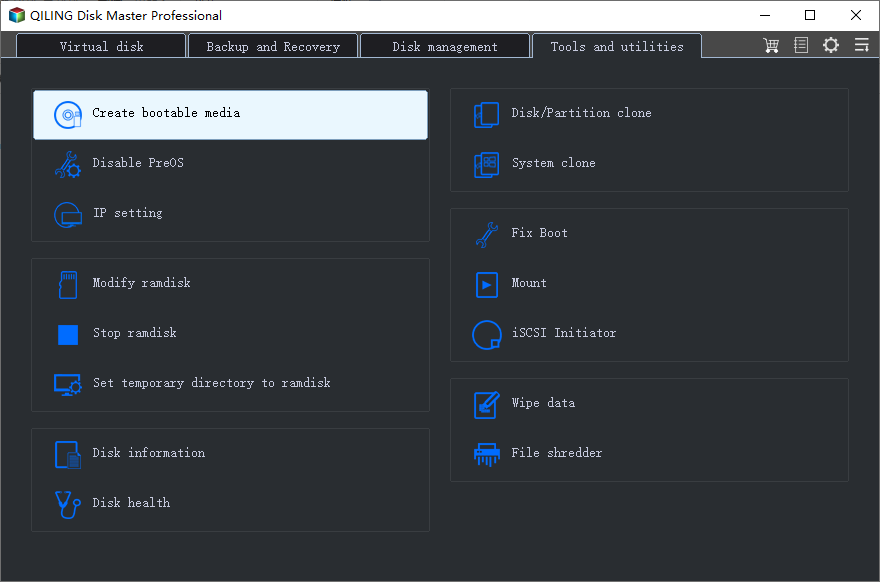
To create a bootable disc, go back to the software's homepage, click on "Tools" and select "Create Bootable Media", then follow the instructions to create a bootable disc based on Windows PE.
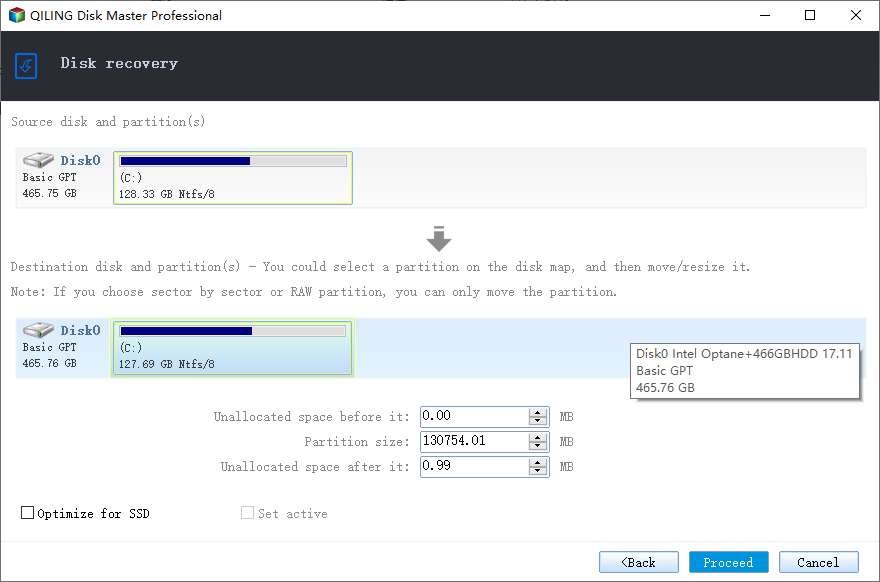
Part 3. Restore Backup to Unbootable Computer with Bootable Media
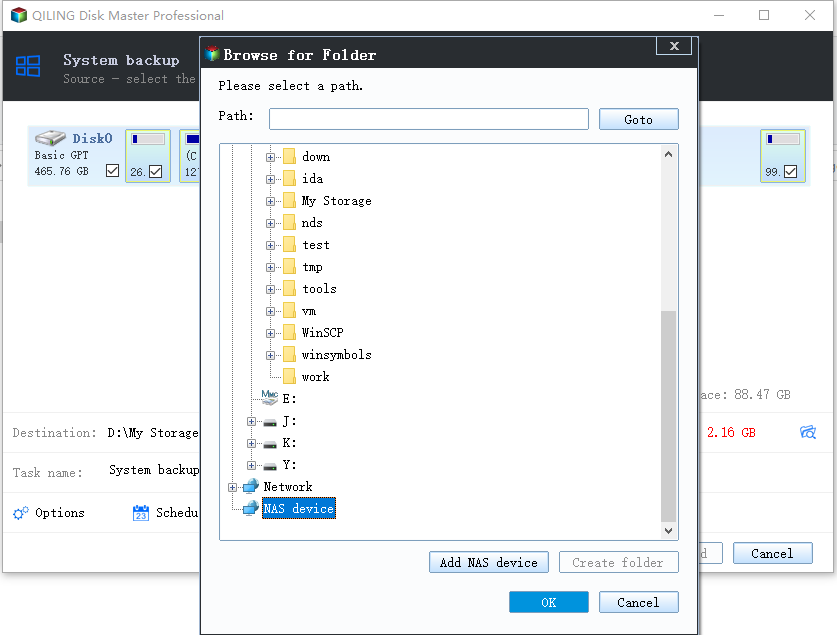
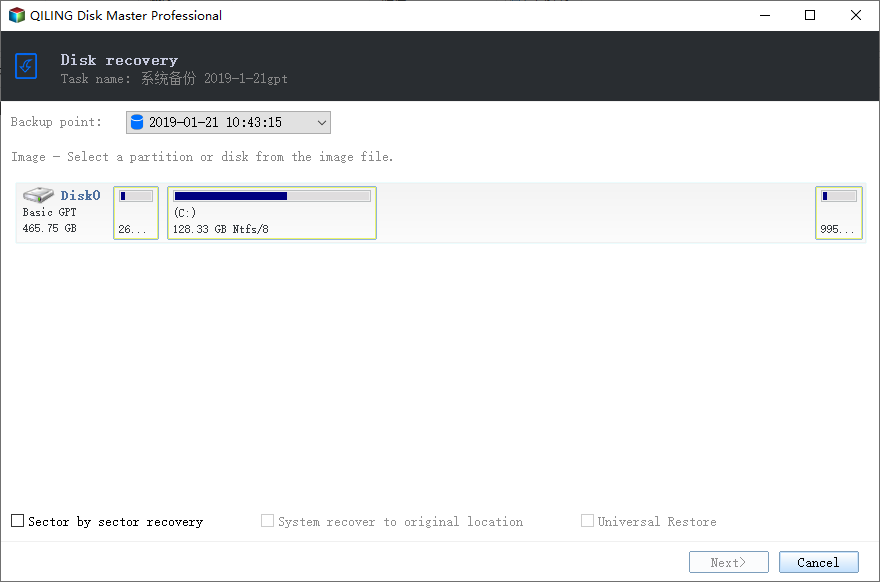
Step 1. Click Restore > Select Image File to navigate manually to the image file location.
Step 2. Select Restore this system backup, and check Restore system to other location, then click Next.
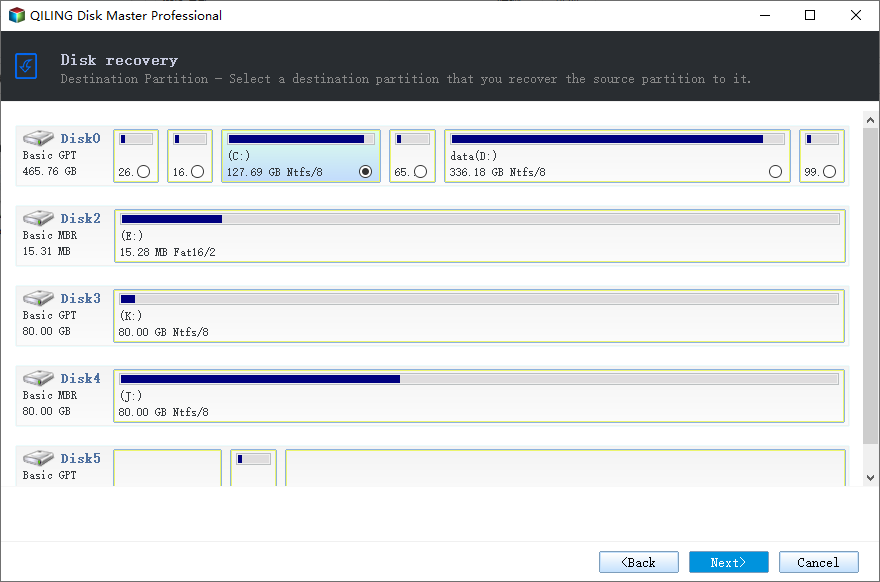
Step 3. Select the destination for the system image that you want to restore and click Next.
Step 4. To successfully restore a system backup to another computer using Qiling Universal Restore, ensure that the target computer has the same hardware configuration as the original system, including the same operating system, processor, and motherboard. If the target computer has different hardware, you may need to configure the BIOS settings to match the original system. Once you have confirmed the hardware compatibility, launch Acronis Universal Restore, select the system backup you want to restore, and click "Proceed" to initiate the restoration process.
- Notes:✎...
- Edit Partition: This feature enables you to adjust the partition size either automatically or manually.
- SSD Alignment: This technology will enable faster data transfer rates between the SSD and the computer, allowing for quicker reading and writing of data. This means that tasks such as loading operating systems, applications, and files will be completed more rapidly, making the overall user experience more efficient.
Summary
If you're having trouble installing or upgrading to Windows 11 due to issues with Secure Boot and TPM 2.0, this article provides a solution. However, if the upgrade or installation process causes your system to fail to boot, you can use Qiling Disk Master Professional to create a bootable disk and make a system backup, then restore it, allowing you to boot the faulty computer into WinPE and perform a system restore as normal.
To protect the unlimited computers of your company, Qiling Disk Master Technician is the best choice. With its inbuilt Qiling Image Deploy tool, you can easily deploy or restore system image files on a server computer to multiple client computers.
Related Articles
- How to Solve Windows 11 Installation Has Failed
When everyone is excited about the upcoming release of Windows 11, have you received the prompt "This PC can't run Windows 11"? I'll share three methods for solving Windows 11 installation has failed. - Windows 10/8/7 Restore System Image to Different Computer Easily
Want to restore Windows backup to a different computer with dissimilar hardware? The easiest way is using a powerful backup and restore software. - How to Fix or Reset Windows Update in Windows 10, 11 (6 Methods)
If you get stuck downloading Windows Update in Windows 10/11, try following methods to fix it or reset Windows Update components. Also, here are some effective tips if you receive serious errors after upgrading. - This PC Can't Run Windows 11 | How to Fix or Bypass it
Many users receive "This PC can't run Windows 11" when they try to install it, or check if their computer is compatible. Why does this happen and how to fix it? - How to Wipe C Drive Securely in Windows 10 | 3 Methods
Read this detailed post to learn a step-by-step tutorial to know how to wipe C drive in Windows 10. If you cannot format system drive directly, check out 3 secure methods to wipe C drive. One command prompt way is also provided to format C drive. - Completely Wipe External Hard Drive in Windows 10 with Freeware
Learn the best way to securely wipe all data on external hard drive like WD Maxtor external drive completely on Windows 10 with free disk eraser.