Best Way to Clone Windows 11 to NVMe SSD
Windows 11 & NVMe SSD: Best Combination
Windows 11 is Microsoft's latest operating system with a sleek interface and enhanced security features. Upgrading to Windows 11 can bring new features and improved performance.
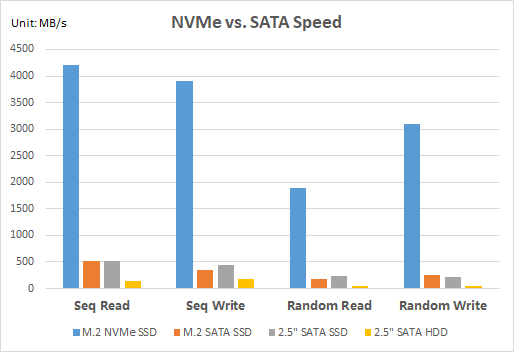
NVMe is a storage protocol designed for SSDs and NVMe drives. NVMe drives offer lightning-fast read and write speeds, reducing boot and application load times.
You may leverage NVMe to maximize Windows 11 performance. Cloning Windows 11 to NVMe provides notable benefits.
- It enables faster data transfer speeds, improving overall system performance.
- Migrating the OS and applications to NVMe reduces boot times significantly.
- Cloning ensures a seamless transition without reinstalling programs and settings from scratch.
- Preparations for Windows 11 NVMe Cloning
- Best Windows 11 NVMe Cloning Software - Qiling Disk Master
- How to Clone Windows 11 to NVMe SSD Step by Step
- Important: Optimizing Windows 11 on NVMe
- Answered! FAQs on Windows 11 NVMe Cloning
Preparations for Windows 11 NVMe Cloning
Before you start cloning, it's important to prepare for a smooth transition.
1. Connect the NVMe SSD
- If there are two M.2 slots: Shut down your computer and open the case. Locate an available M.2 slot on your motherboard and insert the NVMe drive. Secure the NVMe drive in place using the provided screw(s).
- If there is only one slot: Use an NVMe SSD enclosure to connect the new drive externally.
2. Initialize the NVMe SSD (for a brand new SSD)
As NVMe drives only work with UEFI boot mode, your NVMe SSD will have to be initialized in the GPT partition style if you want to use it to boot your computer.
3. Backup files on the NVMe SSD (for a used SSD)
The cloning process will overwrite the destination disk, so it’s necessary to make a backup for important data.
4. Choose a reliable cloning software
A professional cloning tool ensures data integrity and secure boot after cloning. Get the best NVMe cloning software below.
Best Windows 11 NVMe Cloning Software - Qiling Disk Master
Qiling Disk Master Professional is specialized disk cloning software that allows you to perform Windows 11 to NVMe cloning. It has following highlights.
★ It offers the Disk Clone feature to help you transfer everything from one hard drive to another. You can even clone a larger HDD to a smaller SSD as long as the new SSD is larger than the data you want to transfer.
★ It is embedded with the System Clone feature which allows you to migrate only the OS to a new drive. You can use this feature to install Windows 11 on an NVMe SSD.
★ It supports MBR and GPT disk clone. You are able to clone MBR to MBR/MBR to GPT/GPT to MBR/GPT to GPT as per your need. The destination disk remains bootable after cloning.
Download Qiling Disk Master now to have a try!
How to Clone Windows 11 to NVMe SSD Step by Step
Step 1. Install and launch Qiling Disk Master. Under Clone tab, select Disk Clone.

Step 2. Click on the current boot drive to select it as the source disk and then select the NVMe SSD as the destination disk.

Step 3. Check the SSD Alignment option to optimize NVMe SSD performance. Then click Proceed to begin Windows 11 to NVMe cloning.

Boot from the Cloned NVMe SSD
👉 Case 1: If you installed the NVMe SSD in a slot
- Restart your computer and press the specified key (usually F2, Del, ESC, F10, etc.) to go to BIOS.
- Look for the Boot tab and set the cloned SSD as the first boot option.

- Hit F10 to save the changes and exit the BIOS screen. Now you should be able to boot the computer successfully from the cloned SSD drive.
👉 Case 2: If you connected the NVMe SSD via an enclosure
- Shutdown your computer.
- Remove the old hard drive and install the new SSD there.
- Start your computer and it should boot from the new SSD successfully.
Important: Optimizing Windows 11 on NVMe
Once you have successfully cloned Windows 11 to NVMe, you can take additional steps to optimize your system and fully utilize the advantages of NVMe technology. Consider the following tips for optimization:
- Enable NVMe optimizations: In the settings of your NVMe drive, make sure to enable features like "Write Caching" and "Trim" to maximize performance and enhance the efficiency of data transfers.
- Disable unnecessary services and features: Improve overall performance by disabling resource-intensive services and features that are not required for your specific needs. This will free up system resources and allow your NVMe drive to focus on essential tasks.
- Keep drivers and firmware up to date: Regularly update the drivers and firmware of your NVMe drive to ensure compatibility with Windows 11 and take advantage of any performance enhancements and bug fixes provided by the manufacturer.
By following these optimization tips, you can fully leverage the benefits of NVMe technology and further enhance the performance and efficiency of your Windows 11 system.
Answered! FAQs on Windows 11 NVMe Cloning
Q1: How long does it take to clone Windows 11 to NVMe?
The duration of the cloning process varies depending on factors such as the size of your Windows installation and the speed of your NVMe drive. Typically, it can range from half an hour to more than one hour.
Q2: Can I clone Windows 11 to NVMe on a laptop?
Certainly! If your laptop has an available M.2 slot that supports NVMe drives, you can clone Windows 11 to an NVMe drive on your laptop.
Q3: What happens to my old drive after cloning Windows 11 to NVMe?
Once you have successfully cloned Windows 11 to an NVMe drive, you have several options for your old drive. You can repurpose it for additional storage or create backups of important files. If the NVMe SSD works perfectly after a period of time, you can wipe the old hard drive for reuse.
Conclusion
Cloning Windows 11 to an NVMe drive is a powerful way to boost your system's performance, improve boot times, and enhance overall responsiveness. With the help of Qiling Disk Master, you can successfully migrate your Windows 11 installation to an NVMe SSD and enjoy the benefits of modern storage technology.
Besides cloning NVMe drive on Windows 11, you are also allowed to clone SSD to larger SSD on Windows 10, clone IDE hard drive to SATA, etc. Try it by yourself!
Related Articles
- How to Clone Windows 10, 11 to NVMe SSD (Step by Step Guide)
- How to Clone NVMe SSD to NVMe SSD in Windows 10, 11 (2 Ways)
- Easy | Migrate Windows 11/10 to M.2 SSD without Reinstalling
- How to Backup Old Emails in Outlook: A Comprehensive Guide
How to backup old emails in Outlook? This article provides you with three methods to backup old Outlook emails. Let's see how it works.