How to Schedule Automatic Backups in Windows 11 (4 Ways)
- What you need to know about automatic backup
- Perform Windows 11 auto backup with built-in tools
- Method 1: Backup files to OneDrive automatically
- Method 2: Auto backup user files via File History
- Method 3: Backup system and files on a schedule
- [Advanced] Best free automatic backup software for Windows 11/10/8/7
- Verdict
What you need to know about automatic backup
Automatic backup is a process that runs without human intervention, protecting against software problems, hardware failure, and malware attacks by creating a copy of data.
To resolve the "backup disk is full" issue, consider upgrading your backup storage capacity, compressing backups to save space, or deleting old backups to free up space. You can also explore cloud backup services that offer scalable storage and automatic deletion of old backups. Additionally, review your backup settings to ensure they are optimized for your specific needs and adjust them as necessary to prevent future storage issues.
★ Solutions to backup disk full
1. Set automatic backups to run in the way of incremental or differential backup.
Incremental and differential backups are both designed to save disk space by only backing up changed data since the last full backup. Incremental backups save data since the last full or incremental backup, while differential backups save data since the last full backup, both reducing the disk space taken by backup images.
2. Manage backup space with the backup tool you choose.
To perform automatic backups in Windows 11, reliable backup tools are needed, which can also delete obsolete backups automatically to free up disk space.
The backup programs mentioned on this page not only enable automatic backups but also assist in managing disk space.
Perform Windows 11 auto backup with built-in tools
In Windows 11, there are three built-in backup tools you can use to schedule automatic backups. I'll show you one by one. An advanced backup tool is offered as well.
Method 1: Backup files to OneDrive automatically
Microsoft's OneDrive is a cloud service that lets you save your files and photos to the cloud, making them accessible from any device. To automatically back up to OneDrive, you can follow these steps.
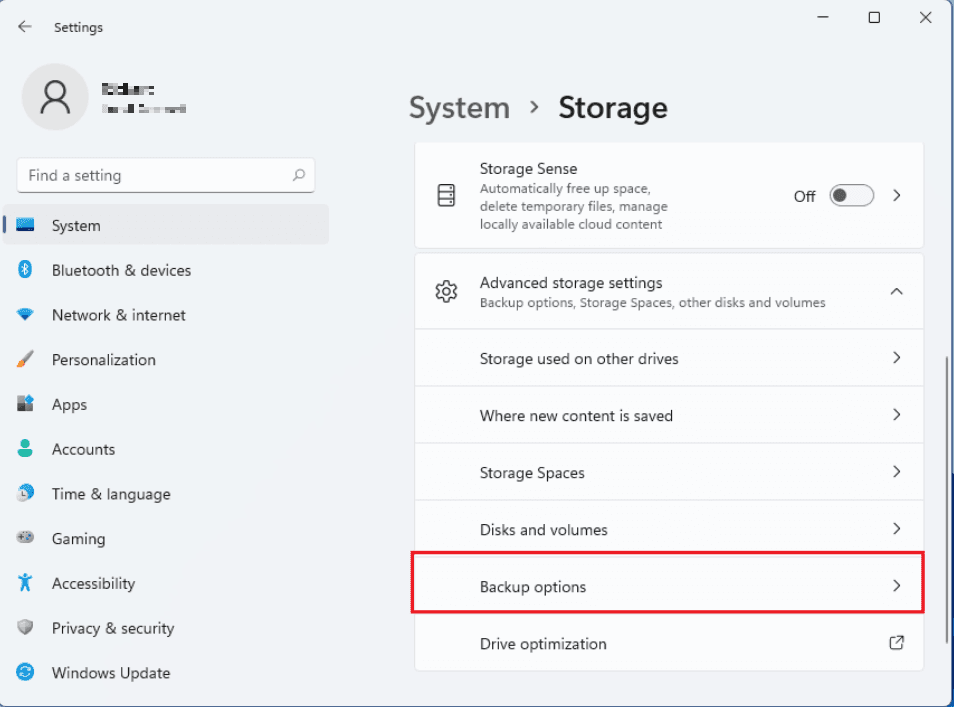
1. To access the storage settings, click on the "Start" button, then select "Settings", followed by "System" and finally "Storage".

2. On the Storage settings page, click Advanced storage settings, then choose Backup options under Advanced storage settings.
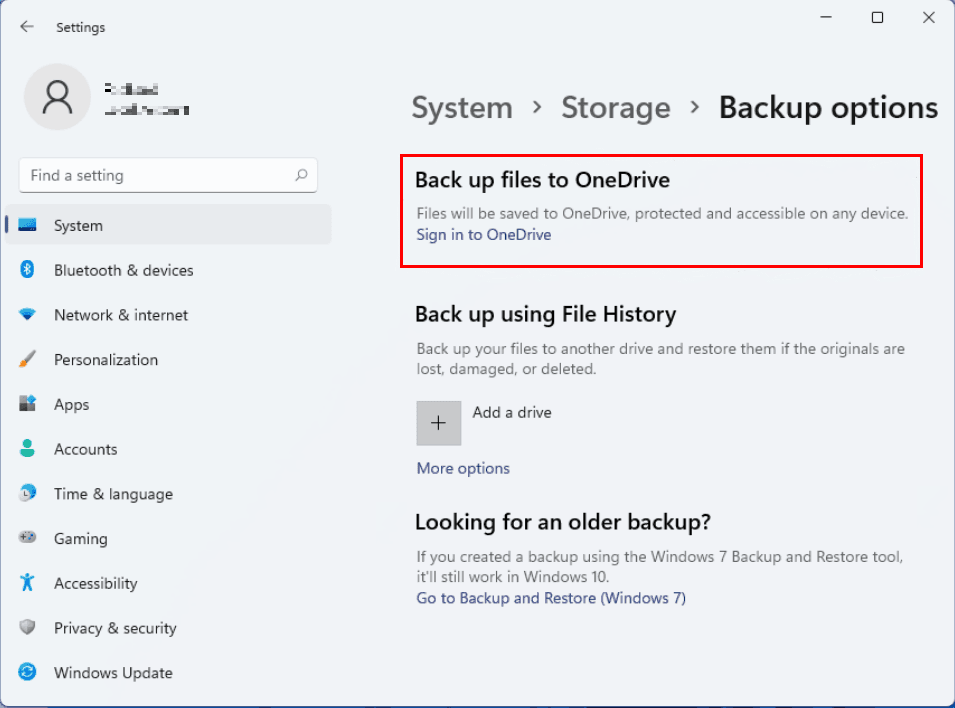
3. On the Backup options settings page, click "Sign in to OneDrive" and enter your OneDrive account.
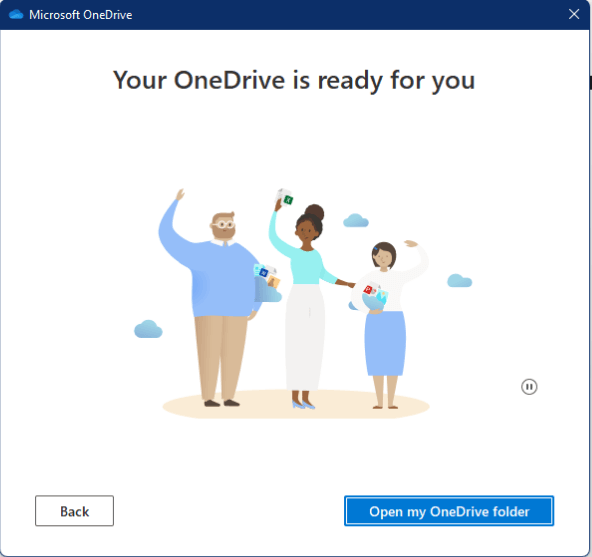
4. You should continue with the setup wizard. By default, your OneDrive folder is located in C:\Users\Username\OneDrive. If you'd like to save OneDrive files on another drive, click Change location to change it.

5. When you see "Your OneDrive is ready for you", click Open my OneDrive folder to access your OneDrive folder.
6. To sync PC files/folders with OneDrive, simply drag and drop or copy and paste them into the OneDrive folder on your PC, and they will be automatically synced to the OneDrive website.
Tip: To sync changes from your PC to the cloud, you must edit files in the OneDrive folder, as editing them in their original location (like the Documents folder) won't sync the changes.
Method 2: Auto backup user files via File History
File History allows you to automatically back up your files to an external hard drive or network share, and restore them if the originals are lost, damaged, or deleted. To set up an automatic backup with File History, you can follow these steps:
1. To connect an external hard drive or USB drive to your computer, first, ensure the drive is properly formatted for your computer's operating system. Next, locate the USB port on your computer, which is usually found on the front or back of the device.
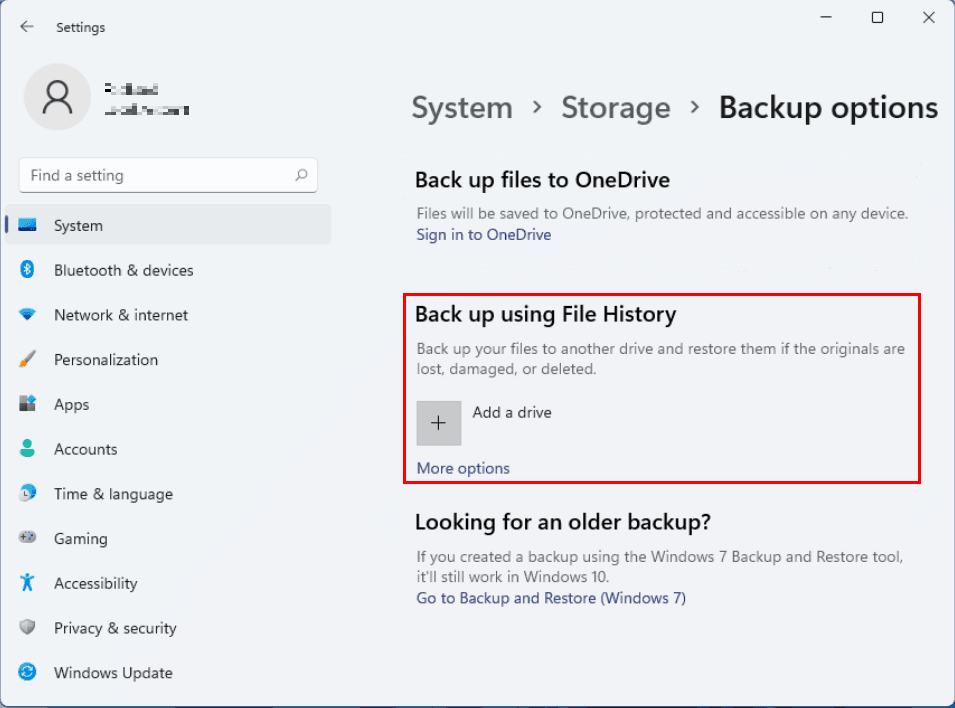
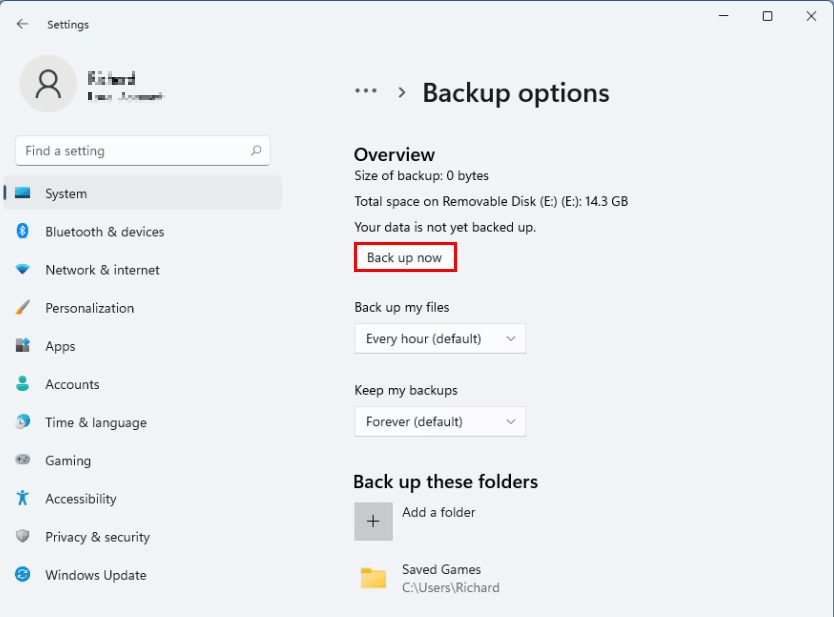
2. To add a drive as a backup destination, open Backup options, click the "Add a drive" button, and select the newly connected drive from the list of available drives. Alternatively, you can also choose a network drive as the backup destination.
3. A new heading named "Automatically back up my files" appears, and the switch is automatically turned on. Clicking on "More options" under the switch allows further customization of the backup settings.
4. On the next page, click "Back up now" to run your first backup.
Tips:
● File History runs incremental backups by default, with the option to change the frequency to every 10 minutes, every 3 hours, or other intervals based on user preference.
● File History normally keeps backups indefinitely, but you can also set it to delete backups older than a specific time period, such as one month, three months, or six months, using the "Keep my backups" options.
Method 3: Backup system and files on a schedule
Windows 11 Backup and Restore can also help you create automatic backups. Besides backing up files and folders, Backup and Restore allows you to create a system image. You can schedule an automatic backup using Backup and Restore by following the steps to create a system image and then setting up a schedule for regular backups.
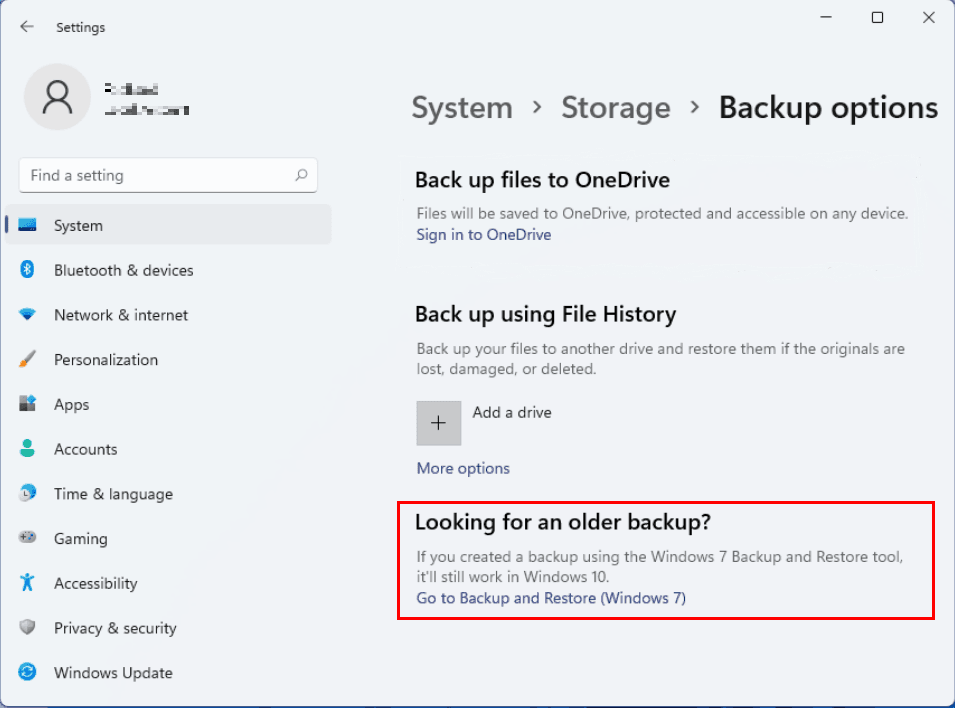
1. To access the Backup and Restore (Windows 7) feature, open Backup options and click "Go to Backup and Restore (Windows 7)".
2. In the Backup and Restore window, click on Set up backup.

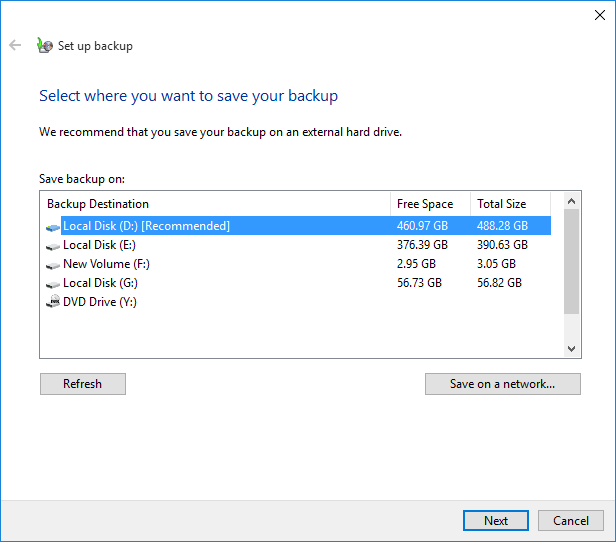
3. Choose a location to save your backup and click Next. You can select a local hard drive, external hard drive, or network location.
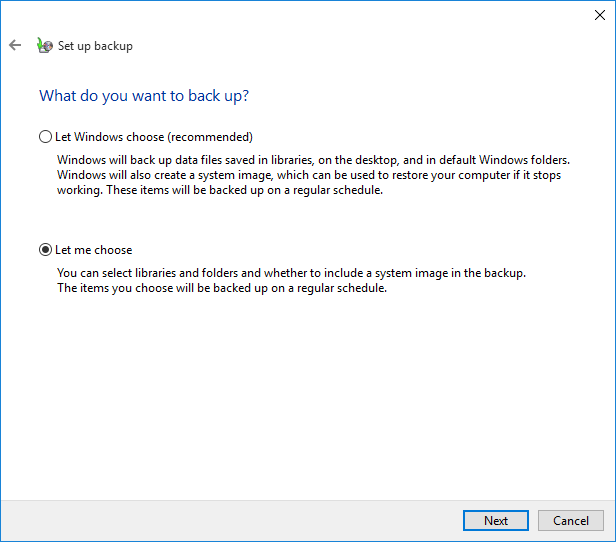
4. To create a custom backup, select "Let me choose" and click "Next".
5. Select the desired items to be backed up and click Next. You can also choose to include a system image in the backup if needed.
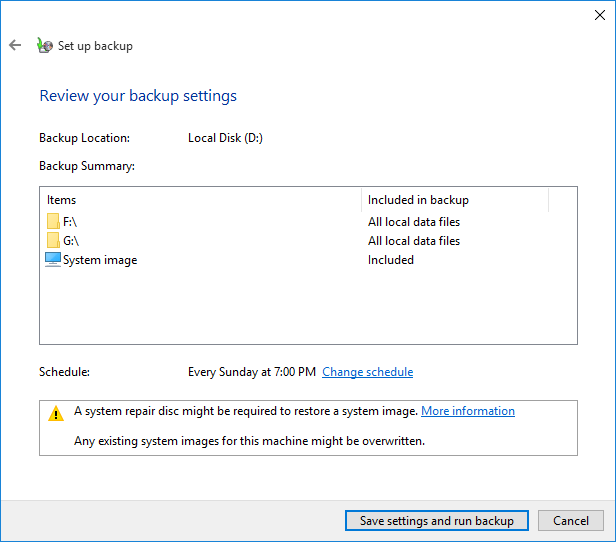
6. Review your backup settings and click on Save settings and run backup.
Tips:
● Backup and Restore runs incremental backup every Sunday at 7:00 PM by default, but can be changed by clicking the "Change schedule" option to set up a different backup schedule.
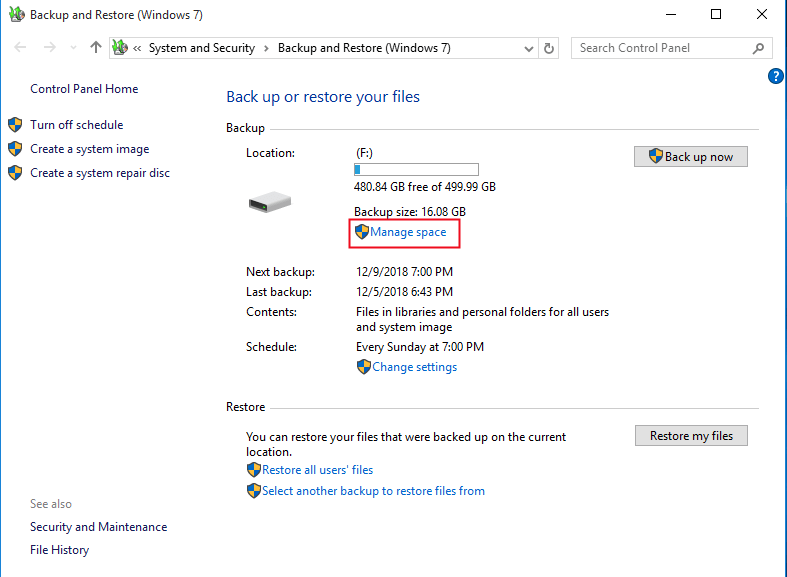
● To free up disk space taken by old backups, go to Backup and Restore and use the "Manage Space" option to clear up disk space taken by old backups.
[Advanced] Best free automatic backup software for Windows 11/10/8/7
Apart from Windows built-in backup tools, I'd like to recommend another easy-to-use backup utility to you - Qiling Disk Master Standard. Following are the highlights of this software:
- Qiling Backup offers various backup types to cater to different needs, including System Backup, Disk Backup, Partition Backup, and File Backup.
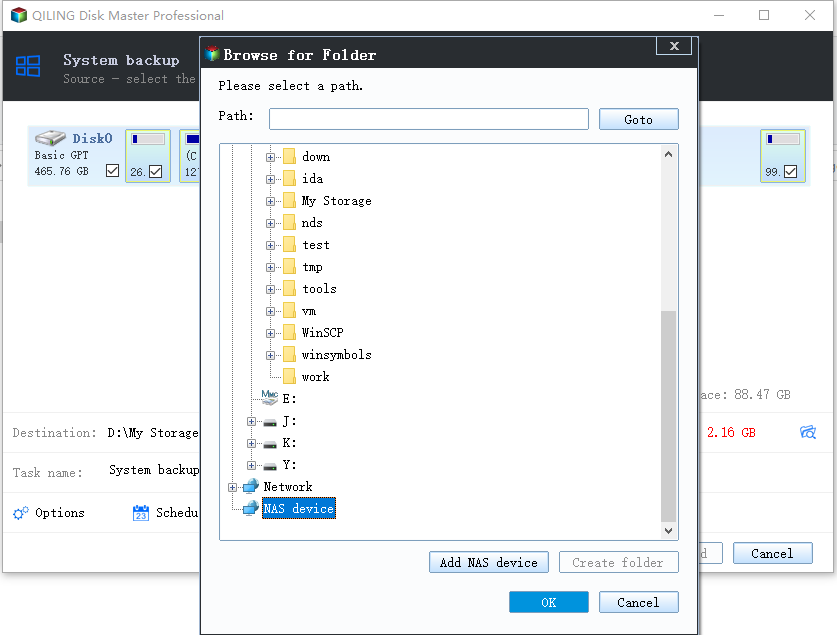
- This tool enables saving backups to multiple locations, including local storage, external hard drives, USB drives, and NAS devices, as well as cloud services like OneDrive, Google Drive, and Dropbox.
- It supports all editions of Windows 11, 10, 8.1/8, 7, Vista and XP.
Follow the instructions below to perform automatic system backup via Qiling Disk Master:
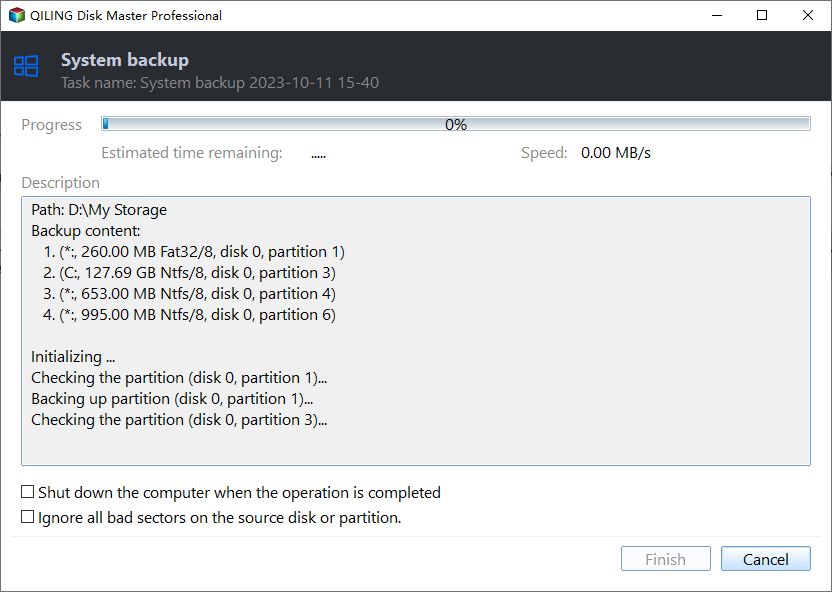
Step 1. Download and install Qiling Disk Master, then click Backup and select either System Backup to backup the entire system or File Backup to backup individual files and folders.

Step 2. The program automatically selects system-related partitions as the source data, and you just need to choose a destination path to store the system image.
Step 3. To schedule a backup, click on the "Schedule Backup" button in the bottom left corner. Then, toggle the "Enable Schedule Backup" switch to on and select a backup frequency from the options: "Daily", "Weekly", "Monthly", "Event triggers", or "USB plug in".
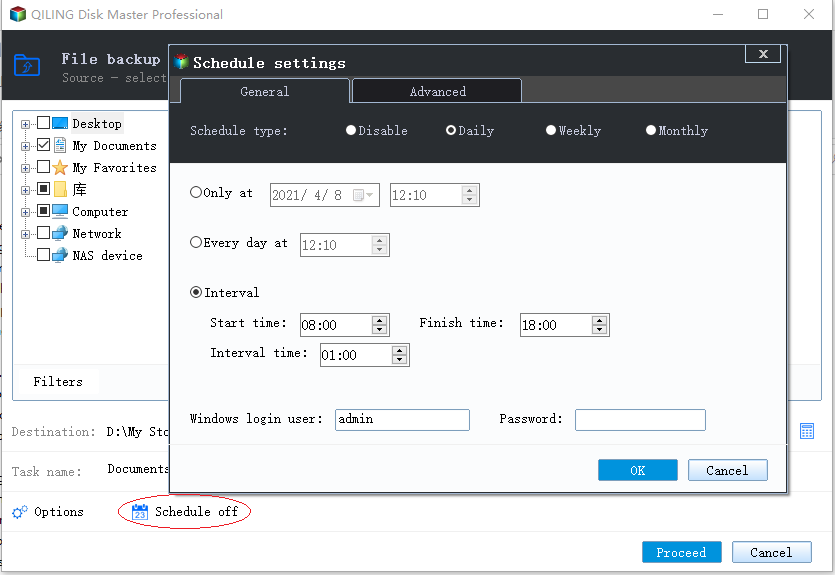
Step 4. In the Schedule window, click Backup Scheme from the left panel. Incremental Backup is selected by default, but you may need an edition upgrade to switch to Differential Backup.
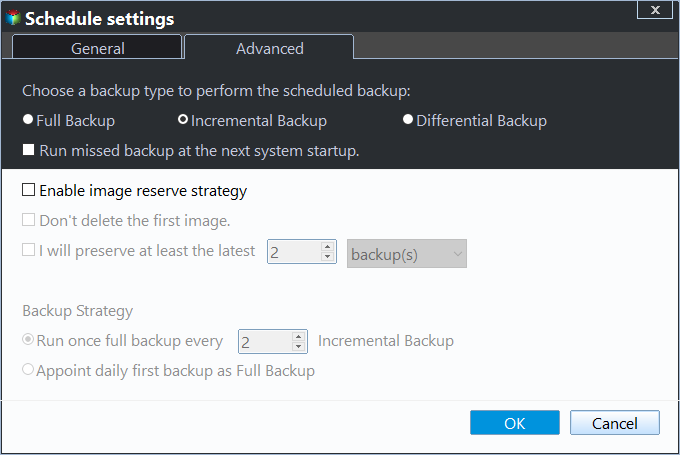
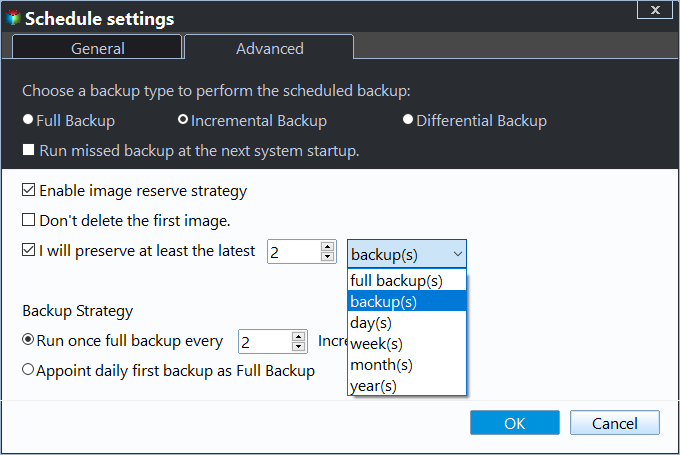
Enable Automatic Backup Cleanup is available in higher editions, offering 4 cleanup rules: "By quantity", "By time", "By daily/weekly/monthly", and "By space", depending on the chosen backup method.
Step 5. After setting all the settings, click on "Proceed" > "Add the schedule and Proceed now" to proceed.
Verdict
To schedule automatic backups in Windows 11, you can choose from 4 free methods offered in this article, each with its own benefits. Alternatively, you can opt for Qiling Disk Master, a more advanced backup solution that offers features like creating a disk image, compressing, and splitting image files, providing more comprehensive backup options compared to Windows built-in tools.
Qiling Disk Master is a professional data migration software that supports SanDisk, Samsung, and Crucial SSDs, among others. It can be used to discover more features and capabilities.
Related Articles
- Best Way for Backing Up Windows 11 to External Hard Drive (2 Ways)
- Top 3 Ways to Backup Windows 10/11 to Network Drive/NAS
- How to Backup Windows 10 Before Upgrading to Windows 11
- Best Free Windows 10 Clone Software to Migrate OS and Data
If you are looking for the best free clone software for Windows 10 to migrate OS and data from HDD to SSD, Qiling Disk Master Standard will be an ideal choice. The easy-to-use interface is acclaimed by a lot of users. - [Easy Fixes] Windows 11 Update Stuck or Failed
Why Windows 11 update stuck on your PC? If you still haven't found solutions, this post will help you to solve the problem with easy fixes. - 3 Ways to Safely Delete Windows 11 Windows.old Folder
Is it safe to delete the Windows 11 Windows.old folder? How to do this to free up space? Read this article to find out. You can also find an effective way to protect your system.