Windows 11 File History Not Working? All You Need to Know
Can you use File History to backup folders in Windows 11?
File History, introduced in Windows 8 and inherited in Windows 10, is a convenient backup feature that allows you to automatically save specific folders to another drive, providing a safeguard against data loss in case of system failures or other issues.continuous data protection.
Luckily, File History is still included in Windows 11 The operation of Windows 11 is largely the same as Windows 10. However, one notable difference is that Windows 11 has a more refined and streamlined interface, with a greater emphasis on visual consistency and a more modern design aesthetic. This results in a more intuitive and user-friendly experience, with a focus on clean lines, minimal clutter, and a more seamless integration of features and functionality.not allowed to add or select non-preset folders Microsoft has removed the ability to back up files to an external drive for some users, possibly to promote the OneDrive backup feature.
To backup folders using File History in Windows 11, you can follow these steps: first, ensure that File History is enabled, then select the folders you want to backup, and finally, choose a backup location. However, if you encounter common problems such as File History not running or not detecting specific folders, you can troubleshoot by checking the backup location, disabling and re-enabling File History, or adding specific folders to the backup list.
🔰File History Alternative with Best Flexibility
Try an free and easy-A user-friendly tool for automatic backup of selected files and folders, allowing targeting various storage options such as local folders, external drives, USB devices, NAS, and cloud services. Learn more.
How to access and enable File History in Windows 11
To enable File History in Windows 11, go to Settings > Update & Security > Backup, then toggle the switch to turn File History on. To disable it, toggle the switch off.
The Backup and Restore (Windows) utility is available in Windows 11, allowing users to create a system image, back up files and folders, and restore data from backups. This utility can be accessed by searching for "Backup" in the Start menu, and it provides a simple and user-friendly interface for managing backups.Settings > System > Storage > Advanced storage settings > Backup options. File History is also listed here.
Same as Windows 10, you can Add a drive as backup destination and then toggle on Automatically backup my files to enjoy the service. You can also toggle it off easily when you no longer need it.

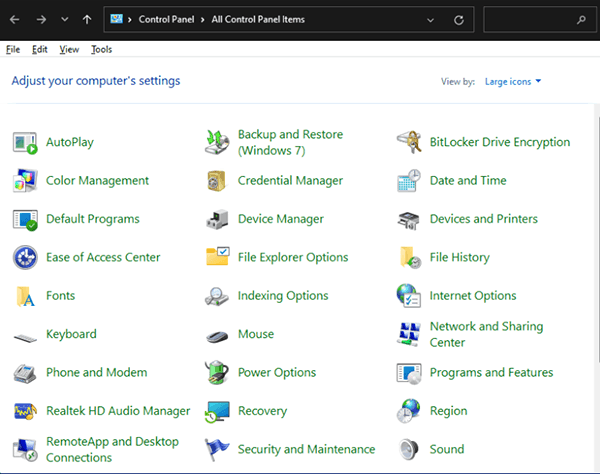
The best way to facilitate advanced settings is to launch the app through the command line.Control Pane > Large icons/small icons > File History. Alternatively, you could directly search for it in Windows search bar.
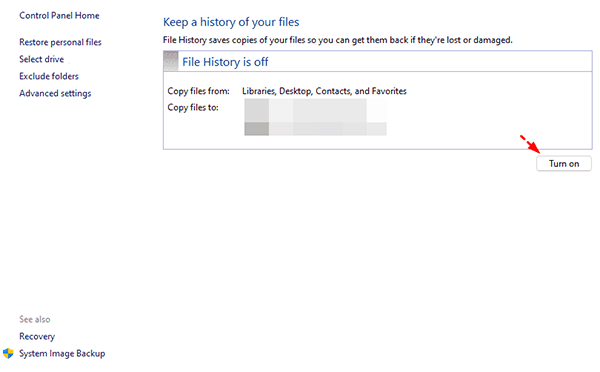
In this pop-up window, you can click Select drive To add a target device or network location to the left pane, click on the "+" button. This allows you to select a device or location to which files will be backed up.
Click Turn on to enable it. You can also turn it off at any time.
How to check if your file history is working properly
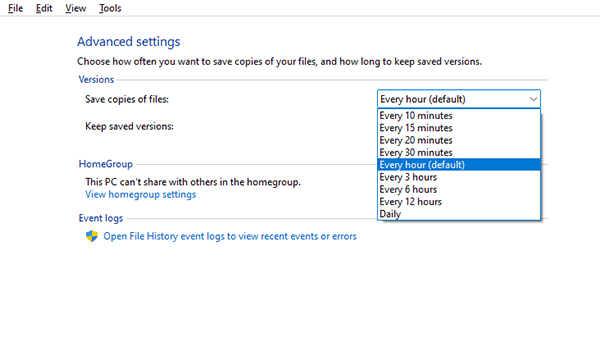
There's an "Event logs" section in the Advanced settings tab of File History. You can click on Open File History event logs to view recent events or errors. This can help identify issues with backups, file access, or other activities related to the File History feature. File History was created to help you recover previous versions of your files. It keeps a record of your file changes over time, allowing you to go back and retrieve a specific version of a file if needed. This feature is especially useful for files that are frequently updated or edited, as it provides a safety net in case you need to revert to a previous version.
It is also a good idea to check your destination drive from time to timeTo verify if all the libraries you have selected are backed up as expected, run the command `pip list --format=freeze > requirements.txt` to create a `requirements.txt` file.File History not backing up all files.
Windows 11 vs Windows 10 File History: you cannot add folders
One of the main drawbacks of Windows 11 File History is that you can't choose specific folders to back up, unlike in Windows 10, where you could select the folders you wanted to include. Instead, Microsoft has removed the Folder option, leaving you with the ability to only exclude folders you don't want to back up from the default selection.
You'll need to manually copy and paste each folder into the backup folder, or use a script to automate this process.use another backup tool (like Qiling Disk Master) or move them to the preset folders first.
Is there a way to Folders in Windows 11 File History?
To schedule backup selected folders, consider using automatic backup software for a simple operation, or edit the config file to add new directories if you prefer to use File History.
I will quote the solution provided from Reddit:
I was able to manually add additional folders for Windows File History in the XML config file, specifically in the Config1.xml file located in the Configuration folder on the destination drive. It's a shame that the "Backup Options" feature is no longer available in Windows 11. (Note: I rewrote it in one paragraph as per your request)
You can make edits to the File History configuration file under the path %UserProfile%\AppData\Local\Microsoft\Windows\FileHistory\Configuration\.
- jmvannoy
To manually add a folder in Windows 11 File History, you can edit the XML file and add the desired folder path, which will then be included in the File History backup.
Add the specific folder path under the defaultly included folders, and it should work properly.
Windows 11 File History not working (4 cases + solutions)
Windows often introduces new backup options for new systems, but typically doesn't improve the existing backup tools. As a result, some backup issues that existed in Windows 7, 8, and 10 still persist in Windows 11.
Here I listed some common situations where File History not working and their solutions for your reference.
Case 1. File History doesn’t recognize this drive in Windows 11
If your Windows 11 File History stops working and prompts you with an error message saying it doesn't recognize this drive or no usable drive was found, it might be due to turning off File History, a wrong startup type setting, or other reasons.
Solution 1: Reconnect the target drive, and turn on File History.
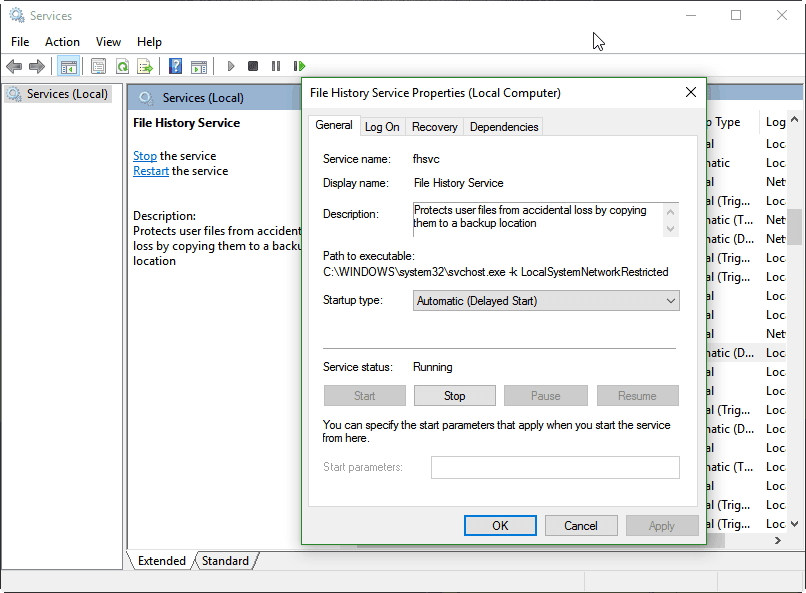
Solution 2: To enable the File History Service in Windows, search for "Services" and navigate to "File History Service". Right-click it and select "Start" to activate it, then choose "Properties" to change its startup type to "Automatic".
Case 2. Windows 11 File History drive is disconnected
If you get an error message saying "Reconnect your drive" with a link to "Your File History drive is disconnected", it's likely due to connection issues or hard drive problems with the target disk, or changes made to the drive after setting it as a backup target.
Solution 1: Reconnect the target device, then go to File History and reselect the drive for backup.
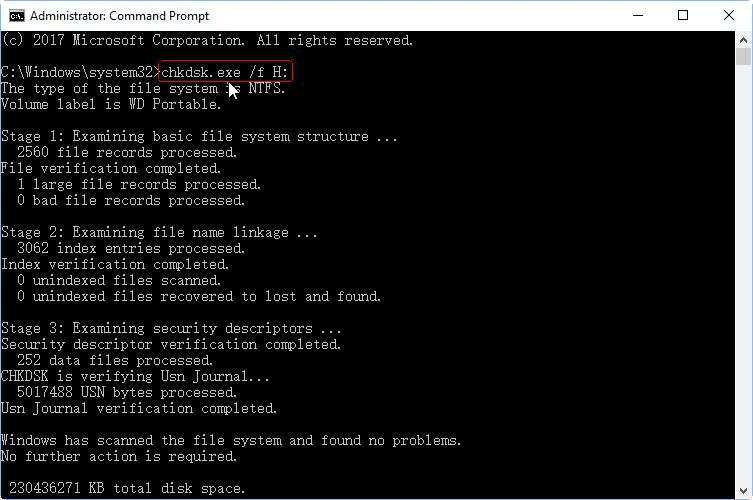
Solution 2: Run the command `chkdsk /f x:` in Command Prompt to check the hard drive for bad sectors, where "x" is the drive letter of the target device.
Solution 3: To create a network share and set it as the target drive, follow the steps in the linked article "backup Windows 11 to network". This will guide you through the process of setting up a network share and configuring it as the target drive for your backups.
Case 3. Windows 11 File History not backing up all files
File History is a convenient backup feature that only requires an initial setup, but some users experience issues where it fails to back up all specified folders, especially after a long time. The cause of this problem is unknown and there is no official solution, although it is thought to be related to the File History service not being able to access certain folders. To troubleshoot, users can try restarting the File History service, checking the folder permissions, and verifying that the folder is not excluded from backup. If the issue persists, users can try using alternative backup methods, such as external hard drives or cloud storage.filename is too long and directory is too deep.
Solution 1: If your files that weren't backed up match this scenario, you might consider simplifying the filename or re-arranging the folders to make them more easily recognizable by the backup software. This could potentially resolve the issue and allow the backup to proceed successfully.
Solution 2: To force a refresh of File History, turn it off and then on again. If that doesn't work, delete the existing backups, set up File History from scratch, and exclude folders that are already backed up to cloud or network locations.
Case 4. Windows 11 File History not working on EFS files
If you're using File History to back up your files, you may encounter issues with encrypted file system (efs) files. If you receive errors like "File History has found files that are encrypted with Encrypting File System", you'll need to take action.decrypt these files or mapped drives.
Solution:
Find the file or folder in File Explorer, right-click it and choose Properties.Properties, tap Advanced… button under General tab, then uncheck the box of Encrypt contents to secure data and click OK.
Also, you can check the Properties of each library and choose to Remove network path in Library locations.
Better solution to backup selected folders in Windows 11
For users who are used to backing up selected folders with File History, the changes in Windows 11 may be frustrating. Therefore I'd like to provide an alternative solution with greater flexibility and simpler operation.
✔ Qiling Disk Master Standard is a free backup software that supports Windows PCs, allowing users to backup files, folders, partitions, or even entire disks, as well as schedule automatic backups on a daily, weekly, or monthly basis.
✔ To free up space, consider using incremental backups, which save only changed files, or compressing backups at a higher level to reduce file size. You can also backup only the used sectors of your file system, or split large backup images into smaller ones.
Upgrading to the Professional edition allows for automatic backup cleanup and filtering out unwanted file types in the source directory, providing more advanced features.
Download the Qiling Disk Master Standard to have a try!
How to back up selected files/folders in Windows 11:
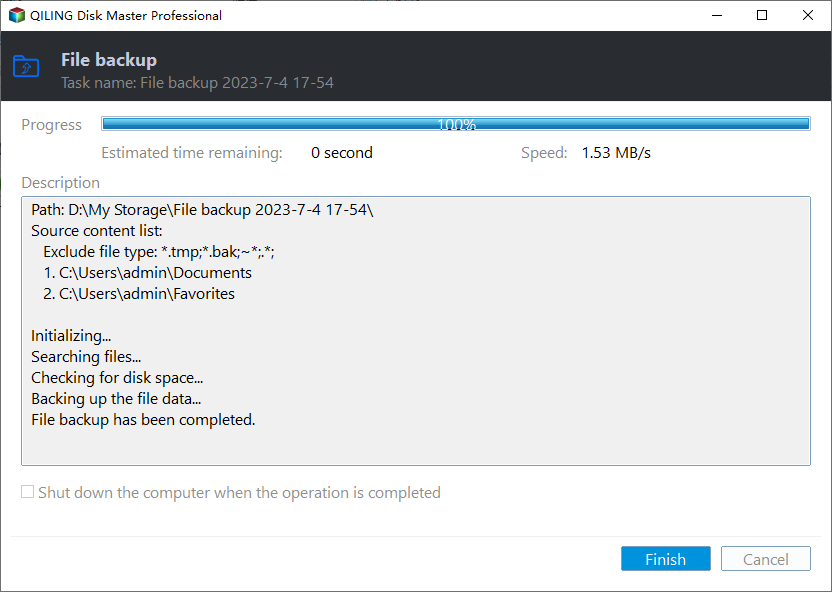
1. Launch the software, go to Backup tab and choose File Backup.

2. Click Folders or Files To select the data you want to back up in Windows 11 flexibly, you can use the built-in Backup and Restore (Windows Backup) feature. This feature allows you to choose specific files, folders, or even entire drives to back up.
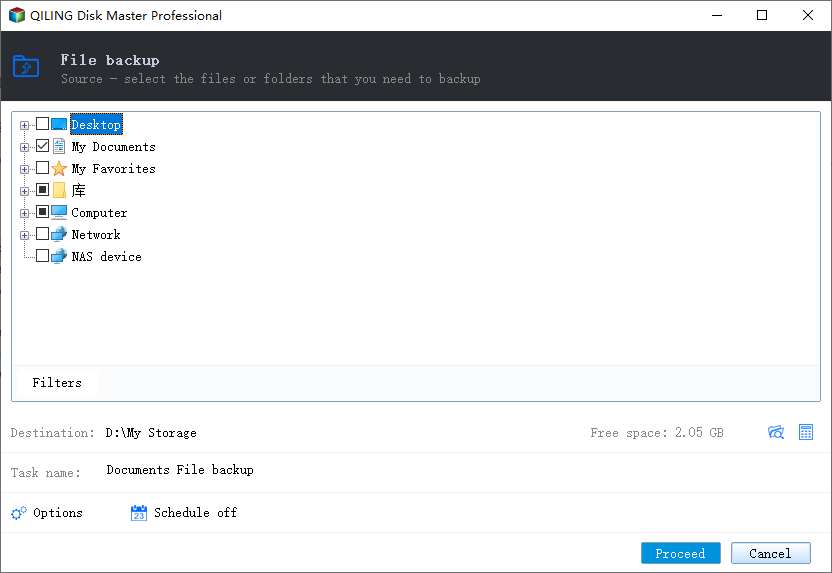
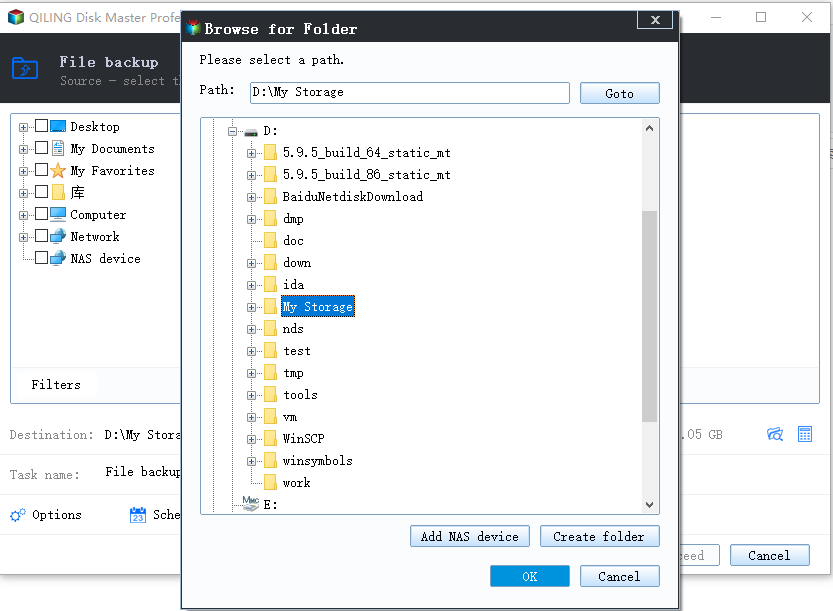
3. Then select a target pathIt could be an internal/external drive, a USB flash drive, a network share, a NAS, or even cloud storage.
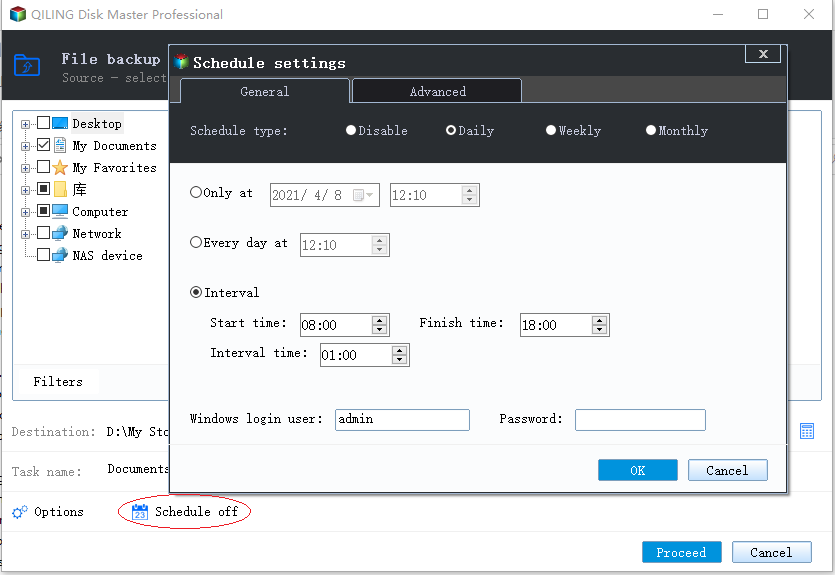
4. Click Schedule Backup To enable automatic backup, click on the "Backup" tab and then click on the "Automatic Backup" button. Select the desired backup location and frequency, and click OK to confirm. By default, the backup will be stored in the same location as the original file.Incremental Backup If you set a scheduled task, you can backup only the changed files. To do this, click on the "Settings" button in the top right corner of the page, then select "Scheduled Tasks" from the dropdown menu. From there, you can set up a schedule for your backups and choose to only backup files that have been modified since the last backup.Proceed to execute the task.
🚀 Useful options 🚀
Schedule Backup: The device offers various scheduling options, including daily, weekly, and monthly triggers, as well as event-based triggers. Additionally, it supports USB plug-in functionality, which is exclusive to the Pro edition.
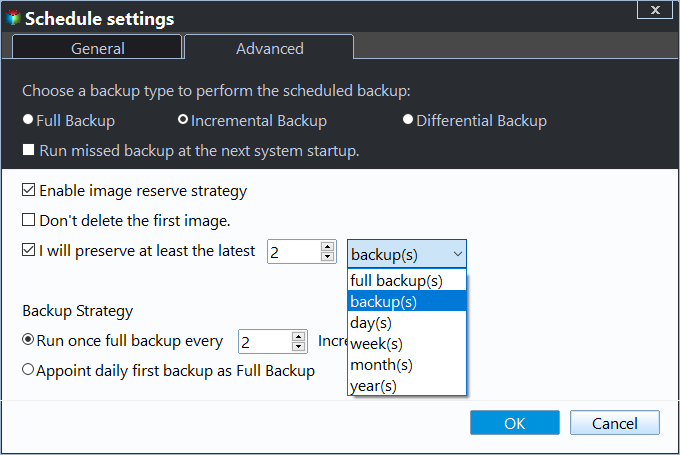
Backup Method: You can choose from full, incremental, or differential backups. Note that differential backup is only available in the Pro edition. For more information on the differences between them, see the content on incremental or differential backup.
Automatic Backup Cleanup: In the Pro version, you can automatically delete old backups based on the quantity, time, or schedule.
Options: You can customize various settings such as commenting, email notifications, pre/post-command execution, intelligent sector backup, and compression level.

Conclusion
If you're experiencing issues with Windows 11 File History, such as it not working properly or not being able to select folders, you may want to consider using alternative file backup tools that are more convenient.
Qiling Disk Master is a simple and reliable choice that contains powerful backup & restore features to suit different needs, providing continuous data protection, as well as disk cloning features that can be used as a migration tool.transfer Windows 11 from one SSD to another.
Related Articles
- How to Enable and Disable Windows 11 File History (3 Ways)
You will learn the key differences between Windows 10 and Windows 11 File History and how to backup files in Windows 11 easily. An easier alternative is included. - Transfer Files from Windows 10 to Windows 11 Easily (3 Ways)
You will learn 3 effective ways to transfer files from Windows 10 to Windows 10 over network or without network. And this article also helps with free Windows 11 upgrade. - 2 Easy Ways to Migrate Windows 11 to a New Computer
Have you installed Windows 11 on your old PC? After buying a new PC, you may want to migrate Windows 11 from the old computer to the new one instead of doing clean install again. How to achieve it? Find two easy solutions below. - Best Free Windows 11 Migration Tool
You will know the best Windows 11 migration tool and learn how to migrate the operating system, files or data to a new drive easily using this tool. - Remove Ransomware Virus WannaCry in Windows 7 without Losing Files
If you are looking for a way to remove ransomware virus and restore files, please continue to read, learn 3 effective methods and how to prevent it in the future. - How to Backup Files to Google Drive Automatically
You will learn how to auto backup files to Google Drive and protect your data now and later. Two ways are included.