Windows 10 vs Windows 11 File History: Backup Files Automatically
- Windows 10 vs Windows 11 File History: Key Differences
- How to Backup Files in Windows 11 with File History
- Way 1: Backup files with File History through Control Panel
- Way 2: Backup files with File History using Edit Group Policy
- Way 3: Backup files with File File History using Registry Editor
- The Best Alternative for Windows 11 File History
- Summary
Windows 10 vs Windows 11 File History: Key Differences
File History is a built-The Windows backup tool will regularly backup files in the Documents, Music, Pictures, Videos, and Desktop folders, as well as OneDrive files available offline on your computer.
After upgrading to Windows 11, some users have reported that the File History feature is missing or not working properly, specifically when trying to select a folder. This issue is likely due to changes made by Microsoft in the new operating system.
#1: File History is no longer in Backup Settings Settings.The main difference between Windows 10 and Windows 7 is that Windows 10 has a more modern and user-friendly interface, while Windows 7 has a more traditional and outdated look. However, users can still access the Backup and Restore feature in Windows 7 by going to Settings -> System -> Storage -> Advanced Storage options -> Backup options, and then selecting "Looking for an older backup" and clicking "Go to Backup and Restore (Windows 7)". This feature can also be accessed via the Control Panel.
#2: File History Folder option is removed in Windows 11. In Windows 11, File History now only allows backups of files in the user account folder or its subfolders.
How to Backup Files in Windows 11 with File History
To use Windows 11 File History to backup and restore files, you must first enable it, as it is disabled by default. There are three ways to do this, allowing you to set up this feature and start protecting your files.
Way 1: Backup files with File History through Control Panel
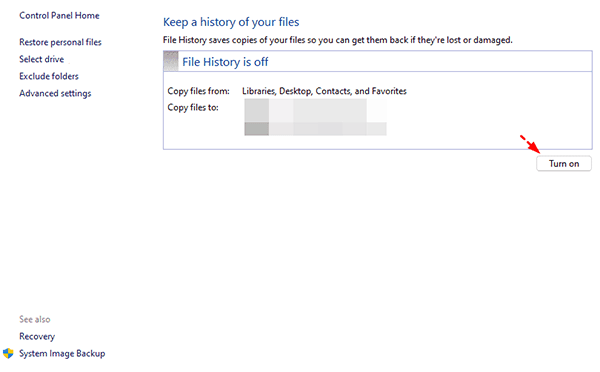
1. To access File History, type "File History" in the Windows 11 search box and select it, which will open the Control Panel and direct you to Control Panel > All Control Panel Items > File History.
2. Select the external drive or network location where you want to save the backup.
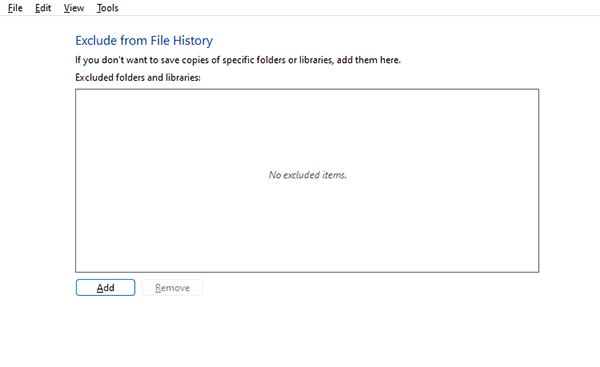
3. Click on "Exclude folders" to select the folders you don't want to include in the backup. This will prevent them from being backed up.
3. After setting up Windows 11 File History, click the "Turn on" button to enable automatic file backups.
Way 2: Backup files with File History using Edit Group Policy
Step 1. Click on the Start menu, then search for and open Edit group policy.
Step 2. To enable File History in Windows 11, navigate to the specified path, double-click on the Turn off File History settings, select the Disabled box, and click Apply.
Computer Configuration\Administrative Templates\Windows Components\File History.
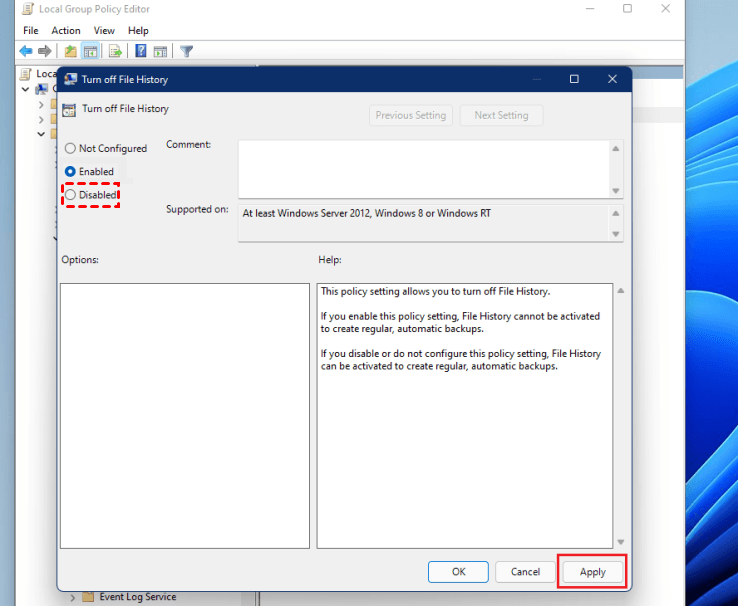
To disable File History in Windows 11, tick the "Enabled" box and click "Apply".
Way 3: Backup files with File File History using Registry Editor
Step 1. Press Win+R to open the Run window and type regedit to open the Registry Editor.
Step 2. In the Registry Editor window, navigate to the path HKEY_LOCAL_MACHINE\SOFTWARE\Microsoft\Windows\CurrentVersion\Policies\System, then right-click the Windows key, select New > Key and name it as File History.
Computer/HKEY_LOCAL_MACHINE\Software\Policies\Microsoft\Windows
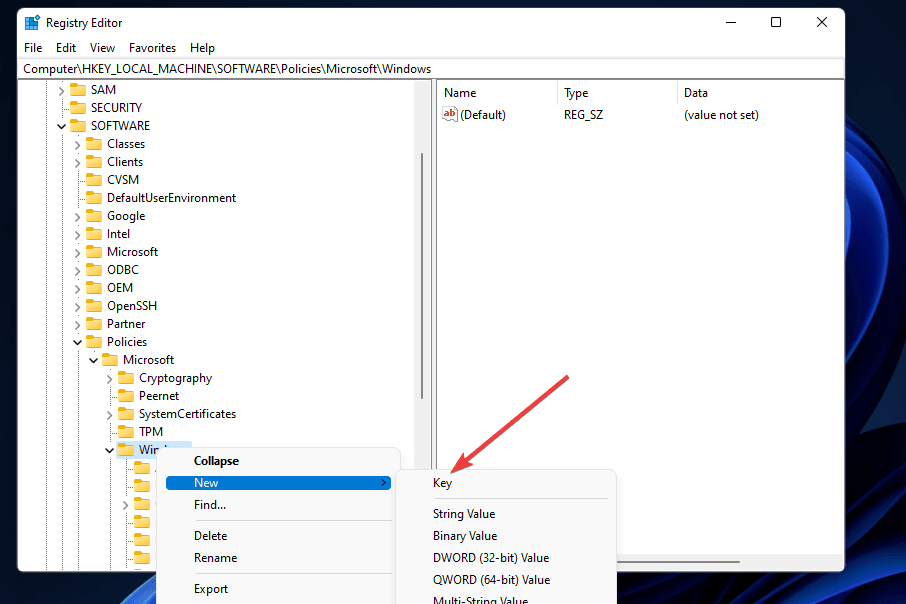
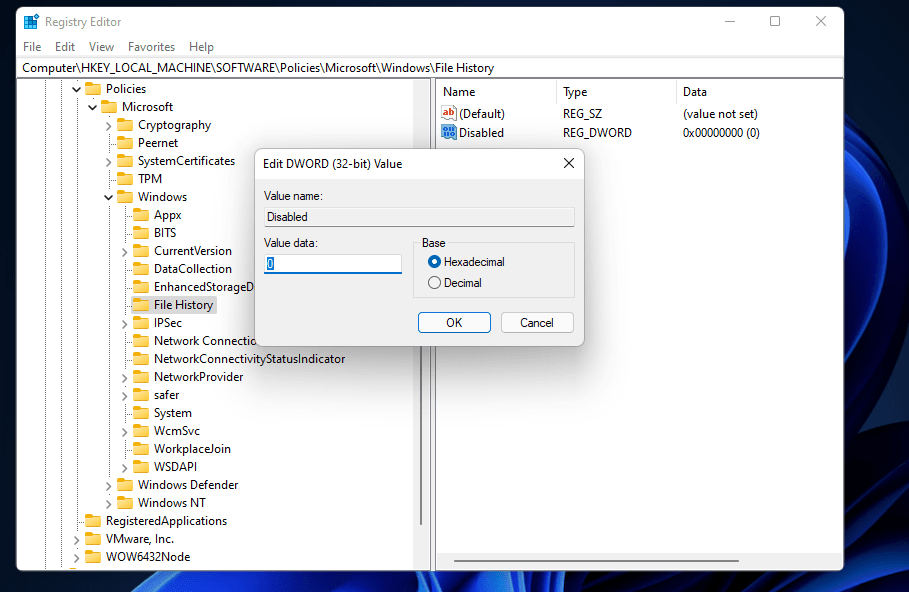
Step 3. In the right pane, right-click the blank space, select New > DWORD (32-bit) Value and name it Disabled.
-value.png)
Step 5. To enable File History in Windows 11, double-click the new Disabled DWORD, set the value data to 0, and click OK.
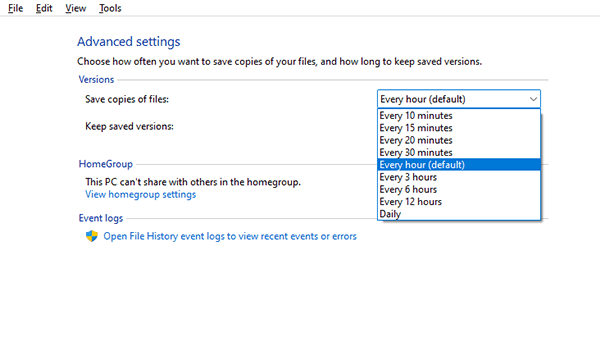
File History in Windows 11 allows users to back up files hourly with a forever retention policy, which means the backup disk will eventually fill up due to the large amount of files being backed up regularly. This can lead to the backup disk being filled up sooner or later, especially for users with a large amount of files in their user account. As a result, the software will not delete file history backup regularly, which can lead to the backup disk being filled up faster.
To avoid potential backup issues, consider changing backup settings to save daily copies of files and keep backup versions until needed, freeing up space.
The Best Alternative for Windows 11 File History
While changing settings in File History can temporarily alleviate the issue of a full backup disk, its limited schedule settings and inability to compress backup images make it ineffective for large numbers of files. A better alternative for Windows 11 File History is Qiling Disk Master Standard.
The backup feature offers more flexible backup frequency, allowing for weekly backups, among other options, and also helps minimize disk space usage with multiple features enabled by default.
- This tool allows you to schedule backups of specific files with varying frequencies, such as daily, weekly, or monthly, and also enables you to set the backup date, time, and interval.
- Incremental backup is a type of backup that only saves the changes made to files since the last backup, rather than re-saving the entire set of files. It is often used in conjunction with a full backup, which saves all files at once, to create a backup system that is both efficient and effective. This approach can help reduce storage space and save time, as only the changed files need to be stored and retrieved.
- It can compress (normal or high compression) or split backup images into smaller ones automatically.
- This software enables users to backup files to various storage devices, including local drives, external drives, USB drives, and solid-state drives, among others. Additionally, users with a Qiling account can also backup files to Qiling Cloud.
You can download the software to try it out, and the free edition supports various Windows operating systems, including 7, 8, 8.1, 10, 11, XP, and Vista. For server users, a server version called Qiling Disk Master Server is also available.
The advanced edition is recommended for resolving backup disk full issues completely, as it features automatic backup cleanup, which deletes old backup images regularly.
Step 1. Open Qiling Disk Master Standard, click Backup > File Backup.

Step 2. To backup files or folders outside of your user account, click on the "Files" or "Folders" option, allowing you to select the specific items you want to include in your backup, even if they are located outside of your user account.
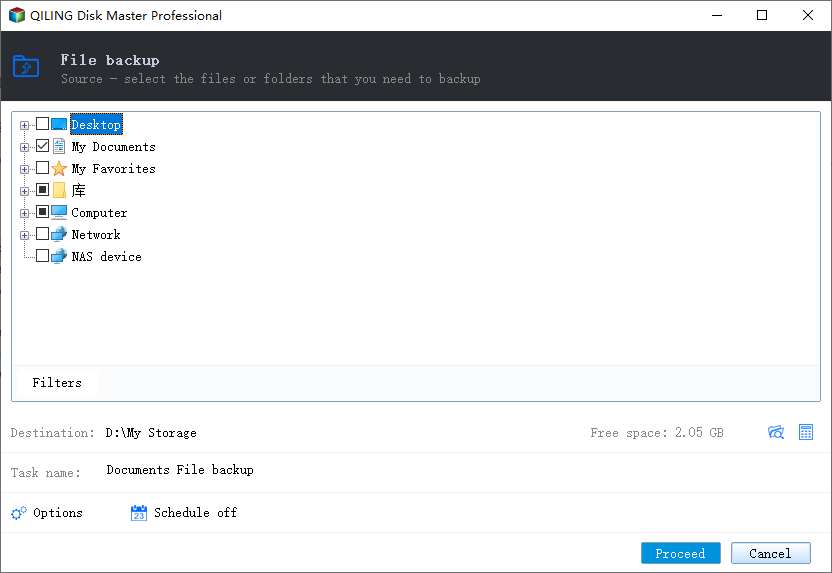
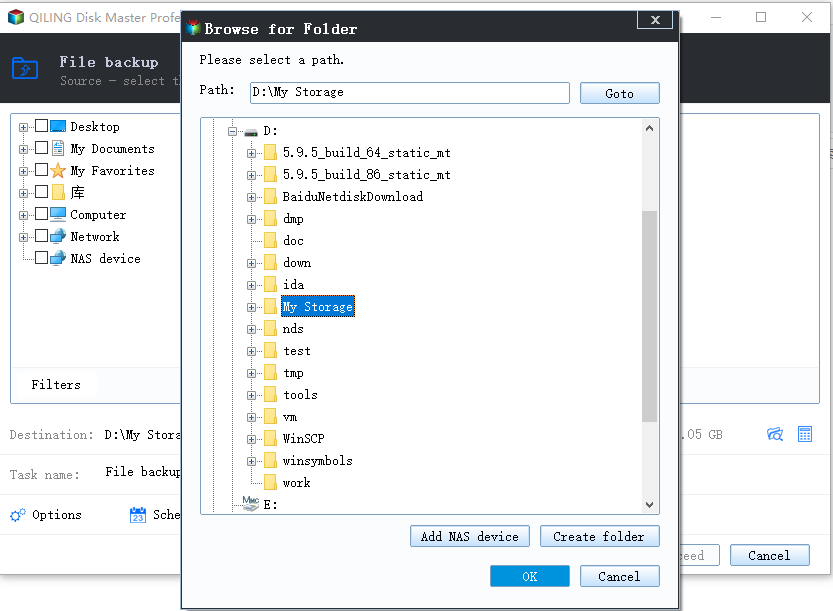
Step 3. Choose a destination path for your backup, which can be an external hard drive, network location or NAS, cloud drive, etc.
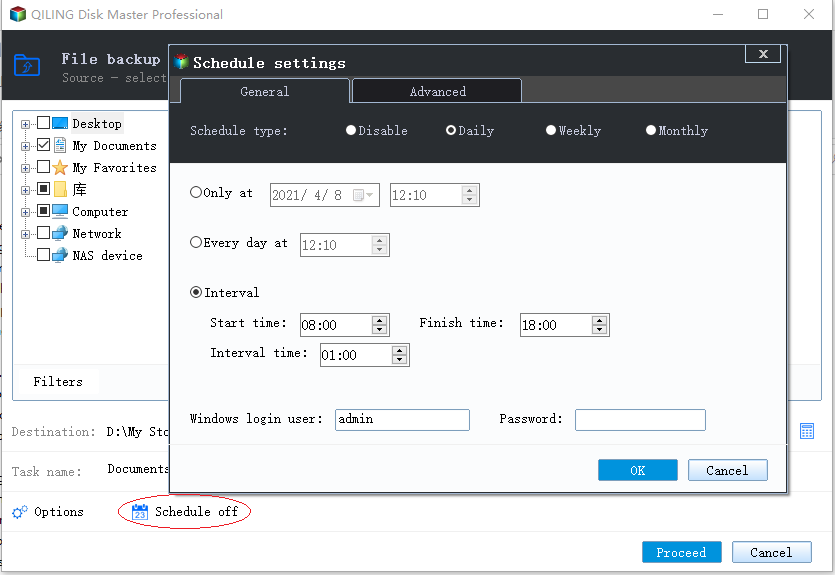
Step 4. To schedule a backup for your files, click on "Schedule Backup" and choose a daily, weekly, or monthly backup frequency. To prevent the backup disk from becoming full, you can set the compression level to normal or high, enable splitting, and configure incremental backups.
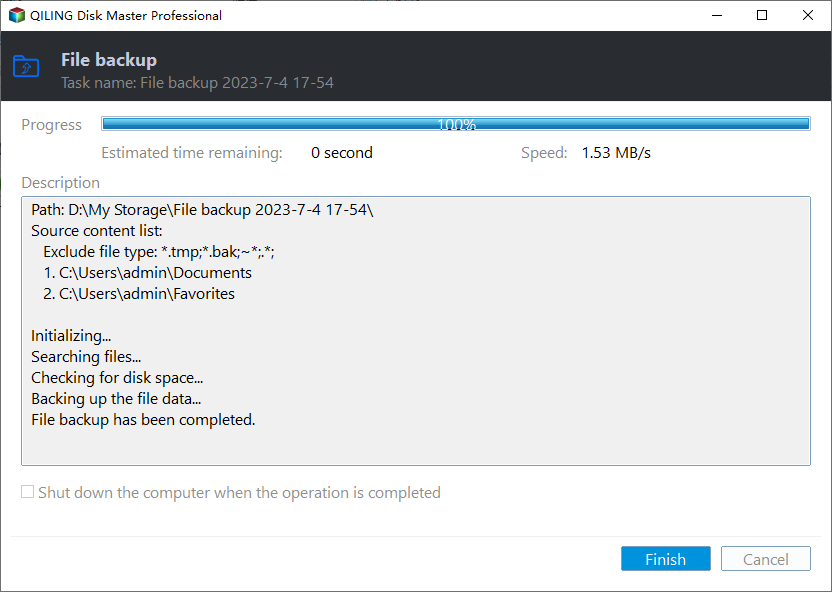
Step 5. Confirm all your operations and then click Proceed.
Summary
Windows 10 and Windows 11 have differences in File History, and this article provides a step-by-step guide to backing up files in Windows 11. Enabling File History using the three given methods can lead to the backup disk being full due to limited backup settings and a large number of files to be backed up, and the removal of the Folder option in Windows 11 means you cannot back up files outside the user folder.
If you're looking for an alternative to Windows 11's file history feature, Qiling Disk Master Standard is a suggested option. This software offers flexible backup options, such as daily, weekly, and monthly backups, and helps minimize disk space usage with features like compressing backup images, backing up only changed files, and directly deleting backup files. Overall, it's worth trying out this backup software.
Related Articles
- Best Free Backup Software Windows 11 to Protect PC and Data
Looking for the best free backup software for Windows 11 to protect your computer OS and data? Scroll down to get the top 5 choices. - How to Backup Windows 10 Before Upgrading to Windows 11
It's important to backup Windows 10 before upgrading to Windows 11. If there is a problem after the upgrade, or if you don't like the functions of the new system, you can easily restore to the previous state through a backup. You can learn three ways to backup Windows 10 in this page. - How to Backup Windows 11 Files & OS to Network Drive
The backup function of Windows 11 has some changes compared to Windows 10, so can you still backup Windows 11 data or system to network drive in old ways? Read this guide to find the answer. - How to Create Windows 10 System Repair Disc Step-by-step?
Create System Repair Disc for Windows 10? Here you have detailed steps on how to create Windows 10 system repair disk on CD/DVD and USB drive with screenshots. - When and How to Restore Windows 10/8/7 from Recovery Partition
When Windows system fails to boot, you can restore Windows from recovery partition. Here is a guide to walk you through every step of the way. - Windows 7 Starts in Safe Mode But Not Normal (Tested Fixes)
Learn how to fix the common problem that Windows 7 starts in safe mode, but not in normal mode from this page. Five solutions are mentioned.