Delete File History Backup in Windows 10 for New Backups
- Need to delete old file history in Windows 10
- How to delete file history backup in Windows 10
- Method 1: Change File History backup settings
- Method 2: Clean up old versions in Windows 10 file history
- Method 3: Reset File History in Windows 10 using FhManagew.exe
- Method 4: Turn off back up using File History
- How to backup files in Windows 10 without occupying much disk space
- Wrapping things up
Need to delete old file history in Windows 10
File History continuously protects personal files stored in Libraries, Desktop, Favorites, and Contacts folders, keeping a record of every change made to these files.
However, over time, your backups will become more and more until your disk is full, and Windows 10 won't automatically delete Windows 10 file history older versions, as the backup file retention period is set to forever by default, leading users to want to delete file history backup in Windows 10.
To remove all backup files from File History and start fresh, go to Control Panel > System and Security > File History, and click on "Manage Storage Spaces". Then, click on "Delete all backups" to remove all backup files. After that, you can stop File History and restart it to begin creating new backups. Alternatively, you can also delete the backup files manually from the designated backup location. To do this, navigate to the backup location (usually C:\Users\[username]\AppData\Local\Microsoft\Windows\FileHistory), and delete all files and folders within it.

While it doesn't automatically delete file history backups, you can still change the backup retention settings or manually delete them using the following methods. For regular deletion, consider using professional backup software instead.
- To delete file history backup in Windows 10, you can follow four different methods. Firstly, you can go to the File History settings by searching for it in the Start menu, then click on "Turn off" to disable the feature.
- How to backup files without occupying much disk space
How to delete file history backup in Windows 10
You might not want to delete older versions in Windows 10 file history if there's still a lot of free space on the backup disk, as it can help you restore files from backup if they're deleted or corrupted.
Deleting backups can be a risk, so it's recommended to keep the last backups, which may be one or more, to ensure data safety in case something goes wrong. If all backups are deleted, data may be lost forever.
Method 1: Change File History backup settings
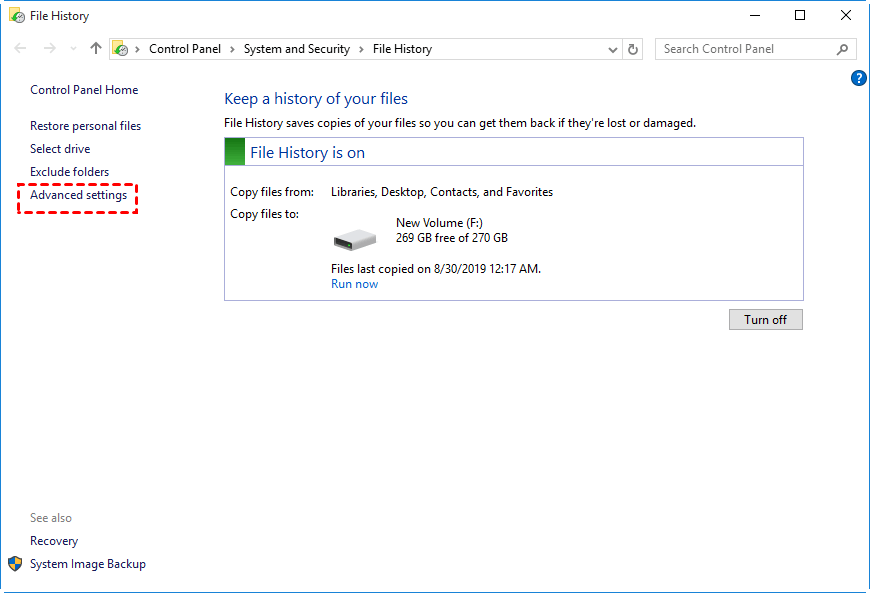
Step 1. Type file history in the search box and select it. Then, in the File History window, click Advanced settings.
Step 2. Go to Versions > Keep saved versions and select Until the space is needed under the drop-down menu.
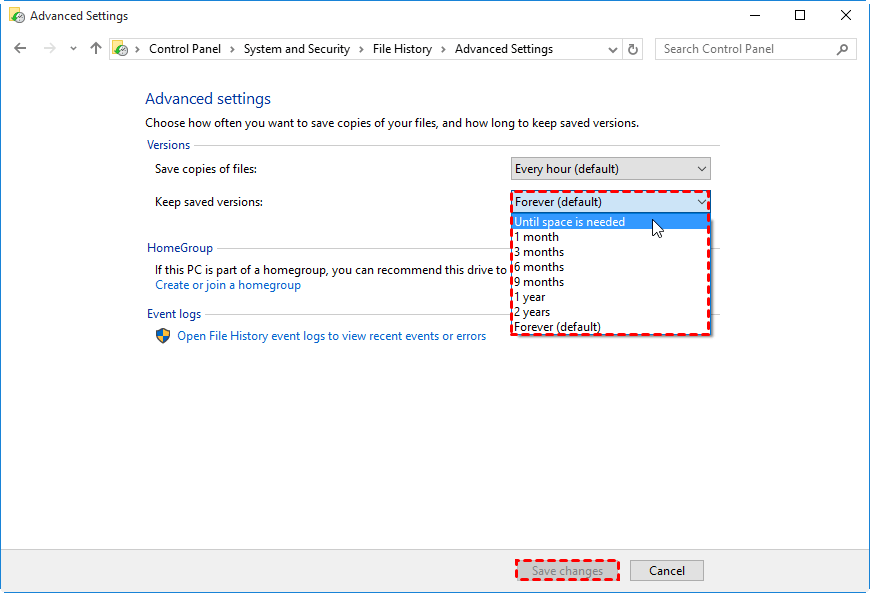
Step 3. Then, click Save changes and close the File History Window.
Method 2: Clean up old versions in Windows 10 file history
Step 1. Go to Keep saved versions in File History and select Clean up versions under it.
Step 2. Select all records except the latest one, or all records older than 1 month to 1 year. The default option is all records older than 1 year.
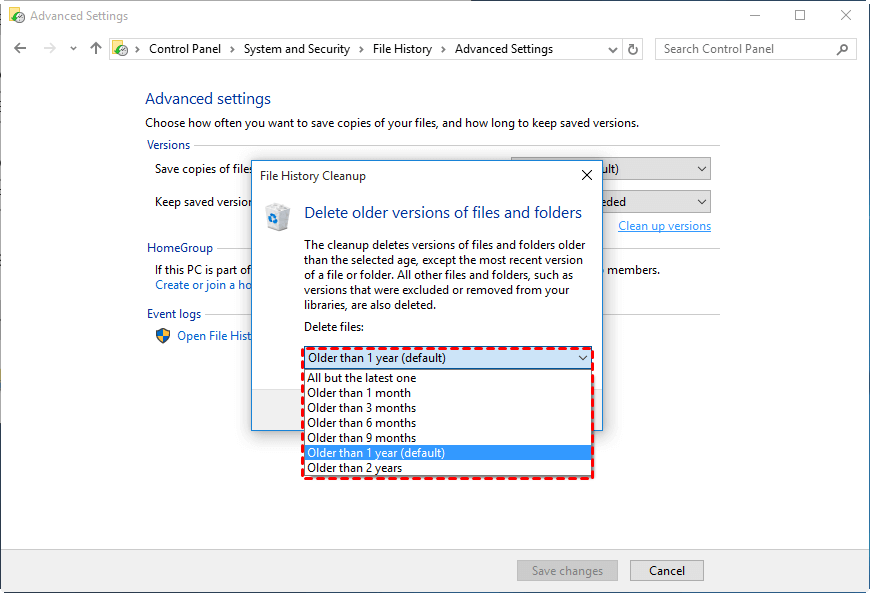
Step 3. After clicking "Clean up", Windows 10 will delete old versions of files from the file history, and a message will be displayed indicating that the cleanup was successful.
Method 3: Reset File History in Windows 10 using FhManagew.exe
You can still reset file history using FhManagew.exe, but it treats every month as 30 days, so if you want to delete files older than a month, you need to use 30 as the cutoff time. To delete files older than 3 months, 6 months, 9 months, 1 year, or 2 years, replace 30 with 90, 180, 270, 360, or 720 respectively. However, to delete all but the latest file, you need to use 0.
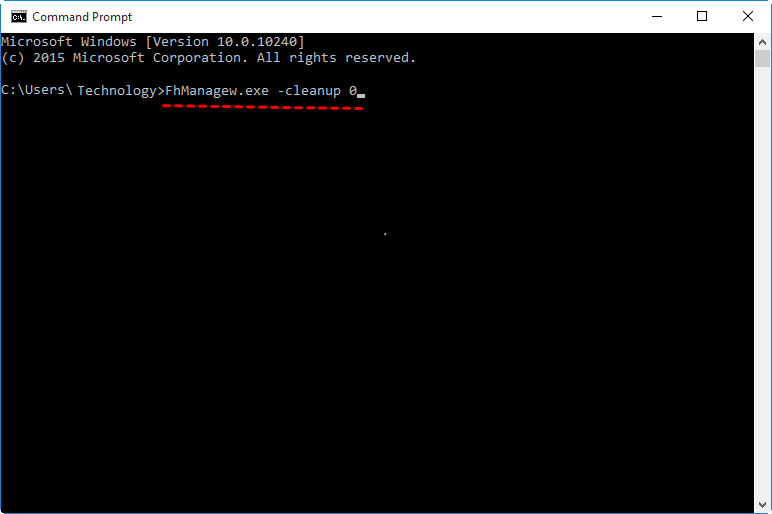
Step 1. Type cmd in the search box and select Run as administrator.
Step 2. `find . -type f -mtime 0` `find . -type f -mtime 1` `find .
FhManagew.exe -cleanup 0
FhManagew.exe -cleanup 0 -quiet To delete file history in Windows 10 without interruption, you can use the command prompt. Open the Start menu, type "cmd" and press Enter. In the command prompt, type "cleanmgr" and press Enter.
Method 4: Turn off back up using File History
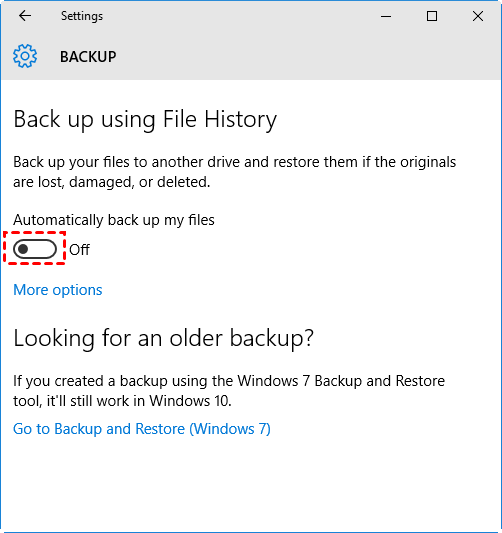
Step 1. Go to Setting > Update & Security > Backup, then you will see Back up using File History.
2. To enable File History, click the "Automatically back up my files" switch button. If it shows "Off", File History is disabled.
Step 3. Go to the backup drive and delete file history folder. Usually, it's named as FileBackup.
Tip on delete locked file history folder:
- To enable file history in Windows 10, go to File History, click the "Automatically back up my files" option, and start the backup process.
- Click More options and then Stop using drive under the Back up to a different drive section.
- Delete file history folder in the backup drive.
How to backup files in Windows 10 without occupying much disk space
File History backup files every hour by default, but since the backup image is not compressed, the backup disk will soon fill up. To manage this, you need to manually delete old backup files to make room for new ones. This is a necessary step to ensure you have a copy of your files in case they're deleted or damaged.
To backup files in Windows 10 without taking up a lot of disk space, the answer is yes. You can use the built-in Backup and Restore feature, but it's not the most efficient way. A better option is to use the File History feature, which allows you to back up files to an external drive without taking up too much space.use a flexible file backup software To alleviate or completely solve the backup disk full issue, consider the following aspects: 1) **Increase storage capacity**: Add more storage space to the backup disk to accommodate more data. 2) **Implement data deduplication**: Remove duplicate data to reduce storage needs.
- Backup specific files You can choose to backup specific files or folders instead of all user files, and set a file filter to backup files with a certain file extension.
- Use longer backup intervals. You could consider using daily, weekly, monthly and set backup date, time and intervals.
- Minimize backup image size. The backup software has a default setting that only backs up used sectors of the file system, splitting or compressing the backup image into smaller ones, and also backing up only used sectors of files (if scheduled backup is enabled). These features help save a significant amount of disk space.
- Delete old backup automatically. The software automatically cleans up old backups, allowing you to delete them based on quantity, frequency (daily, weekly, monthly), or time, thereby preventing issues with insufficient disk space.
The software has a clear interface and user-friendly design, making all steps easy to follow. It can protect and recover unlimited PCs and Servers, and can be downloaded to try it out. Alternatively, Qiling Disk Master Technician or TechPlus edition can be used for this purpose.
(PS: all the free-The trial version of the software has a 30-day time limit, after which all features will become unavailable. It's recommended to upgrade to the pro trail version, which can be purchased with a 10% discount for a single computer.
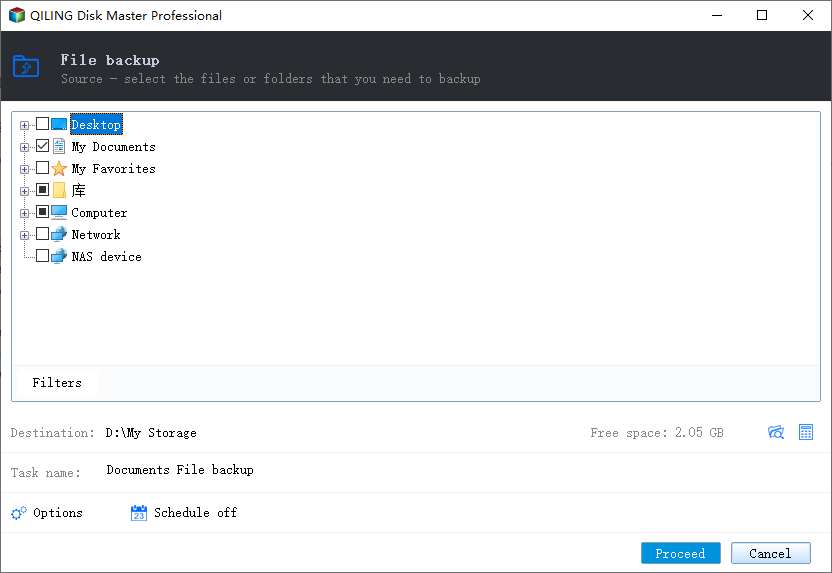
Step 1. Launch Qiling Disk Master Professional after installing it. Then, click Backup and File Backup subsequently.

Step 2. Select the data you want to backup, such as files or folders, and choose a path to save it to, which can be an external hard drive, USB drive, cloud drive, or other storage options.
Step 3. Set backup and retention settings, then click Proceed to backup files in Windows 10, which will automatically delete file backups based on the backup retention policy.
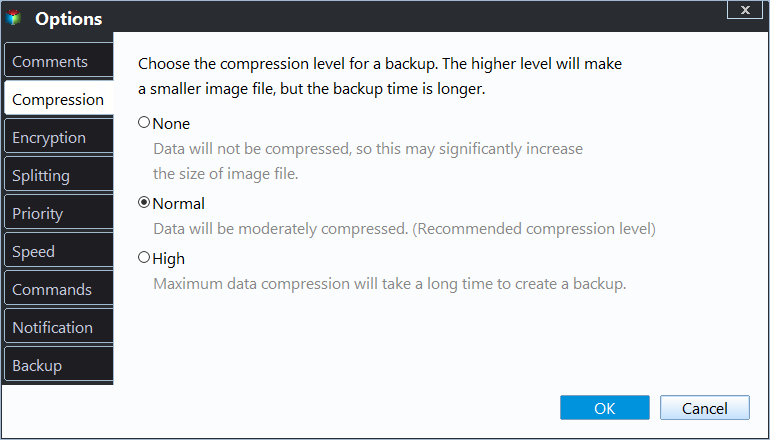
- Click Options to modify the file image, such as splitting, compressing, adding comments, setting backup mode (intelligent sector backup or sector by sector), and enabling email notifications to receive updates.
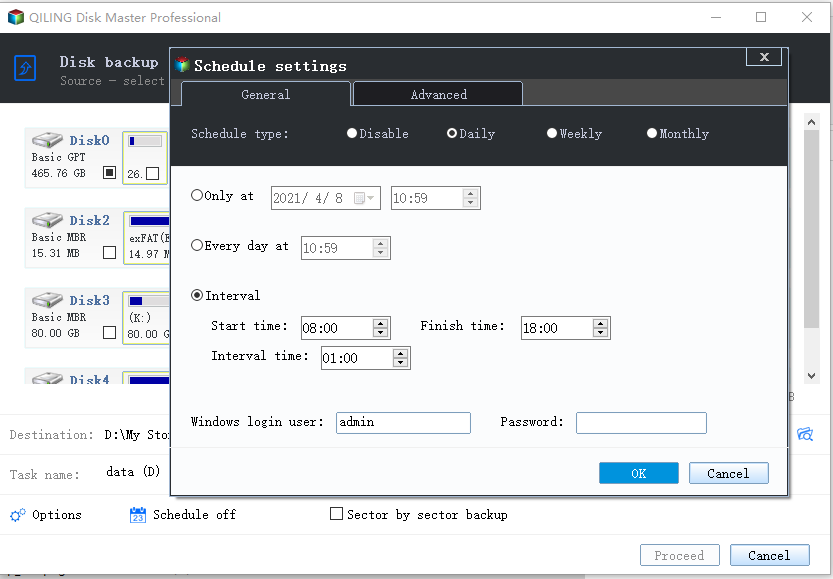
- Click Schedule Backup To set backup frequencies, you have three options: daily, weekly, or monthly. Additionally, you can utilize event triggers or a USB plug-in.
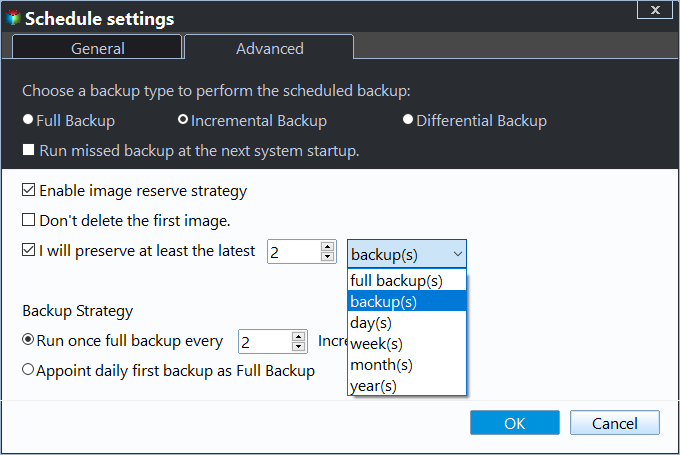
- To enable automatic backup cleanup, click on Backup Scheme > Enable Automatic Backup Cleanup after setting the schedule settings. Then, select the cleanup method you prefer, such as By quality, By daily/weekly/monthly, or By time. It's recommended to use differential backup for incremental backups, which can be more demanding for restoration.
Wrapping things up
To free up disk space for new backups, you can delete file history in Windows 10 using one of four methods. However, if you continue using this software for file backup, you may still encounter the issue of excessive storage usage, even if you adjust the backup interval and retention. This is because the backup interval is too short, typically within a day, and the backup image retains its original size, as it is not compressed.
To resolve the issue of a full backup disk, consider using professional backup software. This allows for targeted backups of specific files or folders, longer backup intervals, and more flexible retention policies, ultimately alleviating the problem.
Related Articles
- Fix: File History Doesn't Recognize This Drive
Have you encountered a message saying "File History doesn't recognise this drive" when using it to back up files to an external drive in Windows 11, 10, 8? Here are how to solve it. - Fix Annoying Error Your File History Drive Was Disconnected
Try the following 5 ways to fix "Your File History drive is disconnected" error, or try the best free alternative for File History - Qiling Disk Master to auto backup your files easily. - File History Cleanup | All You Need to Know
You will get 3 ways for File History cleanup and one professional software to prevent backup disk full issues. - How to Run PC to PC Sync for Folders in Windows 10/8/7?
Want to sync your PC folders to another PC or a cloud drive in Windows 11/10/8/7? Read this article to get the best free PC sync software to help you. - Easiest Way to Backup Network Drive to Local Drive in Windows 10
To backup network drive to local drive in Windows 10/11, you can use the best network drive backup software - Qiling Disk Master. - How to Backup Network Shared Files in Windows 10
This article tells you how to backup network shared files in Windows 10 with the best network backup software Qiling Disk Master.