Top 2 Ways to Create Windows Server 2012 (R2) Restore Point
What Is Restore Point
Windows System Restore points are crucial components of the Windows System Restore utility, often referred to as system restore points. These points are essentially collections of important system files stored with a specific date and time, serving as a safeguard against system failures and providing a necessary layer of protection for Windows Server 2012 systems.
When a restore point is created, the computer saves a backup copy of all data at that time, allowing you to save the state of the operating system and important data. This way, if your system encounters a problem, you can restore it back to an earlier point in time.
Can You Create Restore Point in Windows Server 2012 (R2)?
In Windows Server 2012, searching for "Create a restore point" leads to System Properties, but there is no System Protection tab or option to create a system restore point, unlike in other versions of Windows.
In Windows Server 2012, System Restore is not available, and you cannot create restore points. However, you can use the Windows Server Backup feature to create backups of your system, which can be used to recover your system in case of a failure. This feature allows you to schedule backups and store them on a network share or external drive. You can also use third-party backup software to create restore points.
Creating a system restore point is essentially the same as making an Operating System backup of your computer, as it saves a snapshot of your system's state at a particular point in time, similar to creating a system state backup.
Windows Server Backup is a feature that can be used to create system image backups, similar to the restore point feature. This alternative method can be used to restore a system to a previous state, providing a similar functionality to restore points.
Create System Image Backup Using Windows Server Backup Feature
Windows Server Backup is a powerful feature that allows you to create a single backup, schedule periodic backups, and restore system state to any point in time. Specifically, for Windows Server 2012 (R2), you can use this feature to create a system image backup.
Besides Windows Server Backup, there is another server backup software that provides an easier way to create system restore points, allowing for daily, weekly, or monthly scheduled backup tasks, and offering additional features to manage system backups.
To use this feature, first, install Windows Server Backup.
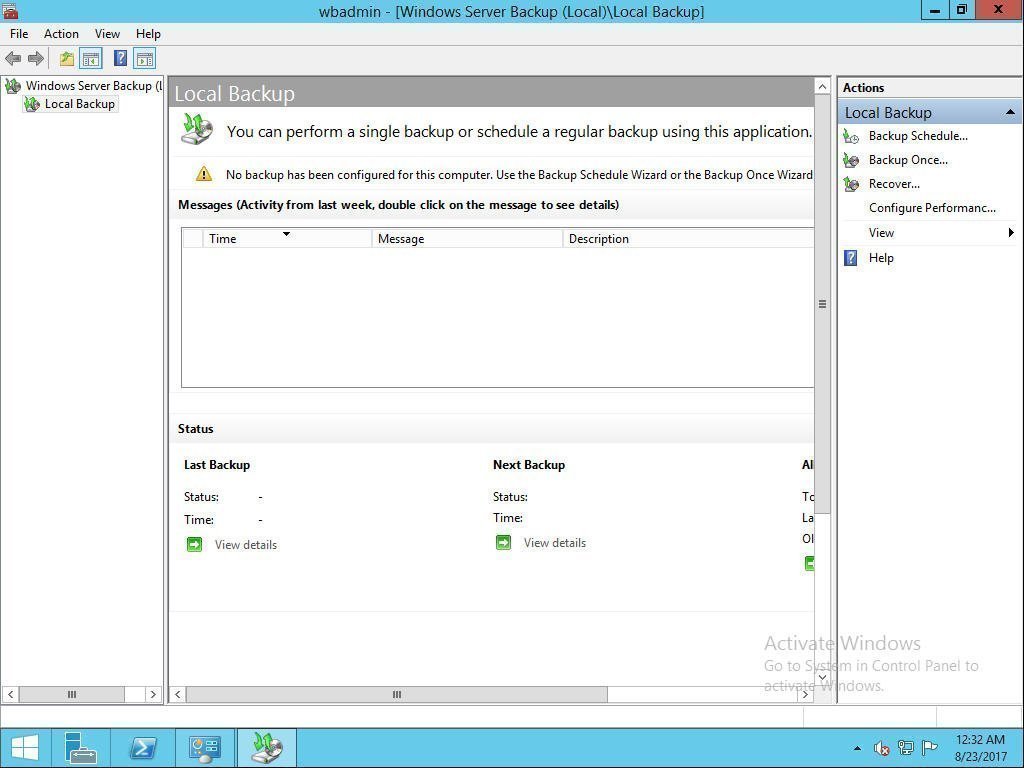
Step 1. After the installation completes, press Win + R and type "wbadmin.msc" to open Windows Server Backup, or click Start, select Administrative Tools, and find Windows Server Backup.
Step 2. Click the "Backup Once" option on the Right Panel, then select "Backup Option" and choose "Create a backup now using Different options" to proceed.

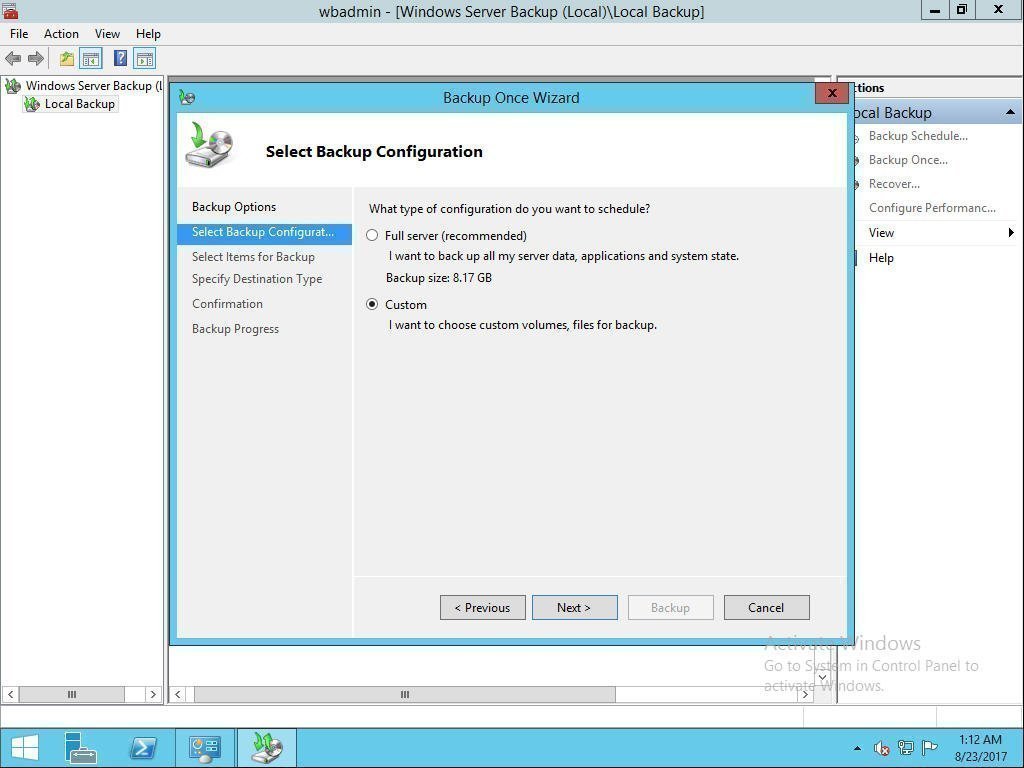
Step 3. You can choose the "Select Backup Configuration" based on your needs, such as selecting "Custom" and clicking "Next" to proceed.
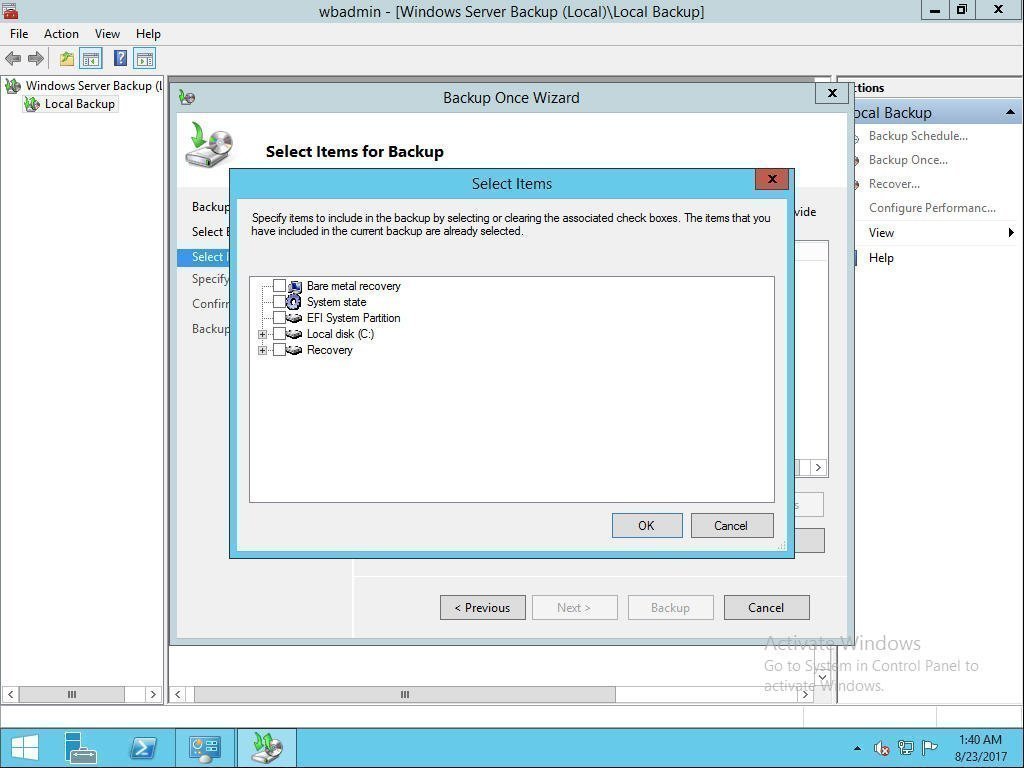
Step 4. Select Items for Backup: Click Add Items, select items to backup, tick System state, and click OK. Then click Next to continue.
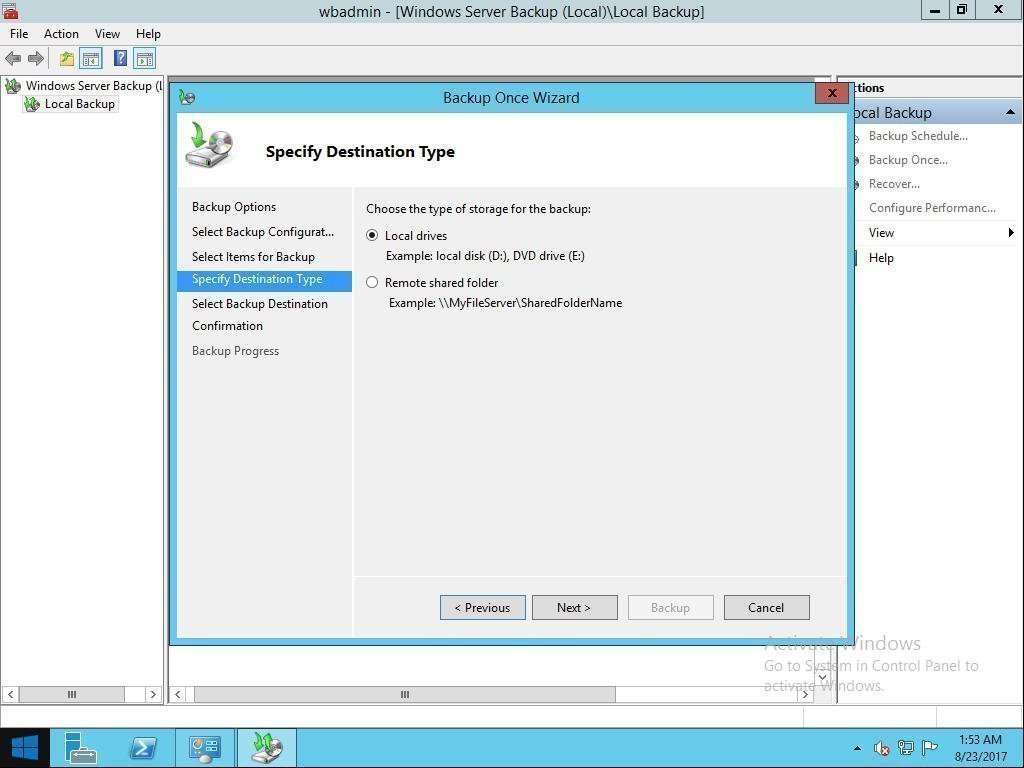
Step 5. Choose the type of storage for the backup, such as a local drive, and then select a hard drive to store the backup. Click Next to proceed.
Step 6. Confirm your option and click Backup. Wait until the process completes.
Creating a system state backup can be time-consuming, especially when system states change frequently. To avoid this, you can use the Backup Schedule Wizard to schedule automatic backups at regular intervals. This way, you can ensure that your system state is backed up regularly without having to manually create a new backup every time a change occurs.

This method can also be applied to create Windows Server 2012 R2 restore points. Additionally, you can click to learn more about Server 2008 restore points.
Easy Way to Create System Restore Point in Windows Server 2012 R2
There is another way to create system image backup using a third-party tool Qiling Disk Master, which is a professional server backup software.
- A system image backup allows you to quickly and easily restore your computer to its previous state in case of an emergency, making it a valuable tool for maintaining your computer's integrity.
- This feature allows you to set multiple scheduled backup tasks, including daily, weekly, and monthly options, and also supports incremental and differential backups, providing flexibility and reliability for your data protection needs.
- The system image backup has a limited storage capacity, but this software helps save space by automatically deleting old backups.
To create a system image backup, the software takes a snapshot of the entire system, including the operating system, installed applications, and all data, at a specific point in time. This process involves copying all the files and settings from the system to a designated backup location, such as an external hard drive or network location.
Step 1. Download Qiling Disk Master Server and open this software. Click the System Backup under the Backup tab.

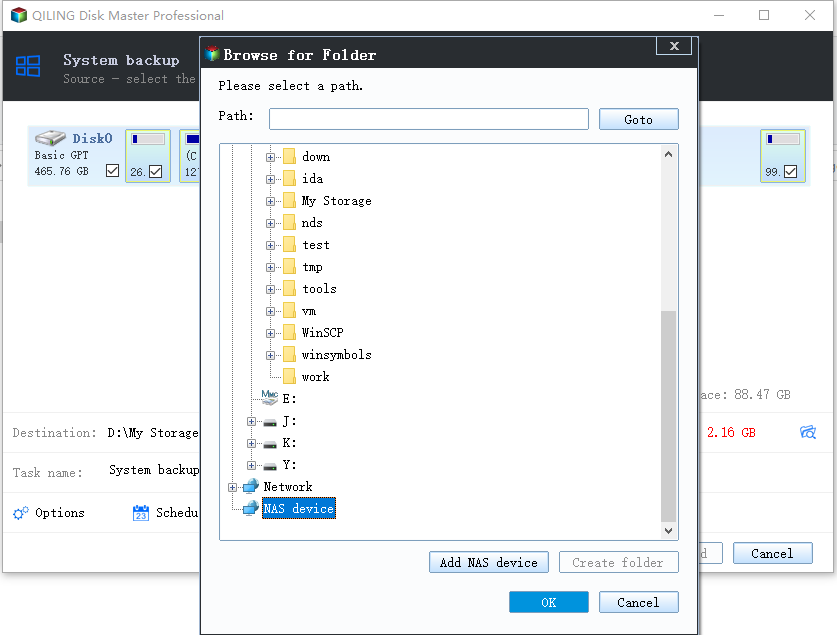
Step 2. To continue, you don't need to select a source, as the software has automatically chosen it for you. Instead, simply choose another location as the destination path to store your system image files. This destination location can be verified as being on an internal hard drive, external hard drive, or NAS.
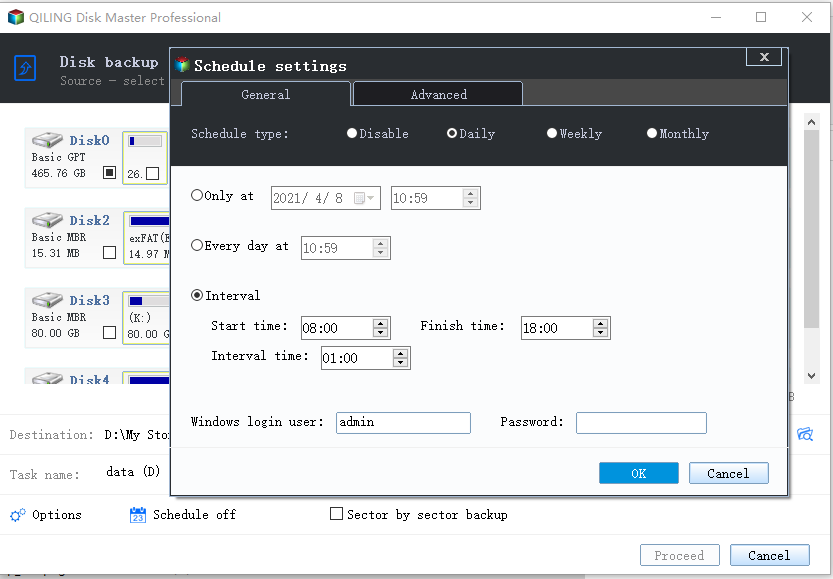
Step 3. To set up an automatic backup system, click "Schedule" and choose one or more settings. To delete old images, click "Scheme" to select a specific role and set the retained backup versions, then click "Proceed".
- Daily/weekly/monthly backup: To keep your system up to date and backed up, consider daily, weekly, or monthly backups to ensure the latest updates, installed apps, and file changes are preserved.
- Event triggers: To backup system without disrupting your operations, use "System Shutdown" in Event triggers.
- Wake the computer to run scheduled tasks: To schedule backups during off-peak hours, set the backup time to midnight or another quiet time, and enable the option to wake the computer to run scheduled tasks.
- Incremental or differential backup: To save time and disk space, both features can be used, as they only backup the changed content.
Qiling Disk Master Server allows you to create a system image backup of Windows Server 2012 (R2) and other versions, making it easy to restore your computer in case of any issues. The software supports Windows Server 2022/2019/2016/2008 (R2)/2003 (R2) and Windows 7/8/8.1/10/11/XP/Visa.
Conclusion
You can create a Windows Server 2012 restore point using either the Windows System Backup (WSB) or Qiling Disk Master Server, depending on your preference. If you prefer a simpler method, Qiling Disk Master Server is a good option, offering more functions than WSB. Additionally, it allows you to backup not only the system but also individual disks or files, giving you more flexibility in your backup needs.
To protect unlimited PCs and servers within your company, you may choose Qiling Disk Master Technician Plus, which offers unlimited billable technical services to clients and allows for the creation of a portable version by copying the installation directory.
Related Articles
- How to Do Windows Server 2012 Backup Schedule Weekly Step by Step?
How to create Windows Server 2012 (R2) backup scheduled weekly? There are 4 solutions for you offered in this article to backup Windows Server 2012 (R2) once a week easily. - How to Create Multiple Schedules in Windows Server Backup?
Read this guide to get three practical ways to create multiple schedules in Windows Server Backup. Applied to Windows Server 2003, 2008, 2012, 2016, etc. - How to Perform Windows Server 2012 System Restore Using Command Line?
If you don't know how to perform Windows Server 2012 system restore command line, please read on and learn 2 practical methods as well as from easy graphics. - How to Create Restore Point in Windows Server 2008 (R2)?
If you are looking for a quick way to capture a snapshot of your computer, please continue to read this article and learn 2 effective ways to create restore point in Windows Server 2008 R2. - How to Perform System Restore in Windows Server 2016 | 2 Ways
How to do system restore in Windows Server 2016? Without restore point option like in Windows Client, you need to create a backup including system state using Windows Server Backup, or try easier alternatives. - How to Create Sector by Sector Backup on Windows 11/10/8/7🔥
To create a sector-by-sector backup of your computer hard drive, follow the steps outlined in this article. The best backup software can help you back up all the sectors on your drive, ensuring a complete and reliable backup.