How to Perform System Restore in Windows Server 2016 | 3 Ways
- Does Server 2016 Include System Restore Points?
- Backup and Restore System State via Windows Server Backup
- How to create a backup in Windows Server 2016
- How to restore from a system state backup in Windows Server 2016
- How to perform bare metal recovery on Windows Server 2016
- Standalone Tool to Perform System Restore in Windows Server 2016
- How to backup Windows Server operating system with Qiling Disk Master
- How to perform Windows Server system restore with Qiling Disk Master
- Conclusion
Does Server 2016 Include System Restore Points?
System Restore in Windows is a feature that allows reverting system files, settings, and applications to an earlier state, but it's not available in Windows Server OS versions like 2016, 2019, 2022, or 2012/2012 R2. However, it can be enabled in Client OS like Windows 10 to create restore points.
To perform a Windows Server 2016 system restore, you can create a backup including system state, but due to limitations and a cumbersome process, consider using alternative methods for easier backup and restore of the operating system.
I'll cover 3 methods below:
- To backup and restore the system state with Windows Server Backup, you can follow these steps:
- A standalone tool can be used to perform system restore in Windows Server 2016. Go ▶
- In Windows Server 2016, you can use a centralized tool to run system restore for multiple computers. This can be done using the Windows Server Backup feature, which allows you to create and manage backups for multiple machines from a central location. You can use the Windows Server Backup feature to create a backup of the system state, including the registry and system files, and then use the System Restore feature to restore the system to a previous state.
Backup and Restore System State via Windows Server Backup
Windows Server 2016 backup and restore involves installing the backup tool, which can be found at a specific path. Once installed, the backup process can be initiated, allowing users to select the data they want to protect and schedule regular backups. The restored data can then be retrieved in case of a disaster or system failure, ensuring business continuity and minimizing downtime.
To install Windows Server Backup, you can follow these steps: Go to Server Manager, then click on "Manage", followed by "Add Roles and Features". From there, select a role-based or feature-based installation, and choose a server from the server pool. Then, follow the wizard to select Windows Server Backup and complete the installation.
To continue, click Tools in Server Manager and choose Windows Server Backup.
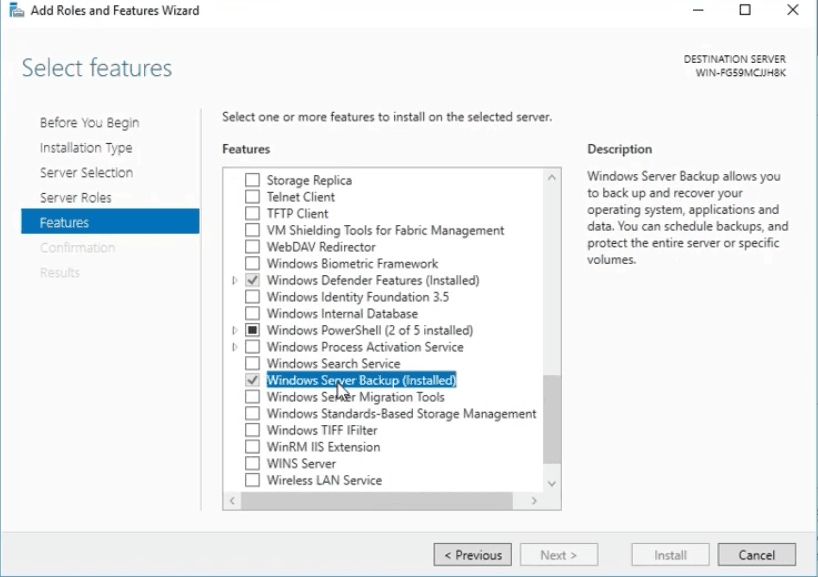
If you're having trouble finding or using the Windows Server Backup service, please refer to the article on Windows Server Backup service missing for assistance.
How to create a backup in Windows Server 2016
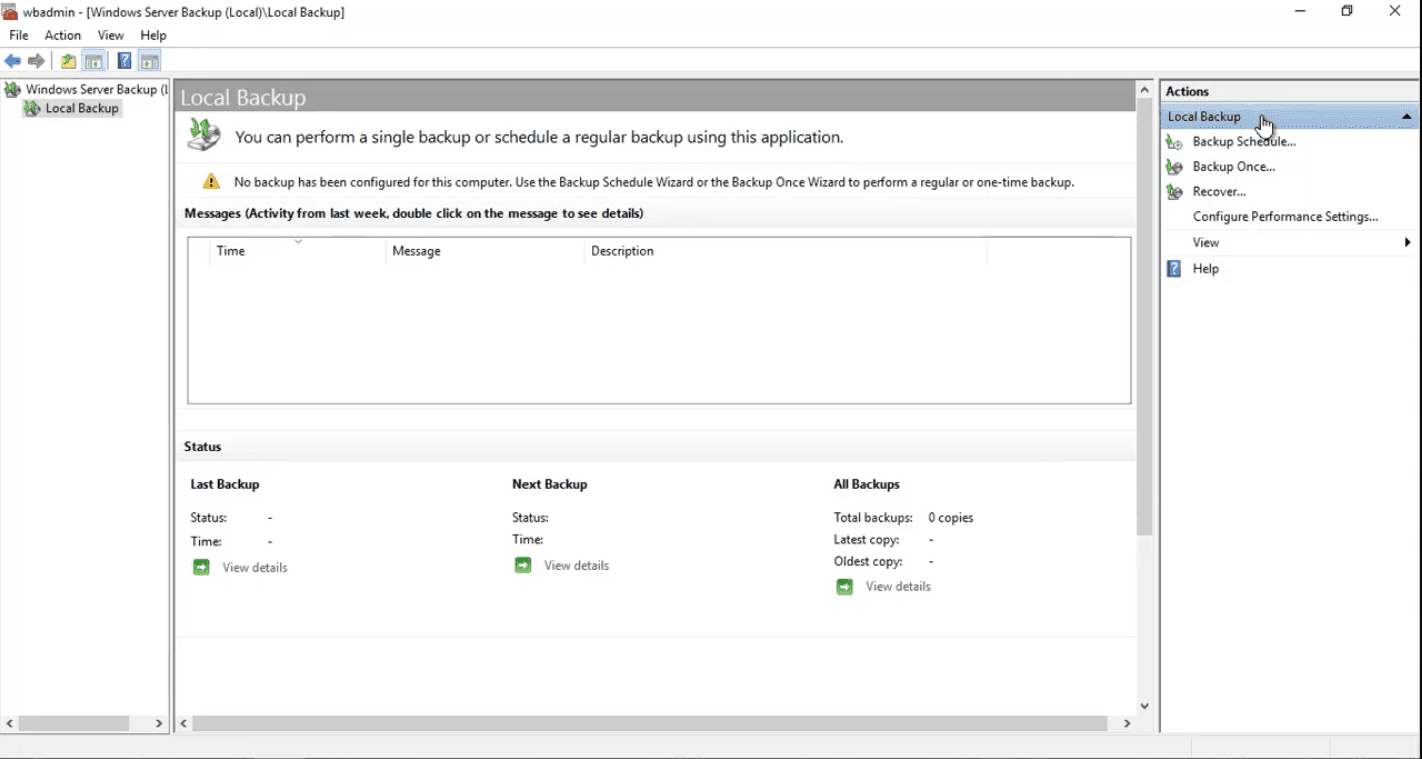
1. Click Local Backup to choose Backup Schedule or Backup Once according to your needs. Here I'll choose the former to set up an automatic backup.
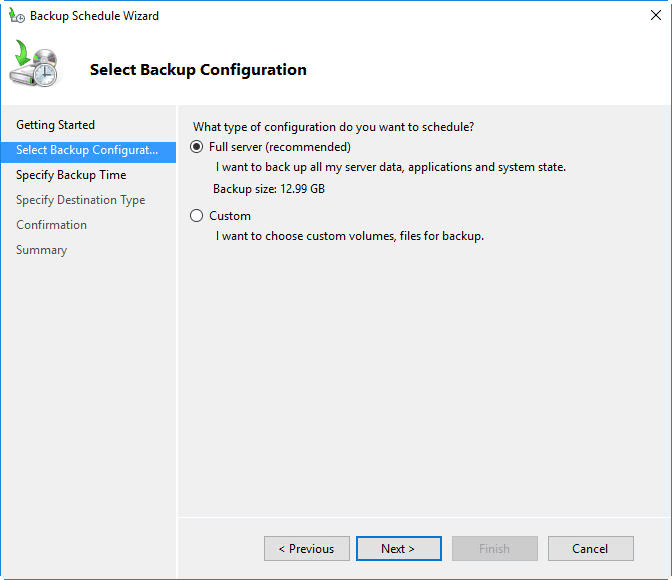
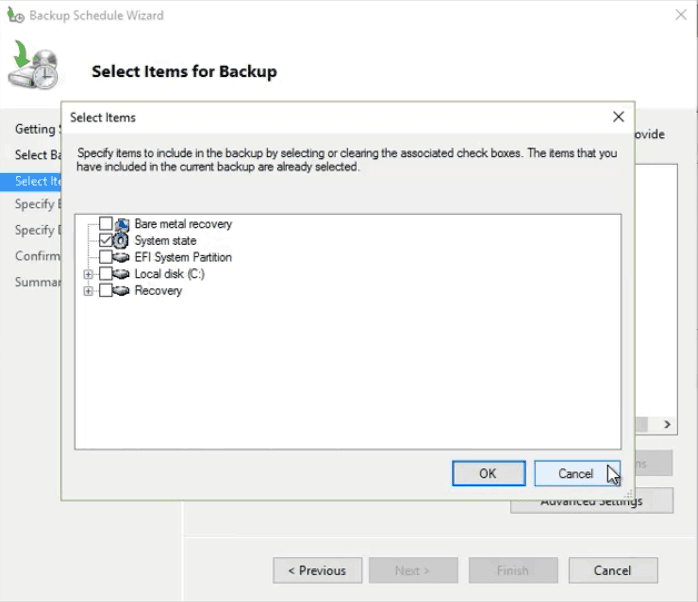
2. Choose backup configuration. Full server refers to all the data on the server, and Custom allows you to select volumes and files manually. I'll choose Custom here to show you what could be included in this backup.
3. To perform a system restore on Windows Server 2016, you have several options. One is to use the built-in System Restore feature, which can be accessed through the Control Panel or by typing "system restore" in the search bar.
👉 System state - Backs up operating system files, allowing you to recover a machine when it's still bootable. Optionally, you can tick the box to include the registry in the backup. This feature is useful for troubleshooting or recovering a system when it's still bootable.System Reserved
and C:
drive to include all the data and files in system drives.
👉 Bare metal recovery - The feature backs up the operating system files and all data except user data on critical volumes, allowing for a complete system recovery when the machine won't start.
Make your own decision and click OK to confirm. To learn what you can back up and recover, please read this guide.
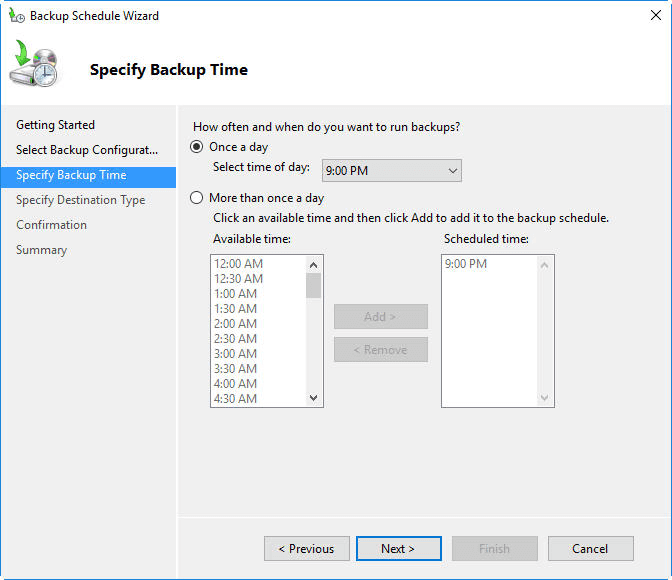
4. Set up a schedule to run the backup automatically, choosing a frequency such as once a day, and click Next to proceed.
To fix the issue of Windows Server Backup schedule not running, check if the Windows Server Backup service is running and set to start automatically. Ensure that the backup schedule is set correctly and that there are no conflicts with other scheduled tasks.
5. Specify a destination type, such as a hard disk, volume, or shared network folder. Hard disk is recommended. Select the destination disk and confirm.
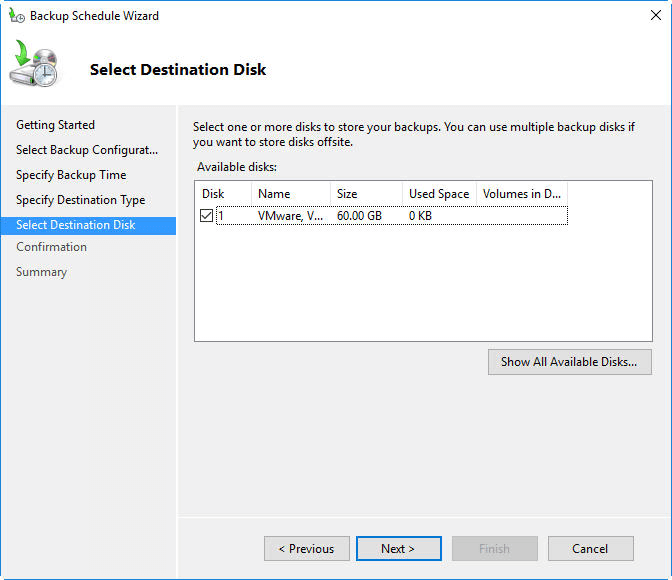
6. Please note that the destination disk will be formatted after the backup process, so it's essential to use a blank disk or backup any data on it before proceeding. This ensures that you don't lose any important information.
How to restore from a system state backup in Windows Server 2016
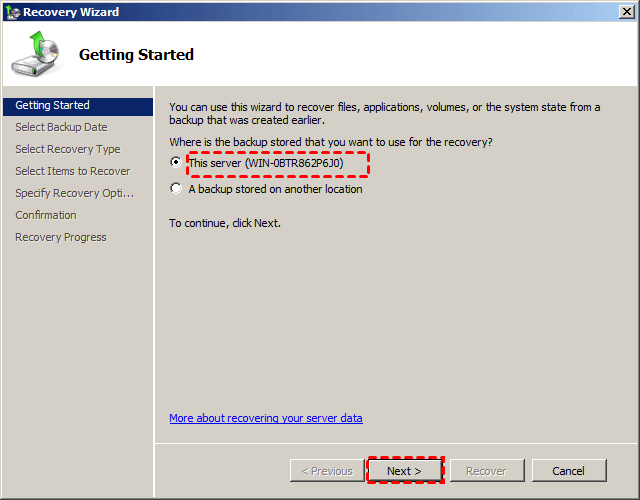
1. With a previously created system state backup, you can select the backup task and choose Recover to restore the system to its previous state.
2. If it's a local backup, choose this server, then select the date of the backup that you want to use for system restore.
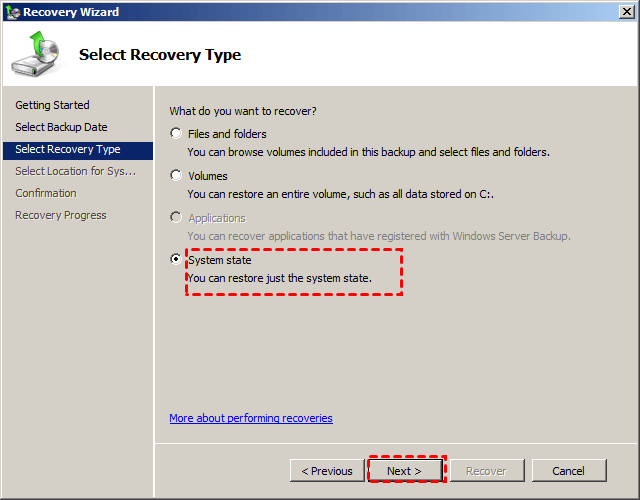
3. Select what you want to recover from the backup. Choose System state here.
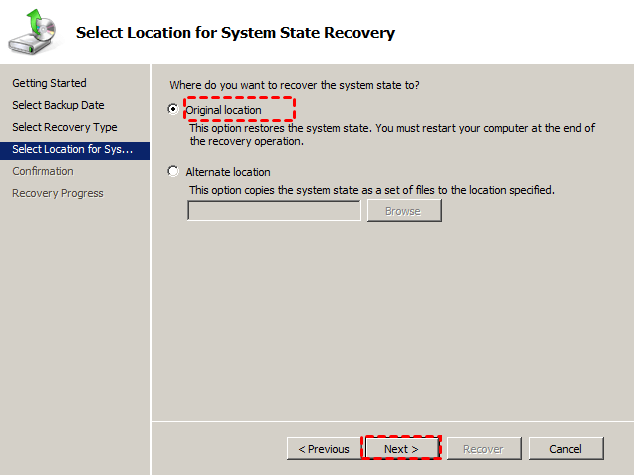
4. To restore the file, please specify where you want to restore it to. The original location is the default selection.
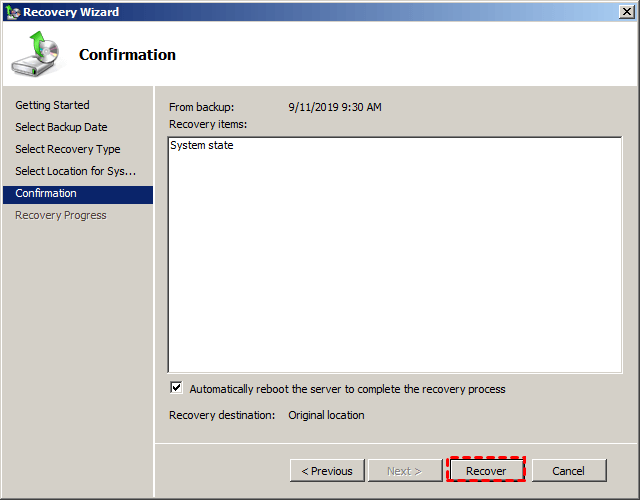
5. Confirm the operation and click Recover to proceed.
To reset Windows Server 2016 to its default settings, you can perform a system restore from a backup or reset it from scratch to fix existing problems. This process allows you to set up the settings from a clean slate.
How to perform bare metal recovery on Windows Server 2016
If your machine fails to start and you've created a bare metal backup before, you can perform a bare metal recovery to restore the operating system and critical data, excluding user data.
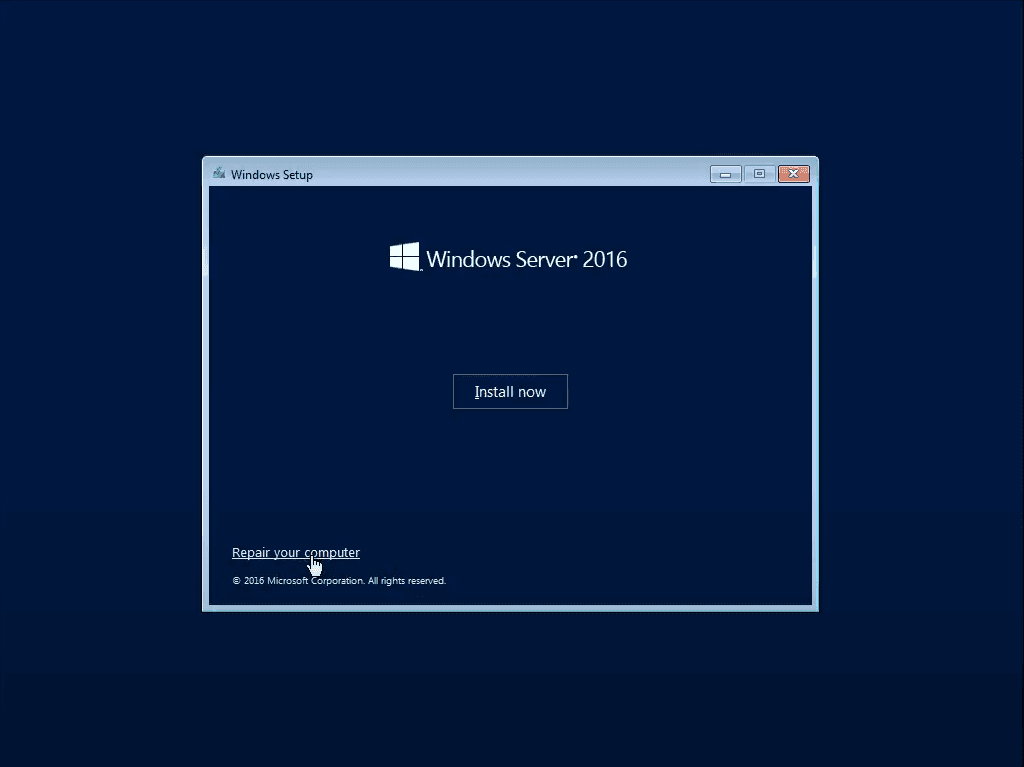
1. Insert the Windows Server 2016 bootable media, boot from it, and select "Repair your computer" to access the recovery environment.
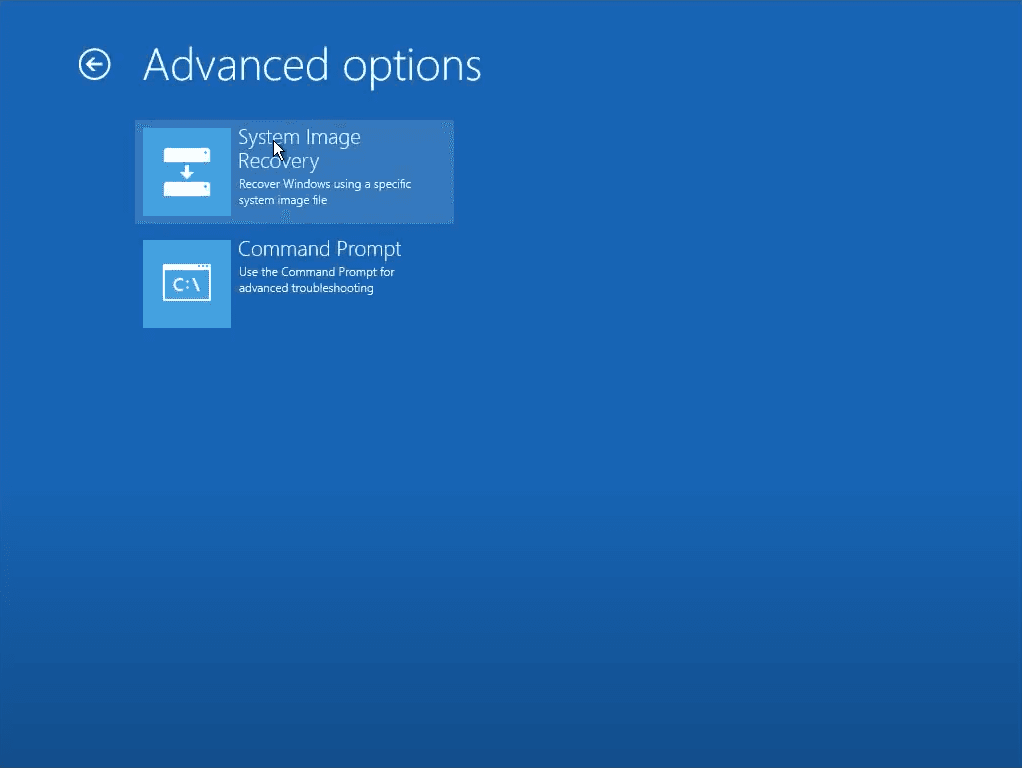
2. Choose Troubleshoot > System Image Recovery to get started.
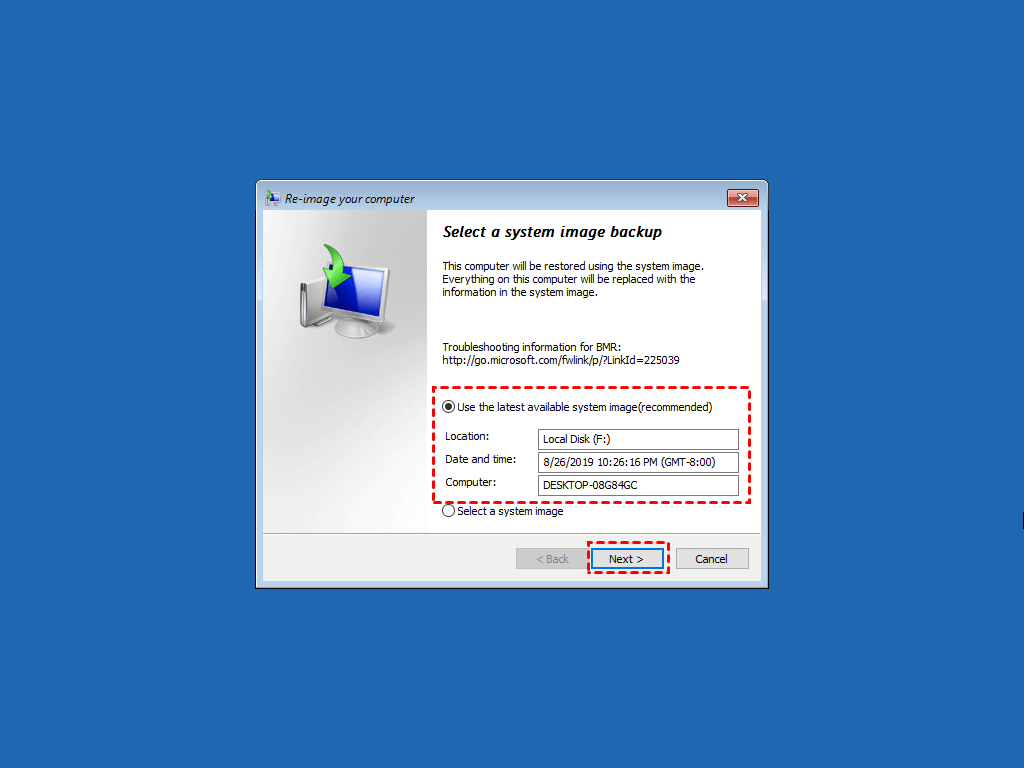
3. The system will automatically detect the latest available system image, allowing you to proceed with the process by clicking "Next". Alternatively, you can manually select a different image from another location by choosing "Select an image".
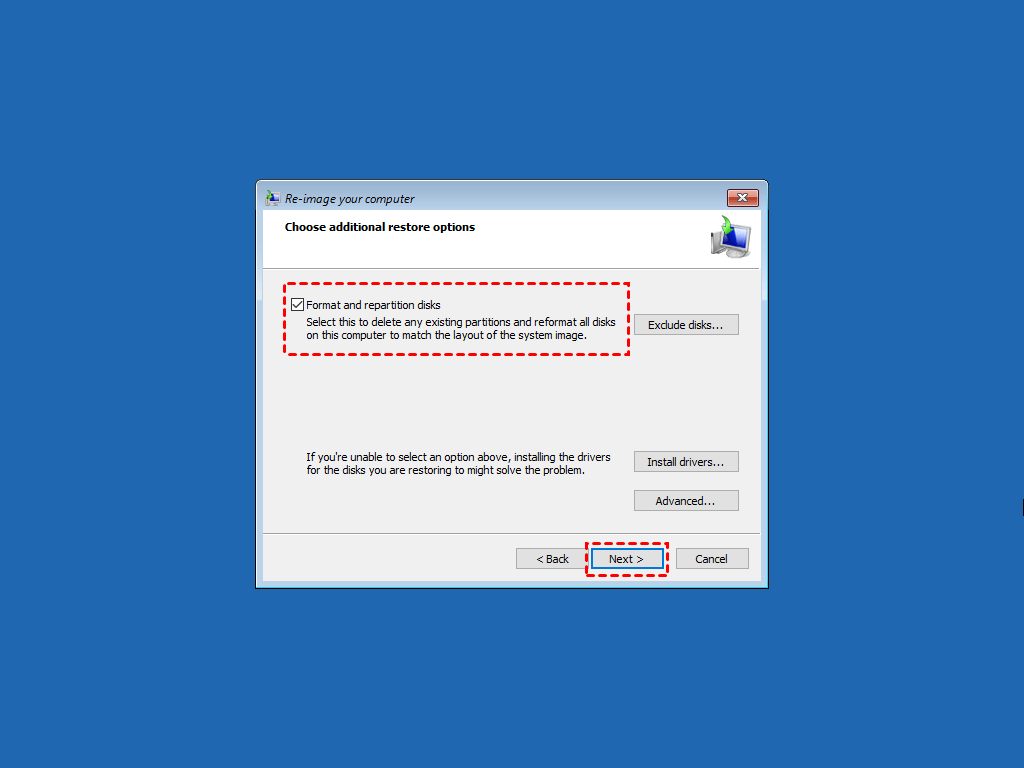
4. Keep the option "Format and repartition disks" ticked to match the layout of the system image, and click "Next".
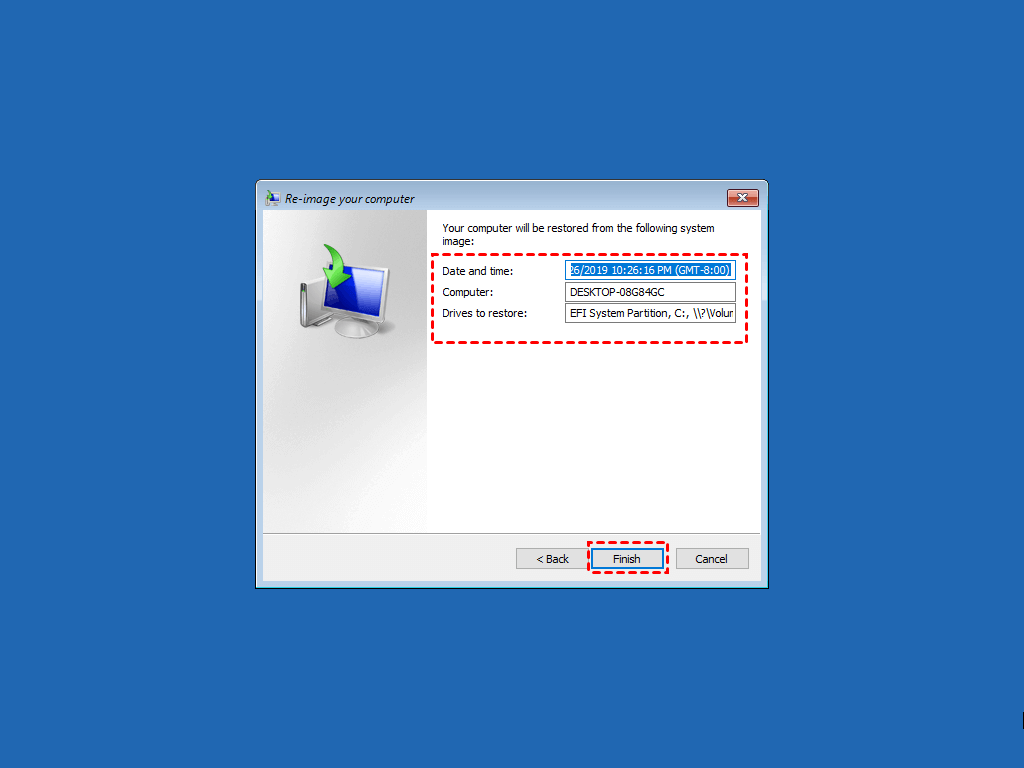
5. Confirm the information and click Finish to perform system image recovery on Windows Server 2016.
Standalone Tool to Perform System Restore in Windows Server 2016
Windows Server Backup is a feature-rich backup tool, but its operation can be lengthy and has some limitations. For a simpler alternative to restore Windows Server 2016, and also newer versions like 2019 and 2022, Qiling Disk Master Server can be a more convenient option.
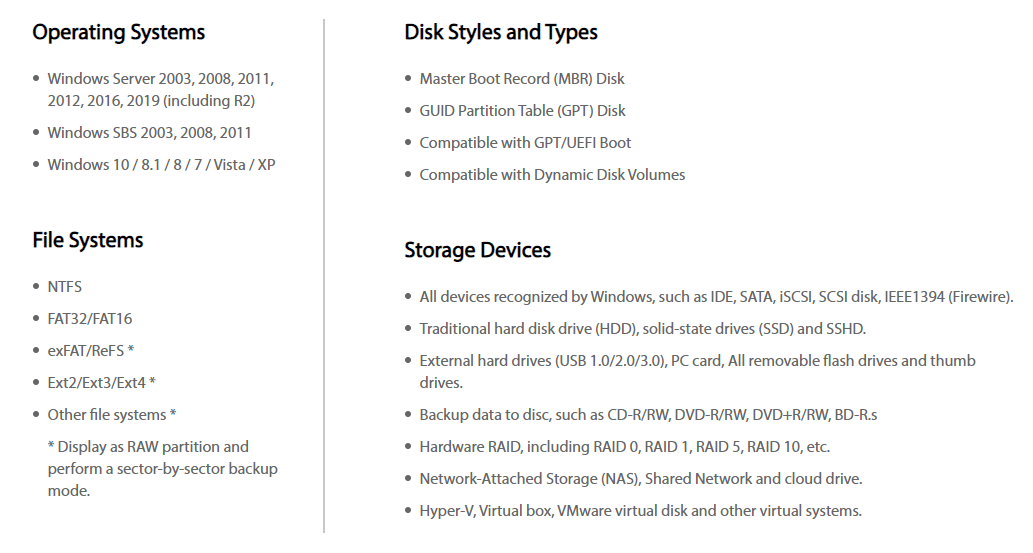
✔ It supports a wide variety of Windows OS, including Windows Server 2003, 2008, 2011, 2012, 2016, 2019, 2022, Windows SBS 2003, 2008, 2011, and Windows 10, 8.1, 8, 7, Vista, XP.
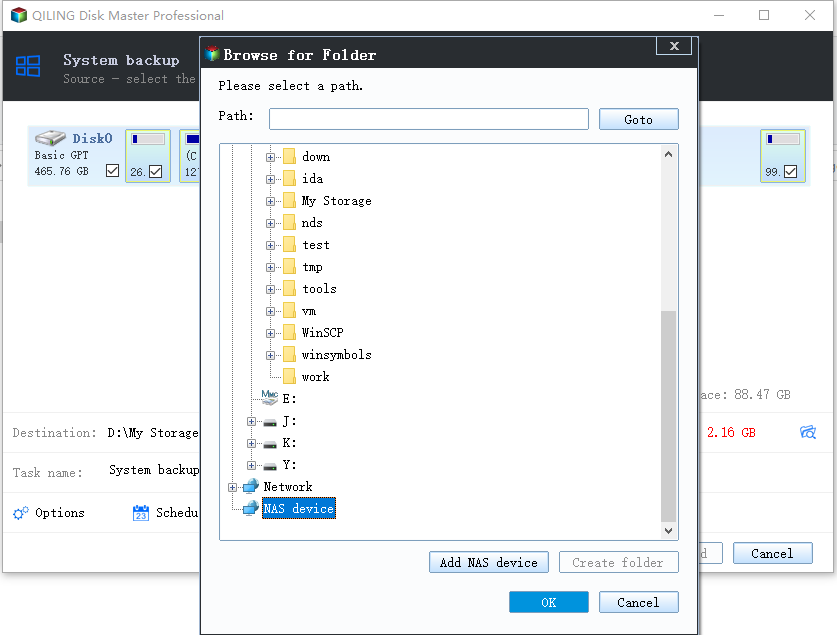
✔ The system supports various storage devices, including internal and external hard drives, NAS, network shares, and cloud services.
✔ The software allows for the backup and restoration of not only the entire system, but also individual files and folders, partitions, and even entire disks, providing a comprehensive solution for data protection and recovery.
✔ It allows you to create a recovery drive and restore system in WinPE to rescue a malfunctioning machine.
✔ With the universal restore feature, you can easily restore a system image to different hardware.
How to backup Windows Server operating system with Qiling Disk Master
1. Launch the software, navigate to Backup, click System Backup, or choose Disk Backup to backup everything on the machine, including OS and all drives on the disk.
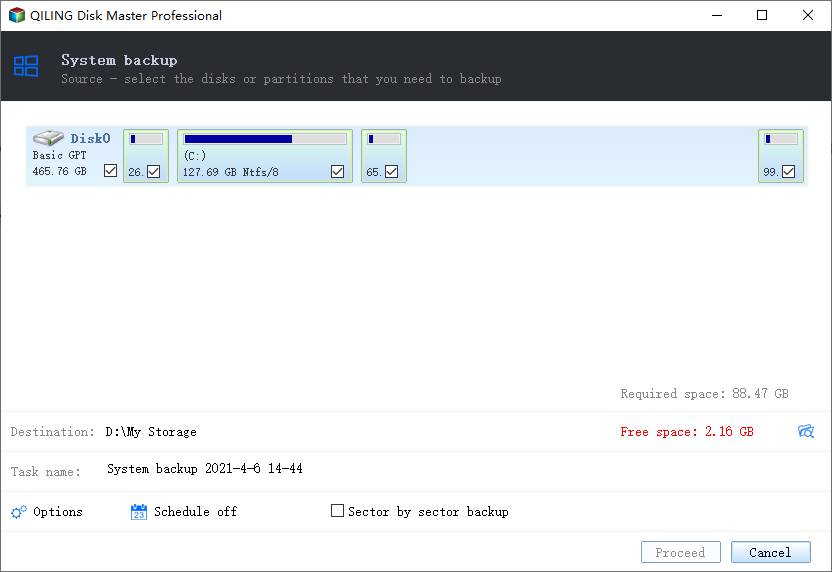
2. The system will automatically select all system files, settings, applications, and personal data in system partitions as the source, and you'll only need to choose a destination path.
3. To optimize the backup, you can further set the following:
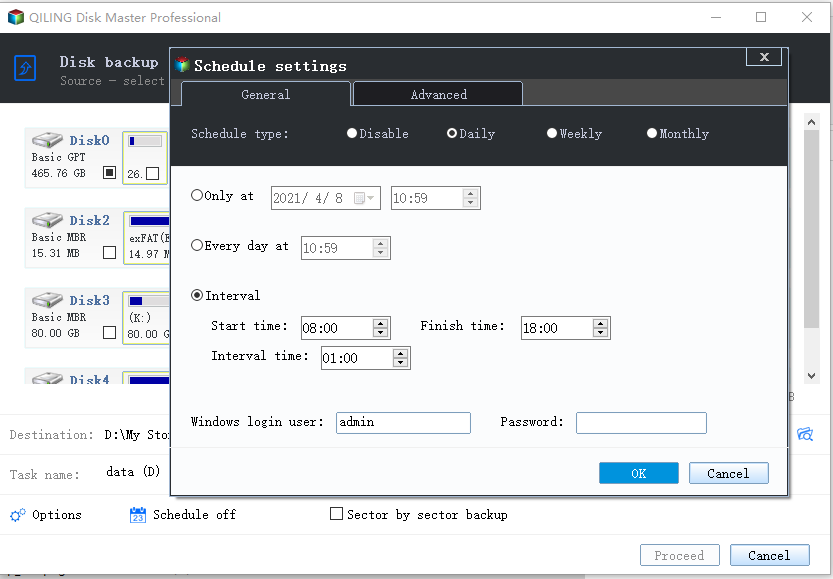
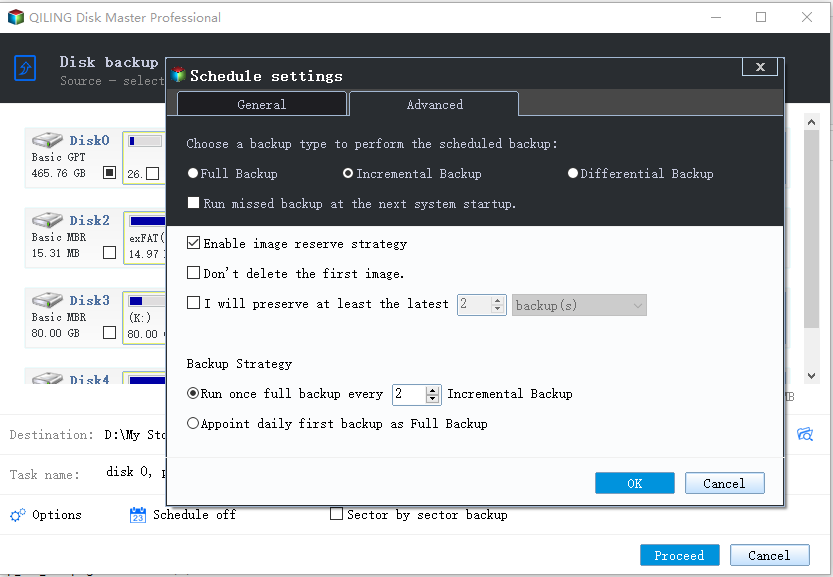
Backup Schedule: To ensure your system is always backed up, you can set up an automatic backup system that triggers at your preferred frequency, such as daily, weekly, or monthly, or even when a specific event occurs, like a USB plug-in. This way, your data is safeguarded and can be easily restored in case of any system failure or data loss.
Backup Scheme: You can choose the type of backup method you prefer, such as full, incremental, or differential, or enable automatic backup cleanup to automatically delete old backups.
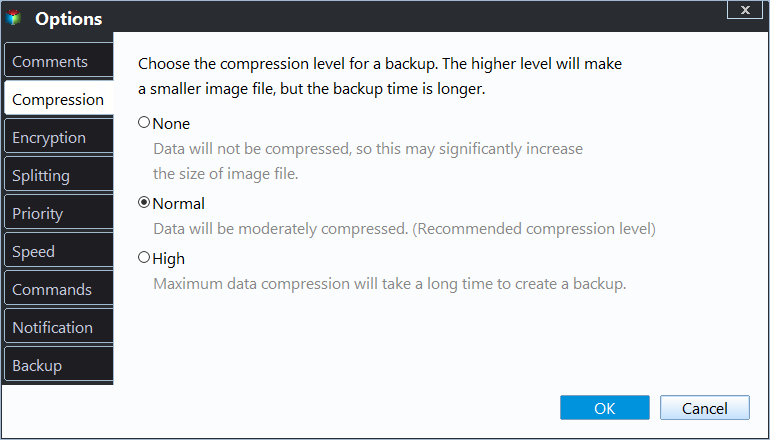
Options: To manage the compression level, image splitting, encryption, operation priority, and email notification, you can use various tools and software, such as WinRAR, 7-Zip, or compression libraries like zlib or gzip. These tools allow you to customize the compression level, split images into smaller parts, encrypt files for added security, prioritize operations, and set up email notifications for specific events or tasks.
To perform a Windows Server 2016 system restore when it won't boot, go to Tools > Create Bootable Media to create a Windows Server recovery drive.
How to perform Windows Server system restore with Qiling Disk Master
If the machine is still bootable, you can run the software normally to perform a system restore. If it's not, you'll need to use the bootable media to start WinPE and complete system recovery.
To perform Windows Server bare metal recovery to different hardware, use the bootable media to launch Qiling Disk Master in WinPE, and select Universal Restore at the last step.
Regardless of the situation, the process to restore a Windows Server 2016 system is generally the same, involving a series of steps to get the system back to a functional state.
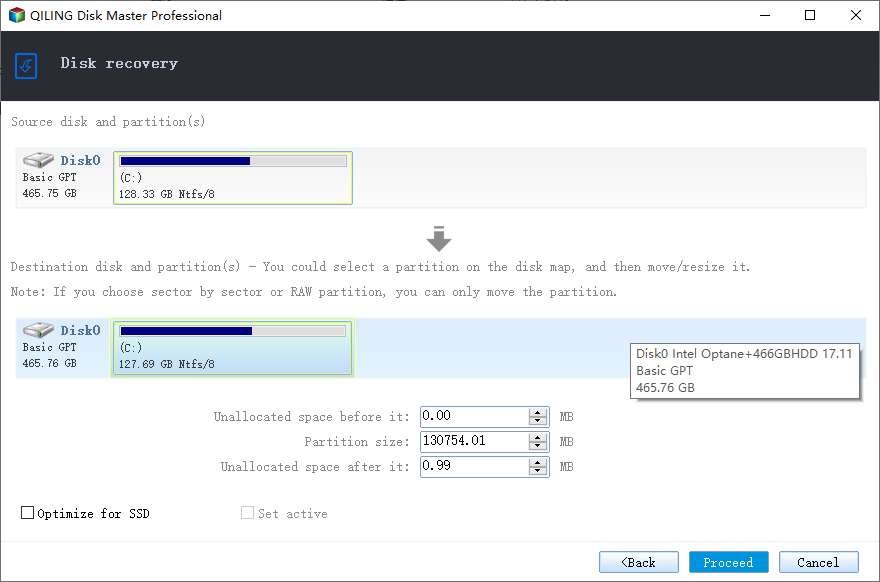
1. Go to the Restore tab and choose Select Task or Select Image File to locate the system image you want to restore.
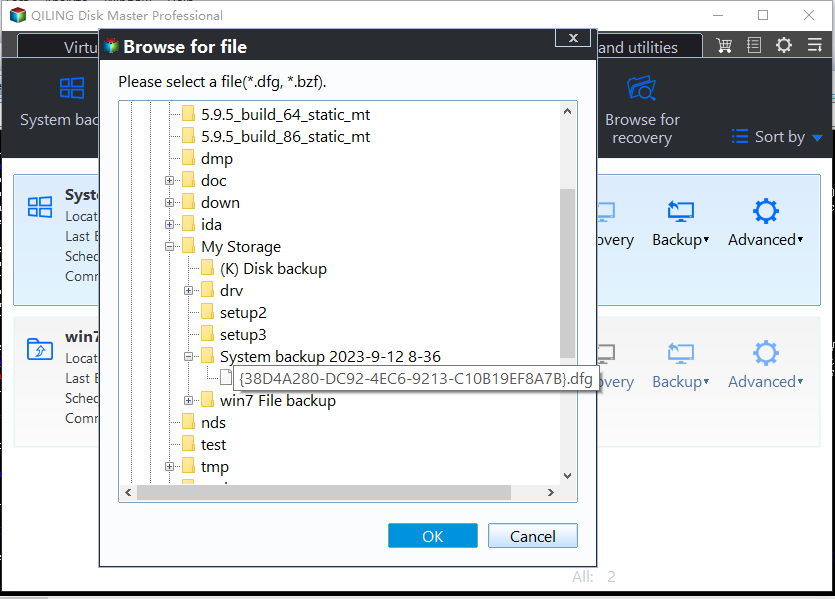
2. Choose Restore this system backup and click Next.
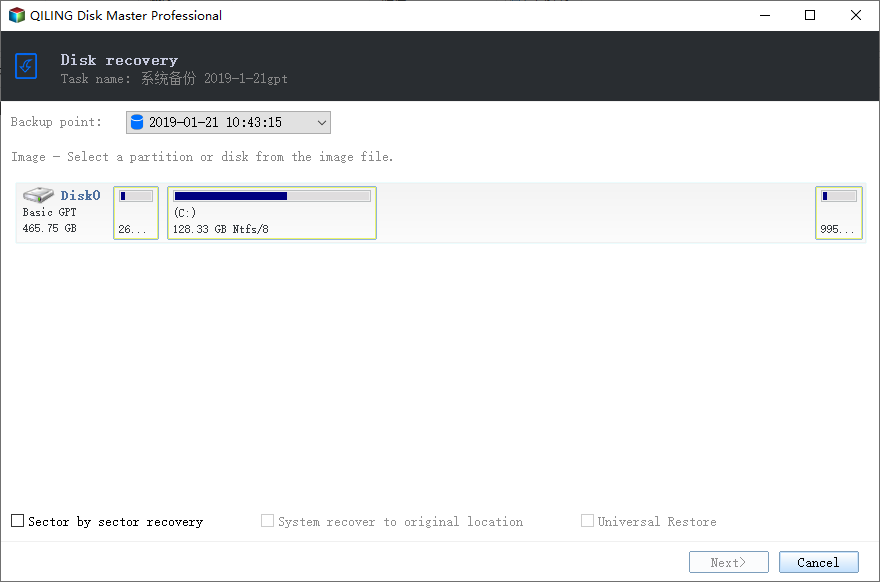
3. Confirm the operation and click Proceed. If the system image is created on different hardware, remember to tick Universal Restore.
Centralized Tool to Run System Restore in Windows Server 2016
Qiling Backup is a convenient and reliable solution for centralized backup management of all Windows operating systems, providing the best enterprise backup software.
- A software that allows you to create system, disk, or partition backups for multiple Windows PCs and Servers, supporting Windows 11/10/8.1/8/7 and various Windows Server versions.
- You can schedule a backup task to run at various intervals (daily, weekly, monthly) using different backup methods, such as full, incremental, or differential backups.
- You can restore the backup image to the same computer or a different computer.
- If your backup has multiple versions, you can restore from any point in time you want.
Download Qiling Backup now to have a try!
Notes:
◑ If you're restoring a system image to a different device, start by adding the target device by clicking "Source Device" > "Windows" > "Add Windows Device".
◑ When restoring a system to another computer, it's recommended to enable the Universal Restore option, which ensures that the system boots securely.
Conclusion
In Windows Server 2016, if the restore point option is not available, you can use Windows Server Backup to create a backup of the system state, which can then be restored when needed. Alternatively, you can use Qiling Disk Master or Qiling Backup to backup and restore the system or entire disk, providing a simpler alternative to the built-in tool.
Qiling Disk Master offers a range of features, including backup and restore, with the ability to restore system images to servers with different hardware. Additionally, it provides a powerful clone feature that allows for cloning hard drives in Windows Server.
If you want to protect unlimited Servers and PCs within your company, Qiling Disk Master Tech Plus could be a better choice.
Related Articles
- 3 Ways to Backup Windows Server 2012, 2016, 2019
In this post, you will get 4 effective methods to create image backup in Windows Server, which apply to Windows Server 2008(R2), 2012(R2), 2016, 2019, 2022, etc. Let's get started! - How to Create Restore Point in Windows Server 2012 (R2)?
A restore point allows you to restore system to the previous state. This article will show you how to create Windows Server 2012 restore point with two ways. - How to Use System Restore from Boot in Windows 10/8/7?
System Restore from boot in Windows 10, 8, 7 can save you from serious system failures. If you find the process too complicated, an easier alternative is available. - How to Backup Windows Server 2016 to NAS Device?
Backup Windows Server 2016 to NAS is very safe and convenient for data protection and disaster recovery. - Best Backup Software for Server 2012(R2) - Qiling Disk Master Server
You can find powerful backup software for Server 2012 (R2) in this post. It also works on with other operating systems such as Server 2016, 2019, 2022, etc. - How to Backup Windows Server 2008 (R2) to External Hard Drive
Backing up Windows Server 2008 or 2008 R2 to an external hard drive can give a big benefit to server users. It can solve the most headachy thing when system crashes.
Products
Articles & Tutorials
- Data Recovery
- Data Backup
- File Recovery
- File Backup
- File synchronize
- System Backup and Restore
- Disk and Partition Clone
- Technical articles
- Disk Master Help
- Windows Deleted File and Disk Recovery Tutorials
- Windows File and Data Recovery Tutorials
- More Windows Tutorials for Install, Security, Files, and PC Tips
- Windows Boot, Repair, and Recovery Environment Tutorials
- Windows Backup Tutorials
- Windows Restore Tutorials
- Windows Clone and Migration Tutorials
- Windows Server Backup, Recovery, and Management Tutorials
- Windows Disk, Partition, and Storage Management Tutorials