Create a Password-Protected Virtual Disk in Windows
A virtual hard disk file is not encrypted just because it is a VHDX. To make a password-protected drive with Windows tools, create an empty VHDX, add a volume inside it, and turn on BitLocker for that new volume. BitLocker Drive Encryption is available for supported Windows Pro, Enterprise, and Education editions; Windows Home's device encryption is not the same manual workflow.
Check the edition and prepare a safe location
Step 1. Open Settings > System > About and check the Windows edition. If the BitLocker management option is unavailable, do not assume a plain VHDX is protected. Microsoft's BitLocker edition guide explains where manual drive encryption is supported.
Step 2. Choose a folder on a healthy drive with enough free space for the VHDX and a separate backup. Keep a second copy of the files you plan to place inside. Decide where to store the BitLocker recovery key outside the new VHDX; losing both the password and recovery key can make the contents inaccessible.
Create and initialize an empty VHDX
Step 1. Open Disk Management as an administrator. Select Action > Create VHD, browse to the chosen folder, and name the file with a .vhdx extension. Set a maximum size that fits your planned documents and host-drive space. Choose Dynamically expanding if you want the host file to grow as data is added, or Fixed size if you need space reserved immediately. Click OK and wait for the new virtual disk to appear. Follow Microsoft's VHD management guide if the dialog differs.
Step 2. In the lower disk map, identify the new virtual disk by its size and status. If it is uninitialized, right-click its disk label and choose Initialize Disk; select GPT for a modern Windows-only data disk. Do not initialize or format any existing physical disk.
Step 3. Right-click the unallocated area inside the new VHDX, choose New Simple Volume, and follow the wizard. Assign an unused drive letter and format this new empty volume as NTFS. Confirm that the new drive appears in File Explorer. At this point it is usable but still unencrypted; do not place secrets in it yet.
Turn on BitLocker and test the password
Step 1. Open Manage BitLocker from Windows search, identify the new virtual-drive letter and size, and choose Turn on BitLocker for that data volume. Do not select the host disk or another physical drive. Choose a password to unlock the drive and enter it twice.
Step 2. Save the recovery key in a separate trusted location, not inside the virtual disk or beside its only copy. Choose the encryption option offered by the wizard for your situation, review the target letter, and start encryption. Wait until Windows reports completion. Microsoft's BitLocker operations guide explains password and recovery-key protectors.
Step 3. Confirm that BitLocker shows protection as on for the VHDX volume. Copy a noncritical test document into it, close the document, and reopen it. Only then move sensitive files. Copying does not remove their unencrypted originals on other drives.
Detach and reopen the virtual disk
Step 1. Close files on the virtual drive. In Disk Management, right-click the virtual disk's disk label and choose Detach VHD. Confirm that the drive letter disappears. Do not select an option that deletes the VHDX file.
Step 2. To test access, choose Action > Attach VHD, browse to the same .vhdx file, and attach it. Unlock its BitLocker volume with the password and reopen the test file. Keep a backed-up VHDX and the recovery key separately; detaching is not a backup.
When a Safe Disk container is simpler
If you want a purpose-built encrypted container instead of creating a VHDX and configuring BitLocker, QILING Safe Disk creates a password-protected .fvd image that can be mounted as a virtual drive. Its image format and management workflow differ from a BitLocker-protected VHDX; do not interchange their passwords or assume one application opens the other's file. See the Safe Disk setup guide for its exact workflow.
Recommended product for selected files: QILING Safe Disk Standard is suitable when you want a separate encrypted workspace without setting up a VHDX and BitLocker. It protects files placed inside its image, not the entire host disk. Choose BitLocker instead when your goal is to encrypt the whole Windows or USB volume.
Create and use a Safe Disk virtual drive
Step 1. Back up important files to separate storage. Install and open Safe Disk Standard, then choose its create-image function. Decide where the image file will live and make sure that drive has enough free space.
Step 2. Enter a location and name for the new .fvd image. Set its virtual disk size, then enter and confirm a strong password. For a new empty image, choose the create-time format option if your installed version requires it. Check the path and settings before clicking Create; do not format an existing image that contains files.
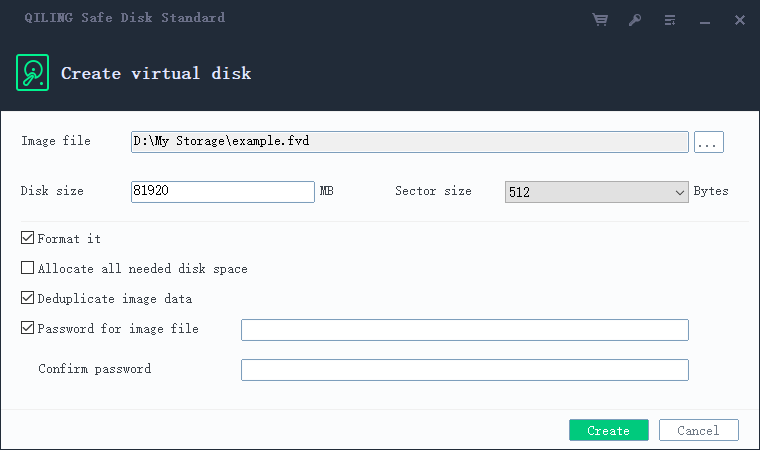
Step 3. When the new image appears in Safe Disk, select it and open the mount settings. Choose a drive letter that Windows is not using, enter the image password, and leave read-only mode off if you need to add files. Click Mount.
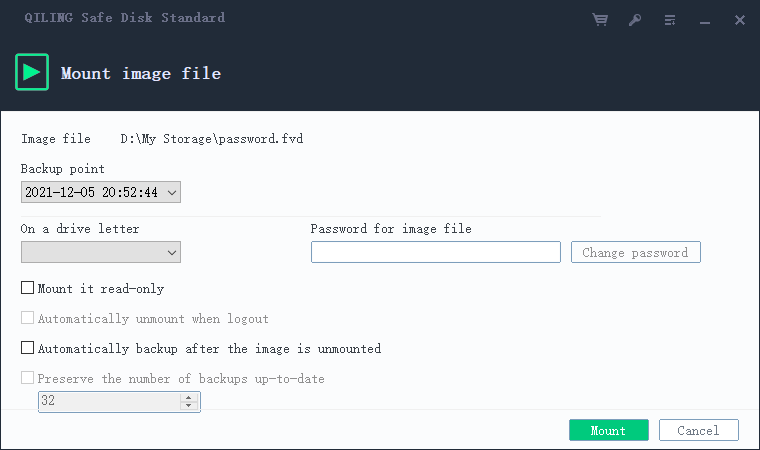
Step 4. Open the mounted drive in File Explorer. Copy a noncritical test file into it, close the file, and reopen it from the virtual drive. Then copy the selected private files and check a few of them. Files left outside the image are not encrypted by Safe Disk.
Step 5. Close documents on the virtual drive and choose Unmount in Safe Disk. Confirm that the drive letter disappears. Back up the closed .fvd file to a different device, keep the password separately, and test that the backup can be added and mounted before relying on it.
Related Articles
- Encrypted Container vs. BitLocker
Choose between protecting a selected set of files and encrypting an entire Windows volume. - Mount an Encrypted Virtual Drive
Open and safely unmount an existing Safe Disk image without formatting it. - Create a Secure Encrypted Backup Container
Size and manage a password-protected container built for backup data.
Products
Articles & Tutorials
- Data Recovery
- Data Backup
- File Recovery
- File Backup
- File synchronize
- System Backup and Restore
- Disk and Partition Clone
- Technical articles
- Disk Master Help
- Windows Deleted File and Disk Recovery Tutorials
- Windows File and Data Recovery Tutorials
- More Windows Tutorials for Install, Security, Files, and PC Tips
- Windows Boot, Repair, and Recovery Environment Tutorials
- Windows Backup Tutorials
- Windows Restore Tutorials
- Windows Clone and Migration Tutorials
- Windows Server Backup, Recovery, and Management Tutorials
- Windows Disk, Partition, and Storage Management Tutorials