How to Create an Encrypted Container on Windows 11
An encrypted container is a file that becomes a password-protected virtual drive when you mount it. It lets you keep selected documents together without changing the file system of your Windows 11 disk. QILING Safe Disk creates this type of container as an .fvd image; it does not encrypt every file on the host drive automatically.
Plan the container and protect your originals
Step 1. Decide which files need protection and estimate their total size. Choose a host disk with room for the container and future growth. A container protects files placed inside it; files left in Downloads, Desktop, or another ordinary folder remain outside it.
Step 2. Keep an independent backup of important originals before moving anything. Choose a unique, memorable passphrase and store it securely away from the container. If you lose access to the password, do not assume the encrypted files can be recovered.
Create the encrypted image
Step 1. Install and open QILING Safe Disk Standard from the official download. Open its create-image function. The product illustration below shows the create stage; controls can differ by version.
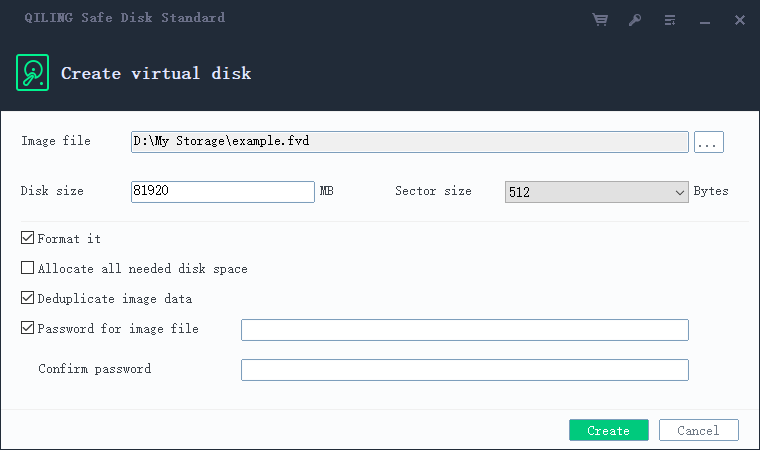
Step 2. Set the image-file location and name. Use a clear name ending in .fvd, such as PrivateWork.fvd. Check the path carefully: the file is stored on that host drive, and a backup of the host drive is not automatically a separate copy of the container.
Step 3. Set the virtual disk size to allow for the documents you plan to add. Leave unfamiliar sector-size and allocation settings at their defaults. For a new empty image, use the create-and-format option if the installed version requires it; never format a populated image to open it.
Step 4. Enter and confirm the image password, review the path, size, and formatting choice, then select Create. Wait until the image appears in Safe Disk's list. Creating an empty container does not move any existing documents into it.
Mount, test, and close the virtual drive
Step 1. Select the new image, choose an unused drive letter, enter its password, and select Mount. Leave read-only mode off when you need to copy files into the drive. If the letter is already occupied, choose another one rather than changing an existing drive.
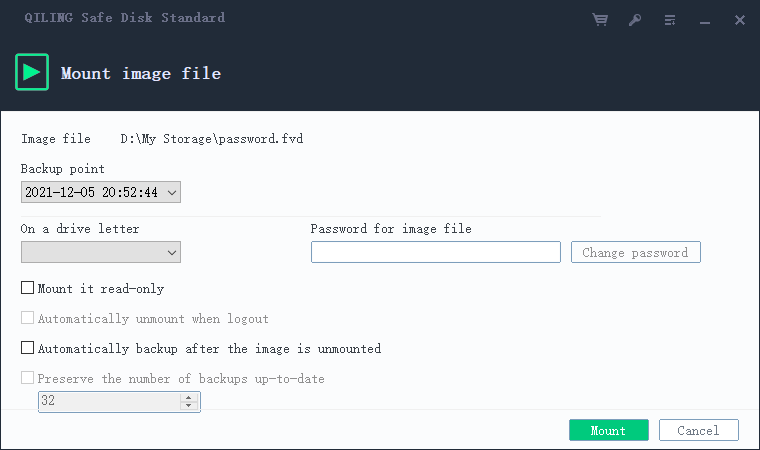
Step 2. Open the newly mounted drive in File Explorer. Copy one noncritical file into it, close the file, and reopen it from the virtual drive. Then copy the remaining selected files and check a few representative documents. Copying does not remove the unencrypted originals.
Step 3. Close programs using the virtual drive and select Unmount in Safe Disk. Confirm that the drive letter disappears from File Explorer. Back up the closed .fvd file to separate storage and test that you can add or mount the copied image before relying on it.
Keep access and backups safe
While the container is mounted, applications running under your Windows session can use its files. Unmount it when work is finished, lock your Windows session when away, and protect the host PC against malware. Deleting a plaintext original after copying it into the container is not the same as securely erasing all traces of that original; plan any removal separately.
The .fvd file is both your encrypted store and a file that can be lost or corrupted. Keep a tested copy on another device and record which Safe Disk version and password open it. To use the image again, follow the mounting guide.
Related Articles
- Password-Protect Files on a USB Drive
Place an encrypted container on removable storage and test it on another Windows PC. - Create a Password-Protected Virtual Disk
Compare a Safe Disk container with a Windows VHDX protected by BitLocker. - Create an Encrypted Folder in Windows 11
Folder-level EFS encryption for when only one directory needs protecting. - Create a Secure Encrypted Backup Container
Build a container sized for backup data and keep it verifiable over time.
Products
Articles & Tutorials
- Data Recovery
- Data Backup
- File Recovery
- File Backup
- File synchronize
- System Backup and Restore
- Disk and Partition Clone
- Technical articles
- Disk Master Help
- Windows Deleted File and Disk Recovery Tutorials
- Windows File and Data Recovery Tutorials
- More Windows Tutorials for Install, Security, Files, and PC Tips
- Windows Boot, Repair, and Recovery Environment Tutorials
- Windows Backup Tutorials
- Windows Restore Tutorials
- Windows Clone and Migration Tutorials
- Windows Server Backup, Recovery, and Management Tutorials
- Windows Disk, Partition, and Storage Management Tutorials