Your PC Ran into a Problem and Needs to Restart Windows 8 – Fix It
Quick Navigation:
- Part 1: How to Fix 'Your PC ran into a problem' if you cannot boot Windows in Safe Mode
- What is Safe Mode in Windows 8?
- Solution 1: Scan and Repair Windows System Files
- Solution 2: Modify Memory Dump Settings
- Solution 3: Perform System Restore
- Part 2: Solutions to 'Your PC Ran into a Problem' if you cannot boot Windows in Safe Mode
- Solution 1: Perform System Restore
- Solution 2: Perform System Image Recovery (if you have system image backup)
- Solution 3: Restore Registry Configuration
- Part 3: Solutions to 'Your PC ran into a problem and needs to restart' loop
Windows 8 error "your PC ran into a problem and needs to restart" can be caused by various issues, including a corrupted file system, overheating, virus attacks, force shutdowns, and registry file deletions. To resolve this problem, you can try the following solutions.
Part 1: How to Fix 'Your PC ran into a problem' if you cannot boot Windows in Safe Mode
What is Safe Mode in Windows 8?
Windows 8 Safe Mode is a diagnostic mode that helps fix most problems and removes rogue programs. It can be accessed by booting the computer in this mode, which can be done by following specific steps. This mode is often used as a solution when the computer says it has ran into a problem and needs to restart.
1. To enable the Charms Bar on a Windows PC, move your cursor to the top-right or top-left corner of the screen, depending on your Windows version. This will cause the Charms Bar to appear, allowing you to access various features and settings.
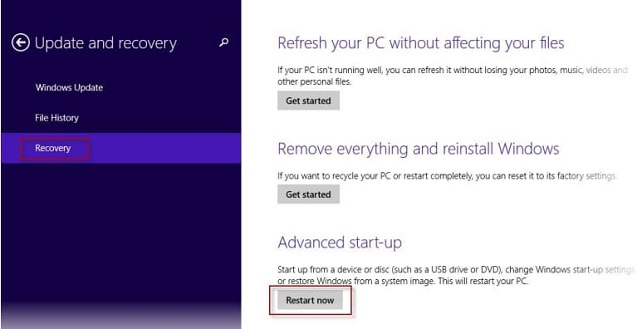
2. To reset Windows 10, go to Settings, then Change PC Settings, followed by Update and Recovery, and select Recovery. From the menu, click Restart Now.
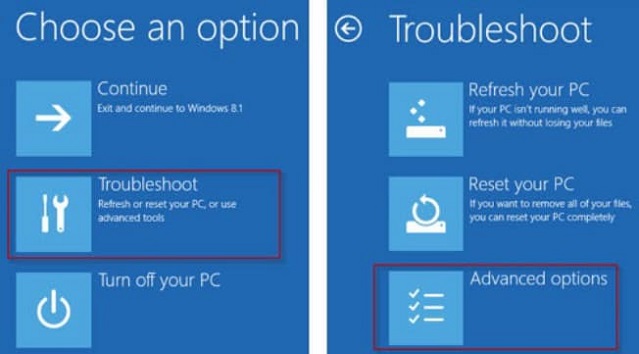
3. To troubleshoot, select the "Troubleshoot" feature, then click "Advanced Options", followed by "Start-up Settings", and finally choose "Restart".
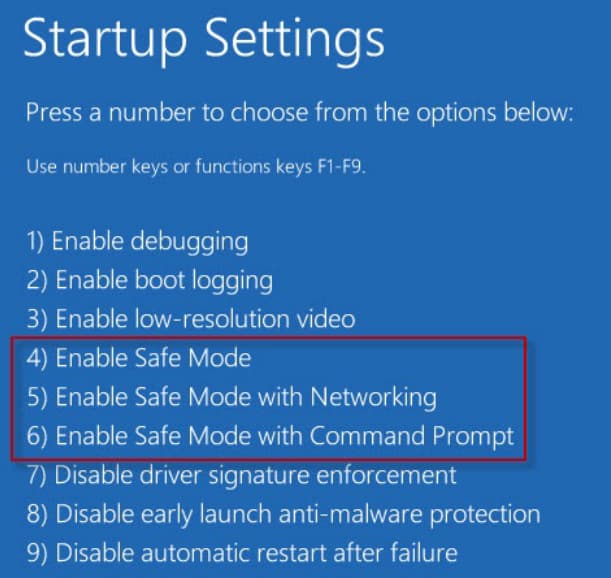
4. You can choose the different options available for Safe Mode by selecting the preferred option using F keys according to the number.
Solution 1: Scan and Repair Windows System Files
You can utilize the built-The System File Checker (SFC) application is used to scan and repair corrupted system files in the operating system. This tool can only be utilized when logged in as an Administrator.
1. To access the Windows 8 Task Manager, first log in to Windows 8 as an Administrator. Then, press the Windows and C keys together to open the Charm bar, which will provide access to the Task Manager.
2. In the search field, input command prompt or cmd.
3. To run the System File Checker (SFC) command, right-click on the Command Prompt in the output and select "Run as Administrator". Enter the password, and then type the command "sfc /scannow" in the Command Prompt to scan and replace corrupted system files.
4. The command will scan for corrupted files in the system.
Solution 2: Modify Memory Dump Settings
In Windows, a memory dump is a collection of information gathered when an error occurs, containing the memory at the point of the crash. This data helps diagnose the problem, and in Windows 8, different types of memory dumps can be accessed from the Control Panel settings.
1. Navigate to Control Panel and select System and Security features.
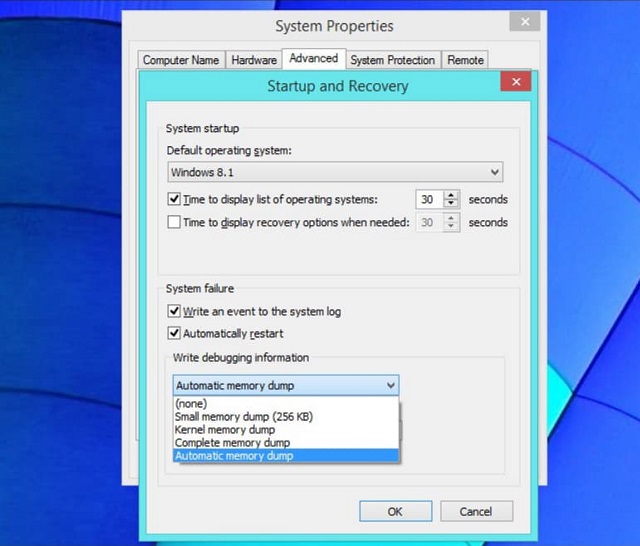
2. To access the Startup and Recovery settings, follow these steps: Click System, then Advanced System Settings from the sidebar, followed by clicking the Advanced tab, and finally, click Settings under the Startup and Recovery tab.
3. Under System Failure, enable both the options and ensure that Write debugging information is set to Automatic memory dump.
Solution 3: Perform System Restore
System Restore is a solution to fix the issue "Windows 8" problem. This built-in feature captures system files and settings at regular intervals, which can be set to daily, weekly, or customized. By initializing a restoring point, you can set your computer back to a previous date and avoid the problem.
1. To access the System settings, go to the Control Panel, and from there, choose the System option. If the System option is not visible, click on the button to select between large and small icons.
2. Click the System Protection option in the new window, which will help the system open the Windows System Restore screen.
3. To restore Windows 8 from a previous state, select the System Restore button from the window. Windows will then prompt you to choose between restoring from a point provided by Windows 8 or selecting a restore point from the available list. Simply make your selection and click the Next button.
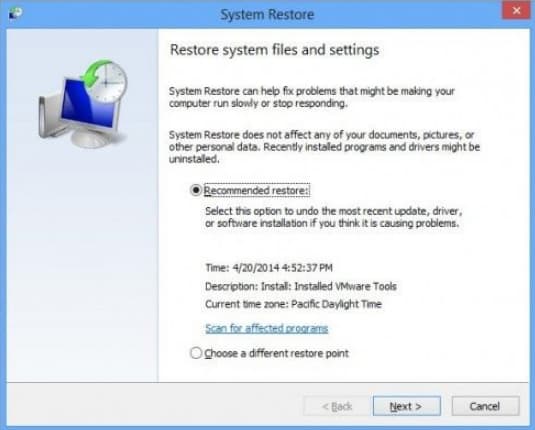
4. Windows will display a list of applications and drivers that will be affected by the system restore, allowing you to review and note any drivers that need updates before proceeding.
5. Press the Restore button to start the restoration process, which should resolve the issue you were experiencing.
Part 2: Solutions to 'Your PC Ran into a Problem' if you cannot boot Windows in Safe Mode
If your PC is experiencing issues installing Windows 8 and you're encountering a problem that requires a restart, even after booting in safe mode, try the following solutions.
Solution 1: Perform System Restore
To use System Restore, first, click on the Start menu and type 'system restore' in the search bar. Then, click on the 'Create a restore point' option. Next, select the restore point you want to go back to and click 'Next'.
Before attempting to use system restore, try using Qiling Disk Master to back up important files, folders, or even a whole hard drive, as system restore can permanently delete some files.
1. Save all your work before proceeding with the procedure and close any running applications. This is to prevent any potential data loss or system crashes that may occur during the process.
2. In the Start screen, type Restore Point and press Enter.
3. Click the "Create a Restore Point" option from the window that appears.
4. Click the System Restore button.
5. Click Next.
6. Before rolling back to a previous point, choose the point you want the system to restore and click the Scan for Affected Programs button or link.
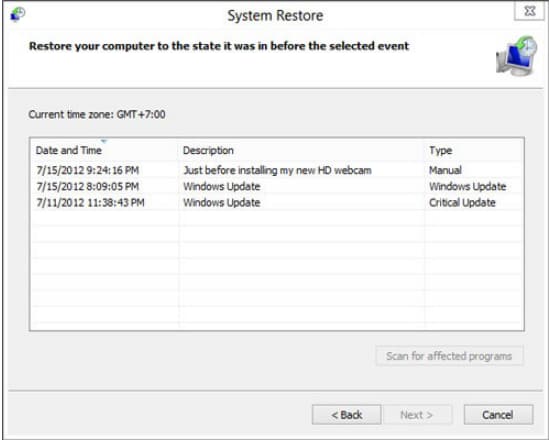
7. If you don't see any major changes or problems indicated by Windows, you can close the message and click Next.
8. The operating system will automatically restore the system to a previous state, and you can follow the on-screen instructions to close any running programs and click Finish to allow the process to begin.
Solution 2: Perform System Image Recovery (if you have system image backup)
If you have a system image backup, you can restore your PC to its previous state without reinstalling Windows 8. All you need is the image copy of your operating system, and you can follow the steps below to restore your computer.
1. To launch the More PC Settings window on Windows, press the Windows key and the I key simultaneously. This will open the More PC Settings window, which provides additional settings and options for your computer.
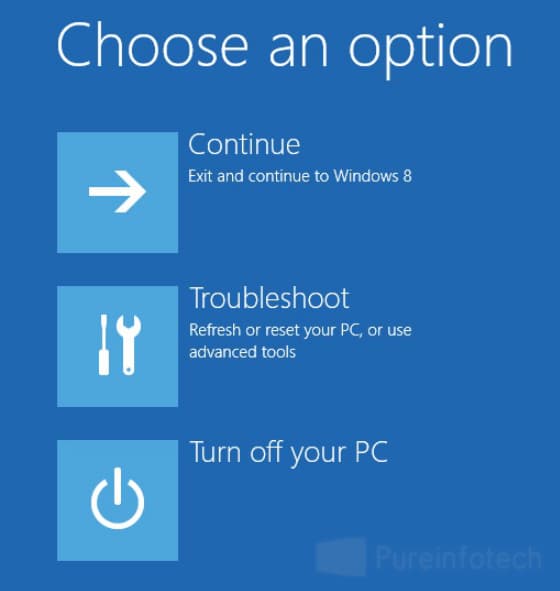
2. To access the Advanced Startup options, go to the General tab in the left pane, click on Advanced Startup, click Restart Now, and then select Troubleshoot.
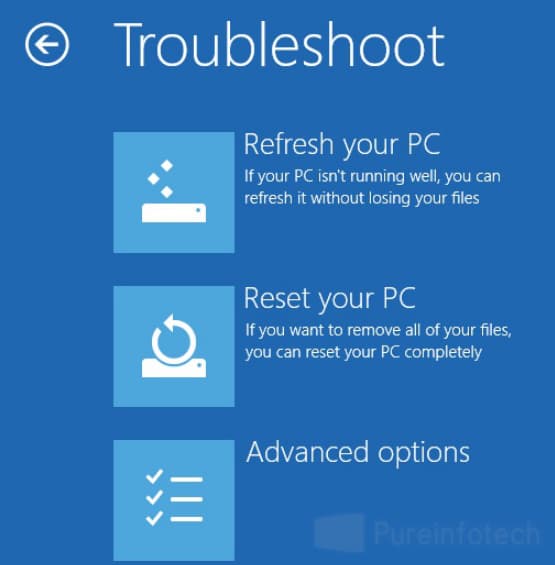
3. To restore your computer to a previous state, click on Advanced Options, then select System Restore, and finally choose the System Image Recovery option.
4. After restarting, the System Image Recovery environment will load. Enter your account credentials and click Continue.
5. Now, you will see the Re-image your computer wizard appears on the screen. If you have the image stored on an external drive, the tool will automatically identify and update it to the newest version. If you want to use a different system image, click Select a system image and press Next.
6. To install a driver, click on the Advanced options, then select the option to Install a Driver, and you can connect to a remote network using your username and password.
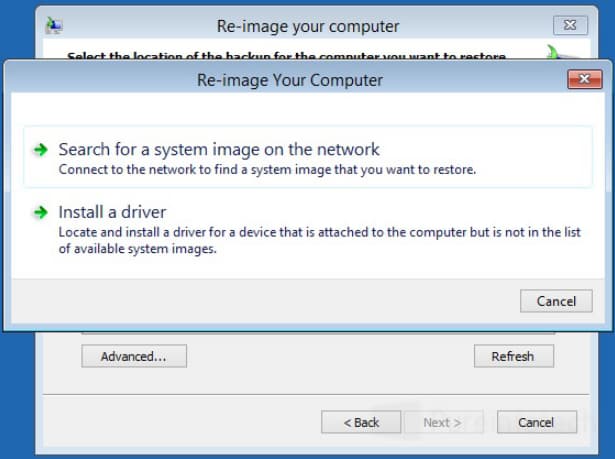
7. To restore a corrupted image, start by entering your network path and clicking OK. Then, select the image file you want to restore and click Next. Next, choose the preferred image and click Next again to complete the process.
8. Once you've completed the steps, you'll see a final summary of the image. Click Finish to confirm your completion. After restarting your computer, you should notice that it's free from the startup error.
Solution 3: Restore Registry Configuration
To resolve the issue on your Windows 8 PC, restart it by following these simple steps. First, press and hold the Power button on your computer until it shuts down.
1. Press Windows and C together to launch the Charm Bar.
2. To access the Registry Editor, type "regedit" into the search bar, click "Yes" if prompted by User Account Control, and select "Computer" from the left-hand menu.
3. To create a backup of your Excel file, go to File, click Export, enter the desired file name, select "All" under the range selection, choose a location to save the backup, and click Save.
Part 3: Solutions to 'Your PC ran into a problem and needs to restart' loop
The solution to the Windows 8 restart loop is to restore Windows 8 using Windows Installation Media, which can be downloaded onto a DVD or USB thumb drive with a reliable internet connection. To do this, you'll need to change the boot sequence settings from the Start menu to allow the computer to boot from the created Windows installation media, which can be a DVD or a USB drive.
The system will begin the installation procedure, taking necessary time to complete the clean installation. This process fixes major troubles that couldn't be solved using other methods. Before proceeding, ensure a backup of essential files, as the process may lead to operating system crashes. The installation media option should be used with caution, and a backup is crucial to protect your computer's health and documents.
If your PC encounters a problem and needs to restart, you might accidentally lose files. Don't worry, you can try Deep Data Recovery to recover them. The process is simple: select the file types and drive to scan, then scan the drive, and finally preview and recover the files. It's a straightforward 3-step process.
Related Articles
- How to Fix SD Card Is Blank or Has Unsupported File System
- [Fix] Convert External Drive to APFS Failed/Greyed Out/Not Available
- 2 Ways to Fix Recycle Bin Corrupted in Windows 8/7/10
- How to Repair Corrupted External Hard Drive in Windows 7/10
- [Solved] Recycle Bin Not Showing Deleted Items
- How to Repair Corrupted/Damaged MP4 Video Files
- How to Easily Clone SSD to HDD in Windows 8/8.1? (4 Steps)
You will learn how to easily clone SSD to HDD or clone HDD to SSD in Windows 8/8.1 with the help of professional disk cloning software - Qiling Disk Master Professional.