How to Recover Hidden Files in USB using CMD [Full Guide]
How do I recover hidden files on my USB?
I stored quite a lot of experimental data and files on my USB. Today, I plugged this USB into a computer in the university computer lab, but all the files were gone. I think I had a virus that was making all my files inaccessible. My colleagues say files can be unhidden through Command Prompt. How can I recover hidden files in USB using CMD? Please help!
The USB, a widely used portable storage device, allows for a plug-and-play interface between a computer and peripherals. However, despite its convenience, USB devices can be vulnerable to virus attacks when plugged into a computer, making it essential to know how to make a USB show hidden files and find lost files on the device.
Why do files get hidden in USB?
Before diving into how to unhide files using CMD, let's briefly explore the common causes that lead to USB data being hidden. These can include accidentally deleting files, using a USB drive with a file system that's not compatible with your computer, or even viruses and malware that can hide or delete files without your knowledge.
▪ Files are hidden by system. The system will hide the files that come with the USB file system to protect them from being damaged or deleted by the user.
▪ Files are hidden due to virus attacks. It's possible that some or all of the file attributes have been modified to be hidden due to a virus or other malicious program when the USB is plugged into the computer.
▪ Human error. You may accidentally hide your USB files or the USB data is deleted or formatted due to an operation error, resulting in lost data.
▪ USB hardware failure. The files on the USB drive are not being recognized due to a damaged USB port or a faulty USB drive memory chip.
Part 1. Use attrib command to recover hidden files in USB using CMD
The attrib command in Windows allows you to display and modify the attributes of files and directories, including read-only, archive, hidden, and system. This can be useful in situations like when a file stored on a USB drive disappears due to a virus infection, and you need to change its attributes to show the hidden directory. The attrib command is available in the Command Prompt of all Windows operating systems.
The attrib command is used to change file attributes. The syntax is: `attrib [-h [-r [-s] [/s [/d] drive-letter: [path] file]`. The parameters used in this command are: `-h` to hide the file, `-r` to read-only, `-s` to system, `/s` to set the attribute for the specified files, `/d` to delete the attribute for the specified files.
Attrib command parameter meanings:
- -h Clears the Hidden file attribute.
- -r Clears the Read-only file attribute.
- -s Clears the System file attribute.
- This command applies attributes and command-line options to matching files in the current directory and all of its subdirectories.
- /d Applies attrib and any command-line options to directories.
To recover hidden files from a USB drive using the Command Prompt, first open Command Prompt as an administrator. Then navigate to the USB drive by typing `cd /d <drive>:` and replacing `<drive>` with the actual drive letter.
Step 1. To get your USB recognized by a Windows computer, plug it into the PC and check if it's detected. If not, you can refer to the page on recovering data from an unrecognized USB flash drive for troubleshooting steps.
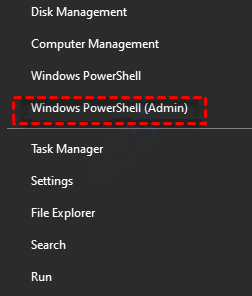
Step 2. To access the Power User Menu, press the WIN key and the X key together. Next, click on Windows Powershell (Admin) and confirm with Yes on the User Account Control pop-up screen.
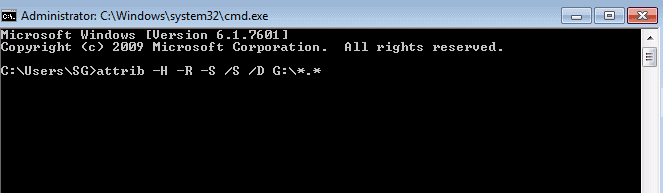
Step 3. To hide, read-only, and system attributes from all files and subfolders on a USB drive, input the attrib command and replace the "drive letter" with your USB drive letter, such as attrib -h -r -s /s /d G:\*.*. Then, press Enter.
Step 4. After the command is finished, you can open the USB to see if all hidden files are visible now.
Part 2. Additional ways to show hidden files in USB
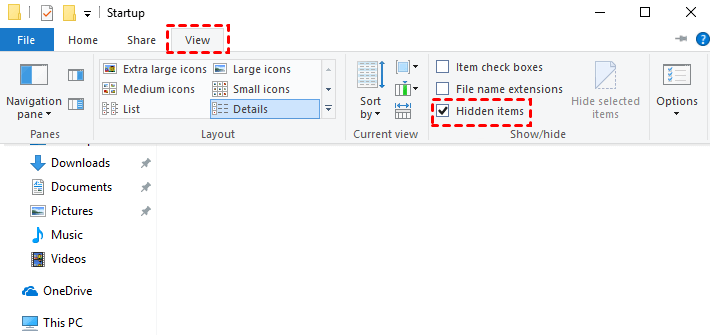
To display hidden files on a USB drive without using the Command Prompt, you can use the File Explorer settings. To do this, open File Explorer, navigate to the USB drive, and click on the "View" tab in the top menu bar. From the "View" tab, select the "Show" dropdown menu and choose "Hidden items" to make all hidden files visible on the USB drive.
Way 1. From File Explorer
You can directly unhide folders hidden by viruses from Windows File Explorer.
Step 1. Plug in your USB to computer and open the This PC or My Computer app on Windows.
Step 2. Click View on the top and check the Hidden items option to view hidden files.
Way 2. Through Control Panel
To recover hidden files in a USB drive via Control Panel, follow these steps. First, click on Start and then select Control Panel. Next, click on System and Security, then click on File Explorer Options.
Step 1. Right-click the Start button, then select Control Panel.
Step 2. Head to Appearance and Personalization and choose File Explorer Options.
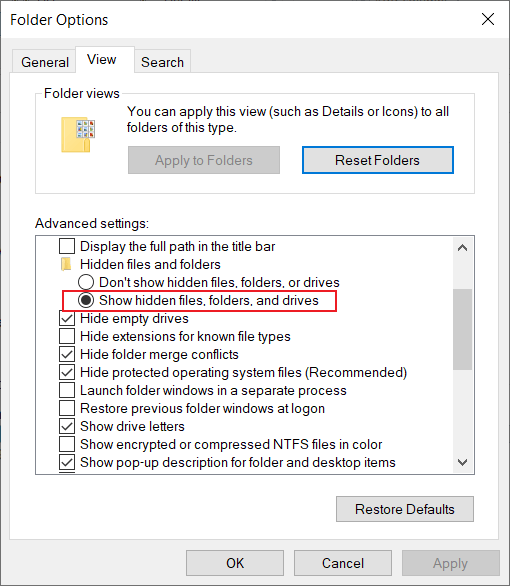
Step 3. To view hidden files, folders, and drives on Windows, tap the "View" tab, then check the box next to "Show hidden files, folders, and drives." Optionally, you can also uncheck the box next to "Hide protected operating system files" if desired.
If all methods to retrieve hidden files on a USB drive fail, it's possible that the files were maliciously deleted by a virus. In this case, you can try recovering the lost data from a backup or use data recovery software to recover the USB files.
Part 3. Easiest way to recover lost files from USB
Deep Data Recovery is a professional tool that offers powerful data recovery features, allowing users to easily and completely recover lost files from USB drives due to virus attacks, accidental deletion, or formatting.
This tool can recover various types of files from different storage devices, including USB drives, internal and external hard drives, and SSDs, as well as SD cards, and can also aid in recovering data from partition loss and system crashes.
Specific USB data recovery steps are as follows:
Step 1. Connect the USB drive you need to recover data to your computer, then download and run Deep Data Recovery software.
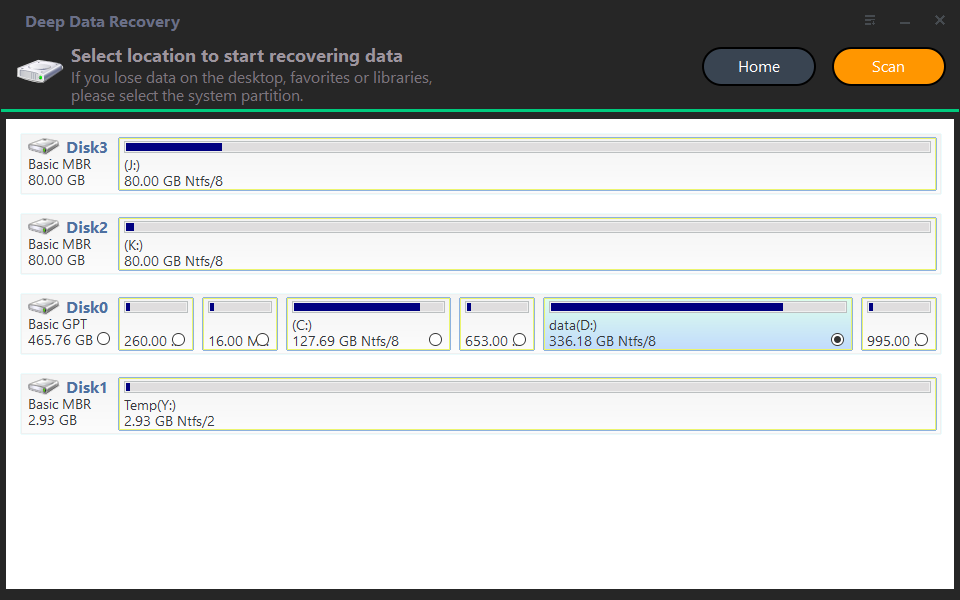
Step 2. Hover the mouse over the drive saved deleted files before, and click Scan to scan.
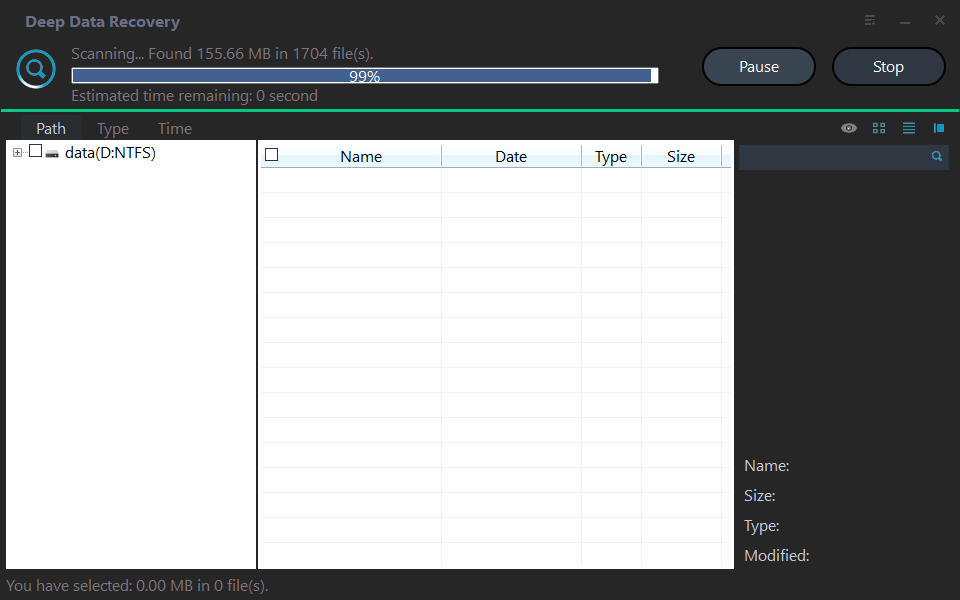
Step 3. The wizard will quickly scan the USB drive and list the found data in real-time.
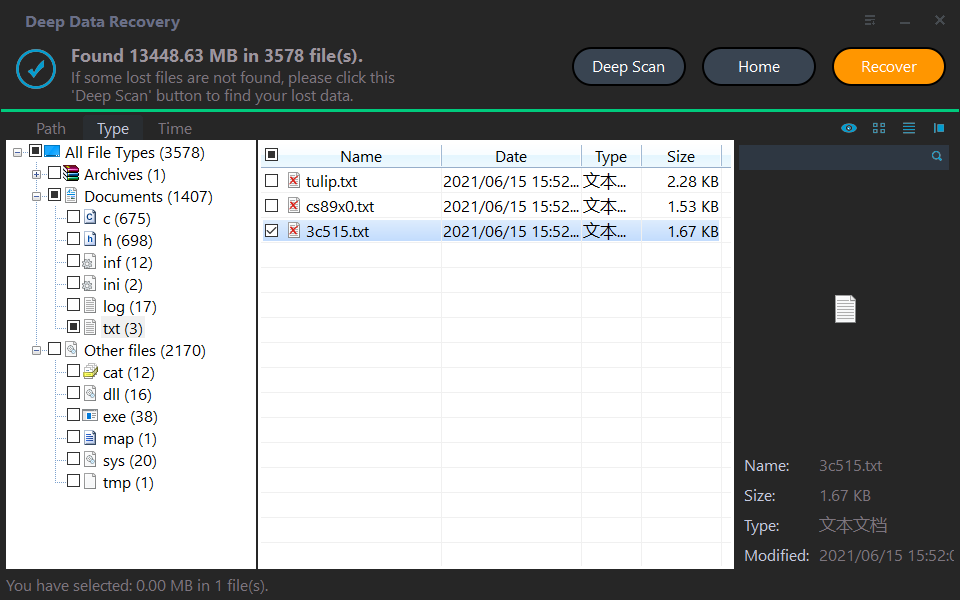
Step 4. View and select required files. And then, click Recover.
Conclusion
If files are missing on your USB drive, first check whether they are hidden. You can use Command Prompt, File Explorer, or Control Panel to show hidden files. If files were deleted or lost, use data recovery software before formatting the USB drive.
Remembering to back up your data is crucial, even though USB data recovery is relatively easy. To make the process simpler, consider using a user-friendly and free backup tool like Qiling Disk Master to create copies of your important data with ease.
Related Articles
- [Full Guidance] How to Recover Data from HDD
Having no idea on how to recover data from HDD? In this post, we will explore the steps you can take to retrieve your precious files/data from a malfunctioning HDD. - Recover Data After Format: Complete in Seconds
Formatting a drive does not permanently erase data. Learn how to recover data after format using professional data recovery software. Act quickly to maximize your chances of successful recovery. - Recover Files from SSD: Easy Steps to Retrieve Your Lost Data
In this post, we will explore a powerful Windows data recovery tool to recover files from SSD on Windows 11, 10, 8, and 7, ensuring you have the best chance of retrieving your valuable data. - The Best Data Recovery Software to Recover Deleted File
It's common to accidentally delete some important files on Windows computer. In such a case, you may want to find the professional data recovery software to recover deleted file. Here you will get a best file recovery tool and learn how to use it. - HP Pen Drive Recovery – How to Recover Files from HP Pen Drive
Get the right HP Pen drive recovery software and learn how to recover files from HP pen drive on Mac or Windows PC with this free download. - Memory Card Recovery - Recover Files from Memory Card
Best memory card recovery software to restore documents, photos, videos, and other files from memory card after formatting, unexpectedly deleting or being RAW. You can free download this recover memory card Mac or Windows tool and gets your lost files back now!