Recover Items Deleted from Recycle Bin (Max 3 Steps)
- Can you recover items deleted from Recycle Bin?
- How to recover items deleted from Recycle Bin effortlessly (with software)
- How to recover items deleted from Recycle Bin without software
- Method 1. Recover deleted files from previous version
- Method 2. Restore things deleted from Recycle Bin via Windows Backup
- Method 3. Recover files after deleting from Recycle Bin using File History
- Method 4. Restore items deleted from Recycle Bin using OneDrive
- Method 5. Restore deleted things from Recycle Bin via Windows File Recovery
- How to stop files from being deleted from Recycle Bin?
The Recycle Bin provides a second chance to recover deleted files, but some users intentionally delete items from it, either manually or through automated processes like Storage Sense or Task Scheduler.
If you've accidentally deleted files or emptied the Recycle Bin, there's still hope to recover them. You can try using data recovery software, such as Deep Data Recovery Wizard, to scan your computer's hard drive and retrieve deleted files. Alternatively, if you've recently emptied the Recycle Bin, you can also check the Recycle Bin's "Previous Versions" or "Shadow Copies" to see if any deleted files are still available. It's essential to act quickly, as the longer you wait, the lower the chances of recovering deleted files.
Continue to read this article and get the answer below.
Can you recover items deleted from Recycle Bin?
Unfortunately, permanently deleted files on Windows 10 can be challenging to recover, especially if they were deleted using the Shift + Delete keys or from the File Explorer's context menu. However, you can try using data recovery software such as Deep Data Recovery Wizard, Recuva, or Disk Drill to scan your hard drive and attempt to recover the deleted files. Be aware that the success of file recovery depends on various factors, including the amount of data written to the disk after deletion and the effectiveness of the recovery software used. If the files were deleted recently, you may have a higher chance of recovery.
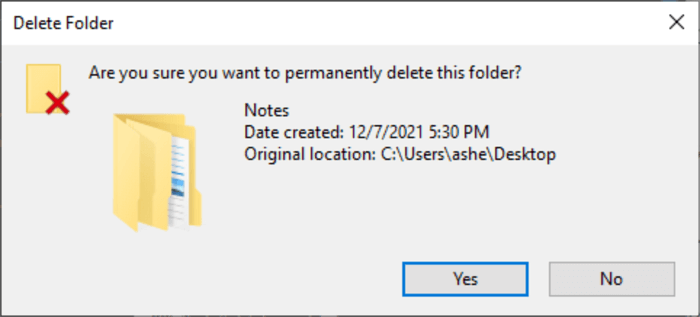
When deleting a file in the Recycle Bin, it removes the file's pointer and makes it invisible, but the file itself remains on the disk. This means the space occupied by the deleted file is marked as free, waiting for new data to arrive. However, if you don't add new data or continue using this hard drive, it is possible to recover items deleted from the Recycle Bin using proven methods.
How to recover items deleted from Recycle Bin effortlessly (with software)
Deep Data Recovery is a Windows application that can efficiently and cleanly recover deleted files, even from the emptied Recycle Bin, using its powerful recovery technologies.
You can recover lost files, such as office documents, images, videos, and compressed files, within just a few simple clicks.
- Two crucial scanning algorithms: Deep Data Recovery allows users to quickly scan and deeply scan a hard drive to recover deleted or lost data, resulting in a high success rate of data recovery.
- Easy. The interface is straightforward, making it easy for even novices to get started quickly. The entire process is a simple 3-step process.
- Complete. 200+ types of data, including documents, images, audio and video files, and compressed archives, can be restored with their original filename, path, format, and quality preserved.
- Efficient. The file filter feature allows you to quickly locate desired files by filtering them based on specific criteria, and preview them to confirm the selection.
- Compatible. You can recover data from a hard drive in Windows 11, 10, 8, 7, and Windows Server using various file systems, including NTFS, FAT32, exFAT, and ReFS.
To start an easy Windows data recovery, follow the guide: first, stop using the device immediately to prevent data overwriting; then, check if the device is still accessible and try to recover data from it; if not, use a data recovery software like Deep Data Recovery Wizard to scan the device and recover lost files; finally, save the recovered files to a safe location to avoid further data loss.
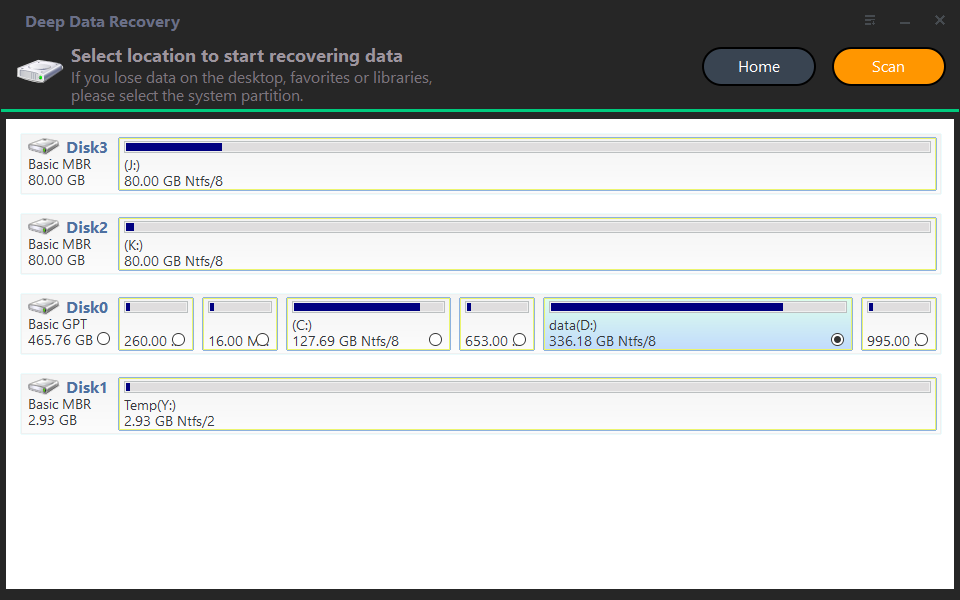
Step 1. Start the program > Hover the mouse over the drive and click Scan to scan the drive.
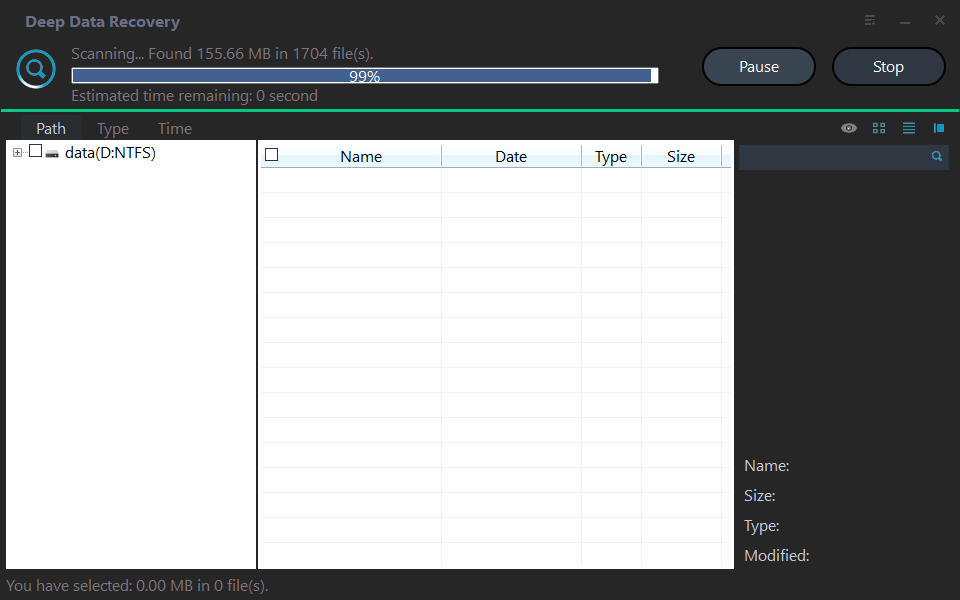
Step 2. The software will automatically start a Quick Scan and Deep Scan to search for deleted or missing files. Once found, it will list them in the following window, allowing you to select the desired files to recover during the scanning process.
To recover deleted or lost files, you can either use the "Restore" option in the software or manually search for the files in the system's Recycle Bin or Trash. Both methods can help you retrieve the files you need, but the "Restore" option is often more efficient and convenient.
✦ Through sidebar directories: Expand Deleted files, go to the original location of deleted files, and select them.
✦ Use the file filter feature: Click the Filter feature, displayed as a funnel-shaped button, and select Type > Documents. Then, type the file name or .xlxs in the search box to narrow it down.
Step 3. After finding the deleted files in the Recycle Bin, double-click to preview them. Then, click "Recover" to save the files to a new location, ensuring they aren't overwritten.
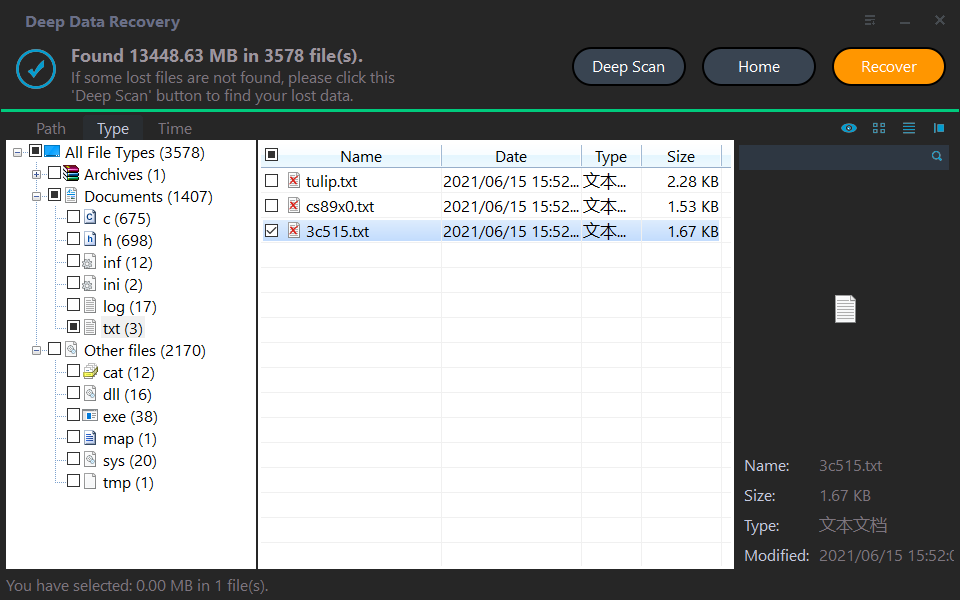
This tool allows users to recover lost files such as photos, videos, charts, and texts, making it easy to restore deleted Excel files from hard disks.
How to recover items deleted from Recycle Bin without software
You can recover deleted items from the Recycle Bin without using any software, and there are several practical ways to do so.
Method 1. Recover deleted files from previous version
The previous versions of folders and files can be restored to get them back to an earlier state, thanks to Windows 10 or 11 automatically creating copies as restore points.
Step 1. Go to File Explorer and locate the folder where your deleted files used to be.
Step 2. Right-click the folder and select Properties.
Step 3. In the Previous Versions tab, select a folder version based on date and time, and then click Open to confirm it.
Step 4. Once confirm the desired version, click Restore.
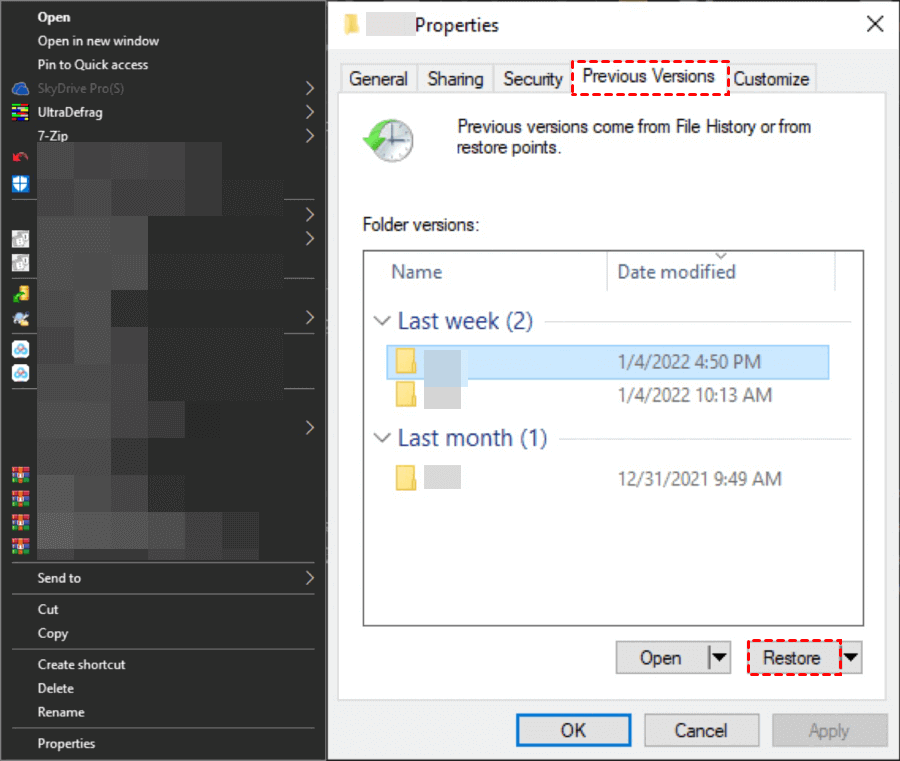
Then you could get files back into the folder.
Method 2. Restore things deleted from Recycle Bin via Windows Backup
If files are permanently deleted from the Recycle Bin, you can use the Backup and Restore feature of Windows, but only if you had created a backup of your files beforehand. Otherwise, this method will be ineffective.
Step 1. To access the Backup and Restore feature in Windows 7, navigate to the Control Panel, then click on "System and Security", and finally select "Backup and Restore (Windows 7)".
Step 2. Click Restore my files.
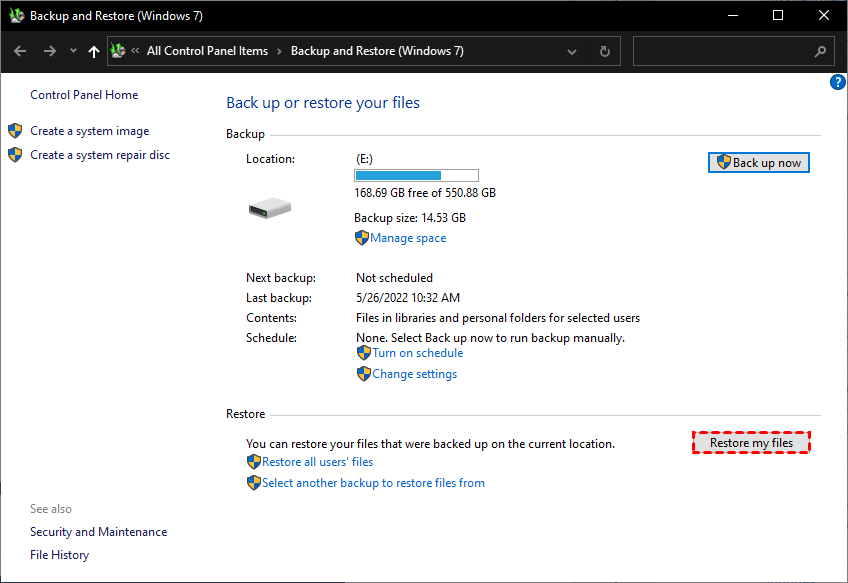
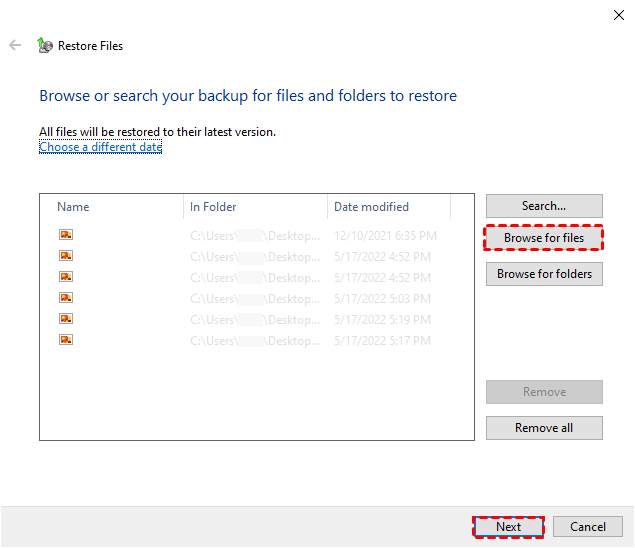
Step 3. Click Search, Browse for files or folders to locate deleted files > Next.
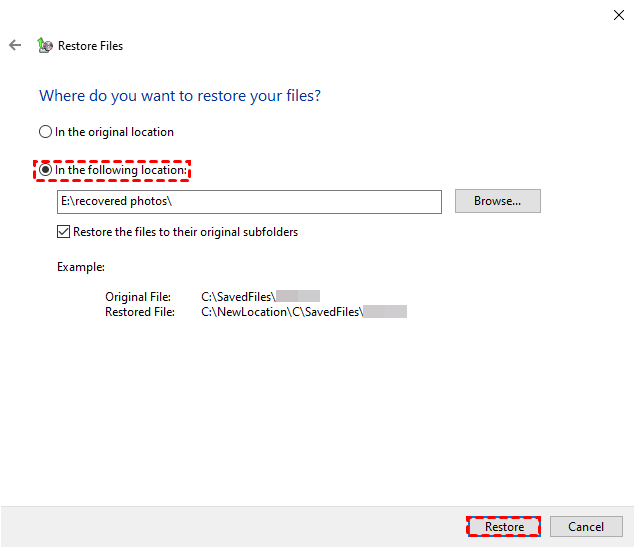
Step 4. Choose a preferred location to store the recovered files, then click the "Restore" button.
You can browse for folders to recover a deleted folder on desktop.
Method 3. Recover files after deleting from Recycle Bin using File History
File History is a Windows feature that automatically backs up files to an external drive, allowing users to easily recover deleted files from the Recycle Bin if it's enabled in advance.
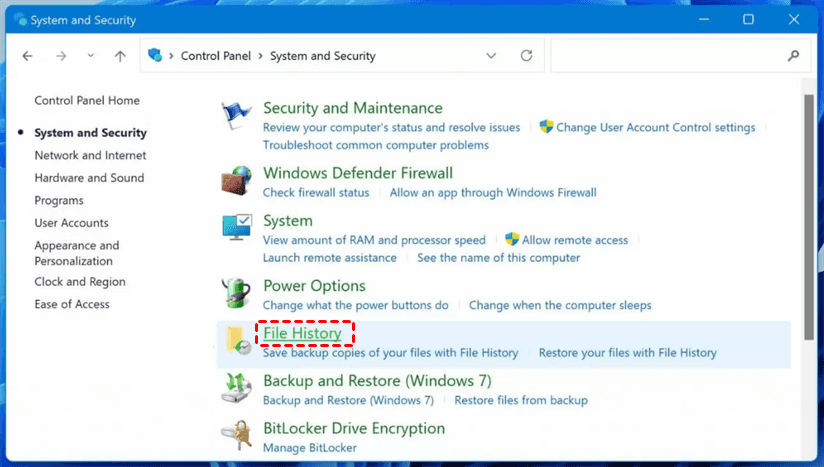
Step 1. Go to Control Panel > System and Security > File History.
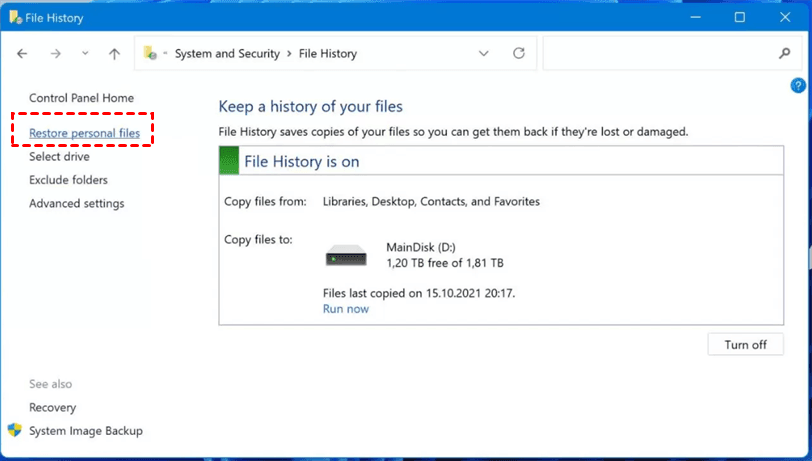
Step 2. Click the Restore personal files option.
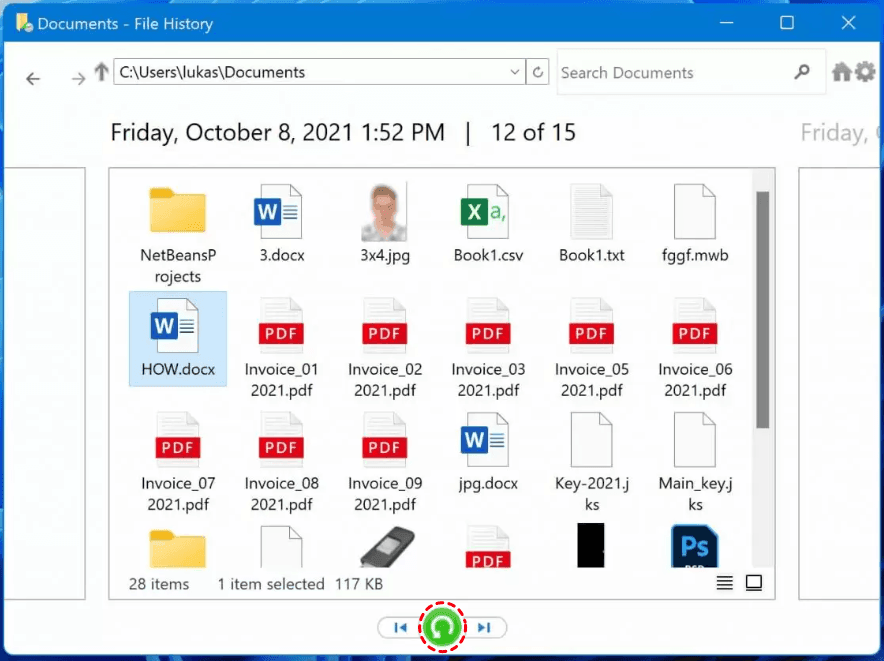
Step 3. To recover deleted files, click the left arrow to access the Recycle Bin, and then click the green restore button to recover the desired files.
Method 4. Restore items deleted from Recycle Bin using OneDrive
Microsoft has a feature in Windows 10 or 11 called "Back up to OneDrive" that automatically backs up files to OneDrive and allows for the restoration of deleted files. This feature can be enabled in the backup settings.
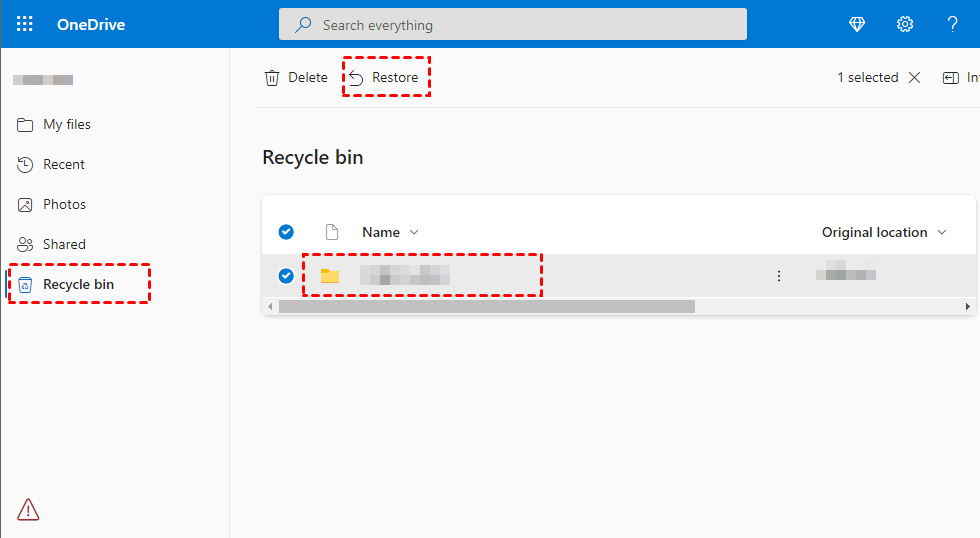
Step 1. Open a web browser and go to https://onedrive.live.com/.
Step 2. Sign in to your Microsoft account.
Step 3. Search the deleted files in OneDrive. Select and click Download to restore them locally.
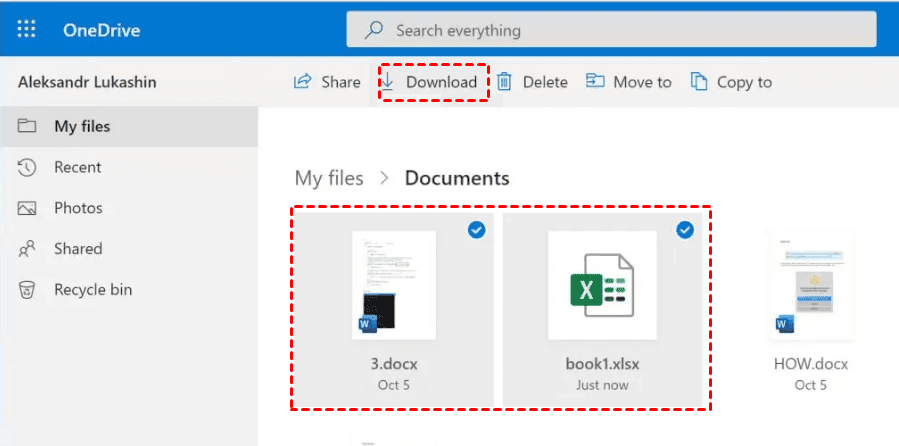
If you can't find deleted files, they may have been permanently deleted from OneDrive. Check the Recycle Bin folder to recover them. If they're not there, they're likely gone for good.
Method 5. Restore deleted things from Recycle Bin via Windows File Recovery
Windows File Recovery is a command-line tool from Microsoft that helps recover permanently deleted files or restore files from the Recycle Bin after emptying.
Using this tool can be challenging due to its lack of a graphical user interface, requiring users to navigate complex commands to achieve their desired outcome.
Now, let's figure out these first.
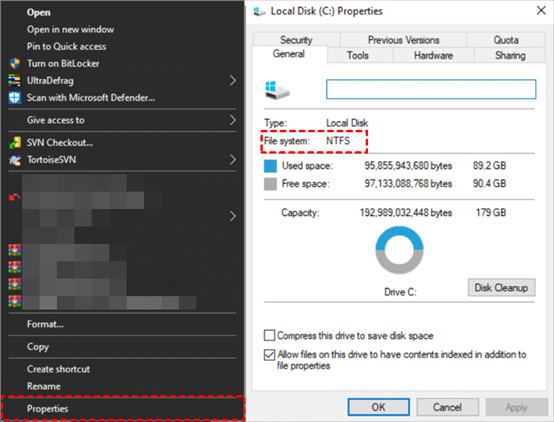
🔷🔹To check the file system:
To recover lost files, go to Start, click on This PC, right-click on the drive that contains the lost files, and select Properties.
🔷🔹 Select a recovery mode:
| File system | Scenarios | mode |
| NTFS | Deleted recently | Regular |
| NTFS | Deleted for a while | Extensive |
| NTFS | Formatted disk | Extensive |
| NTFS | corrupted disk | Extensive |
| FATandexFAT | Any | Extensive |
🔷🔹 Select one or more switches:
| Switches | Meaning | Supported mode(s) |
| /n | You can filter the scan range by specifying a specific file with its name, path, type, etc. to search for. | All |
| /y: | Recovers specific extension groups. | Signature |
| /k | Recovers system files. | NTFS Segment |
| /segment | Segment mode; recovers files under NTFS drives using file record segments. | Segment |
| /signature | Signature mode; recovers files under all file system types using file headers. | Signature |
| /u | Recovers undeleted files, for example, from the Recycle Bin. | NTFS Segment |
You can also refer to how to use Windows File Recovery to get more detailed instructions on recovery modes and switches.
Then, check out the steps as follows.
- Notes:✎...
- If no recovery mode is specified, the Regular mode will be used by default.
- The source and target drives should be different. The source drive, where your files are lost, cannot be the same as the target drive, where you choose to store the recovered files.
- If Windows File Recovery failed to create the destination folder, please get help.
Step 1. Install Windows File Recovery in Microsoft Store.

Step 2. Run it > input the command:
winfr source-drive: destination-drive: [/mode] [/switches]
To restore a deleted zip file from the Recycle Bin to a different drive, use the command "undelete C:\*.* /n" with the wildcard "*" and the "/n" switch, which will search for files on the C: drive and display their names without actually restoring them. Once you find the desired file name, you can replace the "*" with that name and remove the "/n" switch to restore the file to the E: drive.
winfr C: E: /regular /n \C:\Recycler\*.zip
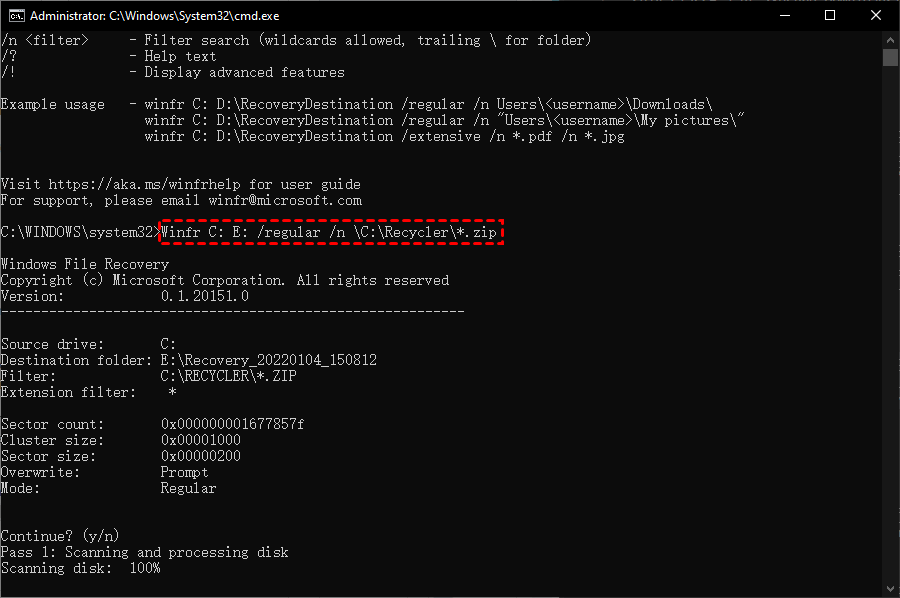
Step 3. Press the "y" key to continue and wait for the process to finish, resulting in a recovery folder being created in the destination drive.
- Firstly, Different backup features, such as previous versions, Backup and Restore (Windows 7), etc., could be utilized.
- Then, If you're familiar with commands, the official tool - Windows File Recovery can also help.
- If you're struggling with complex commands to recover deleted files from the Recycle Bin, you might consider using Deep Data Recovery, a user-friendly tool that can help you recover files easily.
🔗To recover deleted files from the Recycle Bin, open the Recycle Bin, check whether the files are still there, right-click the needed files, and choose "Restore". If the files are no longer in the Recycle Bin, stop using the affected drive and scan it with file recovery software.
How to stop files from being deleted from Recycle Bin?
If you're experiencing issues with files being automatically deleted from the Recycle Bin, consider disabling features like Storage Sense or Tsk Scheduler that remove files manually and intentionally. Alternatively, you can enable automatic backups to prevent file loss.
Method 1. Disable the Storage Sense
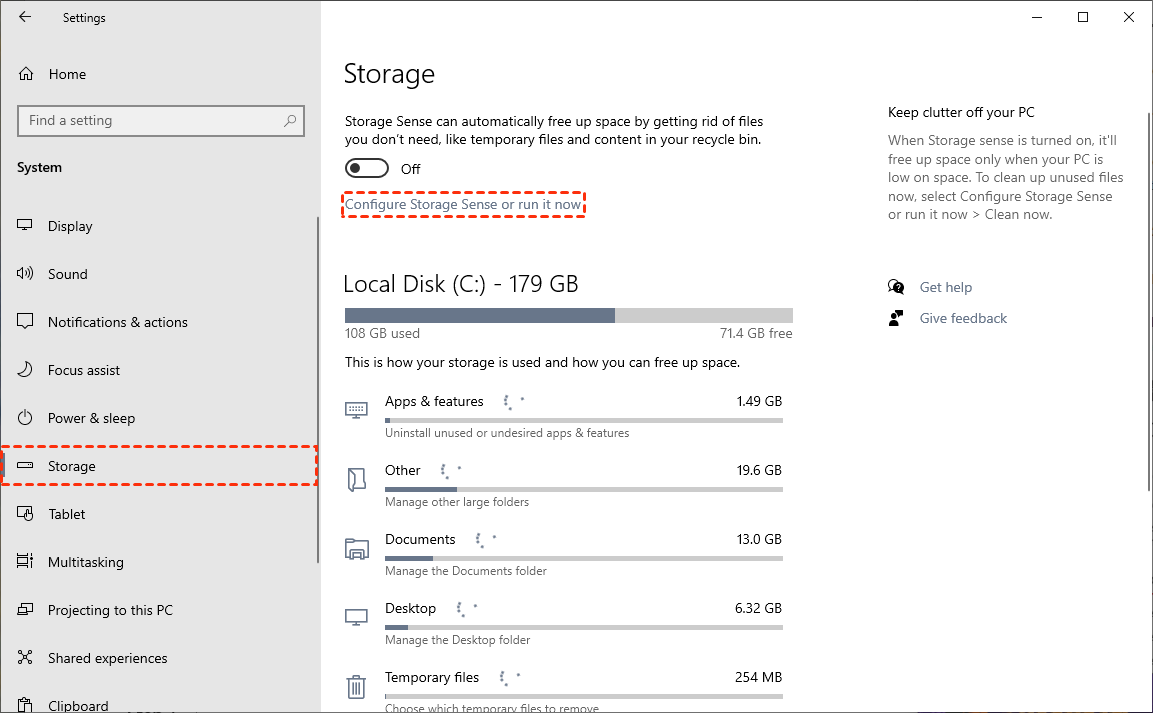
Some users will activate Storage Sense to remove files from the trash bin to free up space, especially when the storage space is running low.
Step 1. Press the Win+I key > Windows Settings > System.
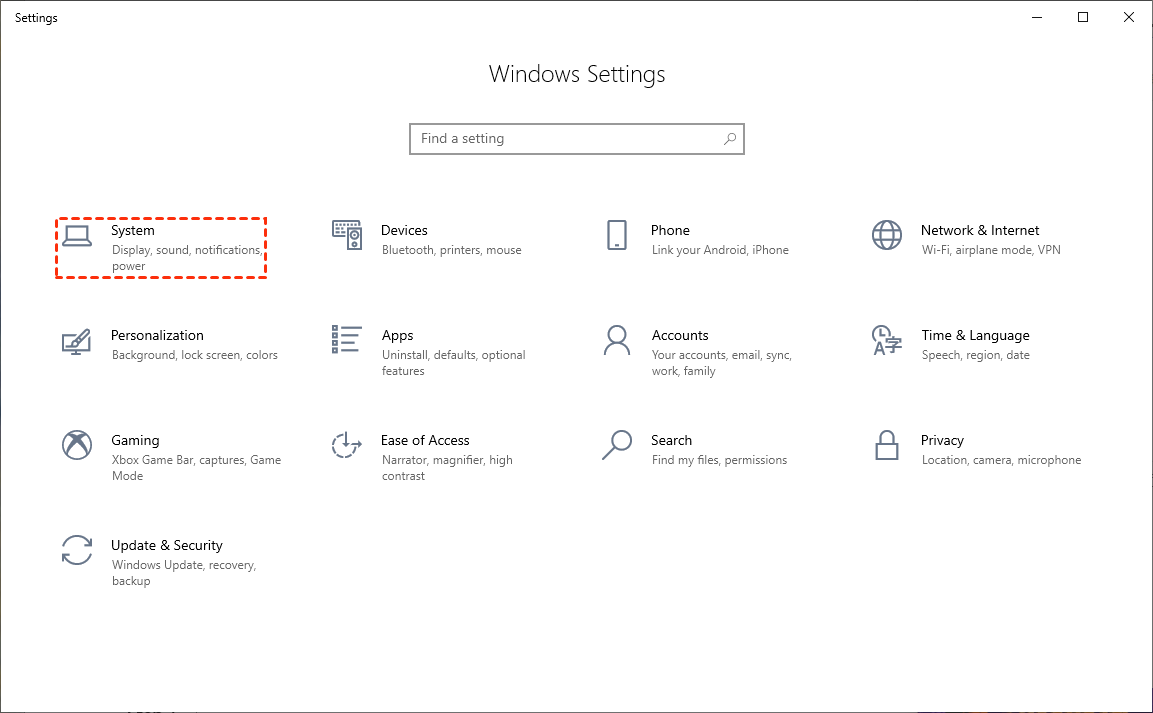
Step 2. Click Storage > Configure Storage Sense or run it now.
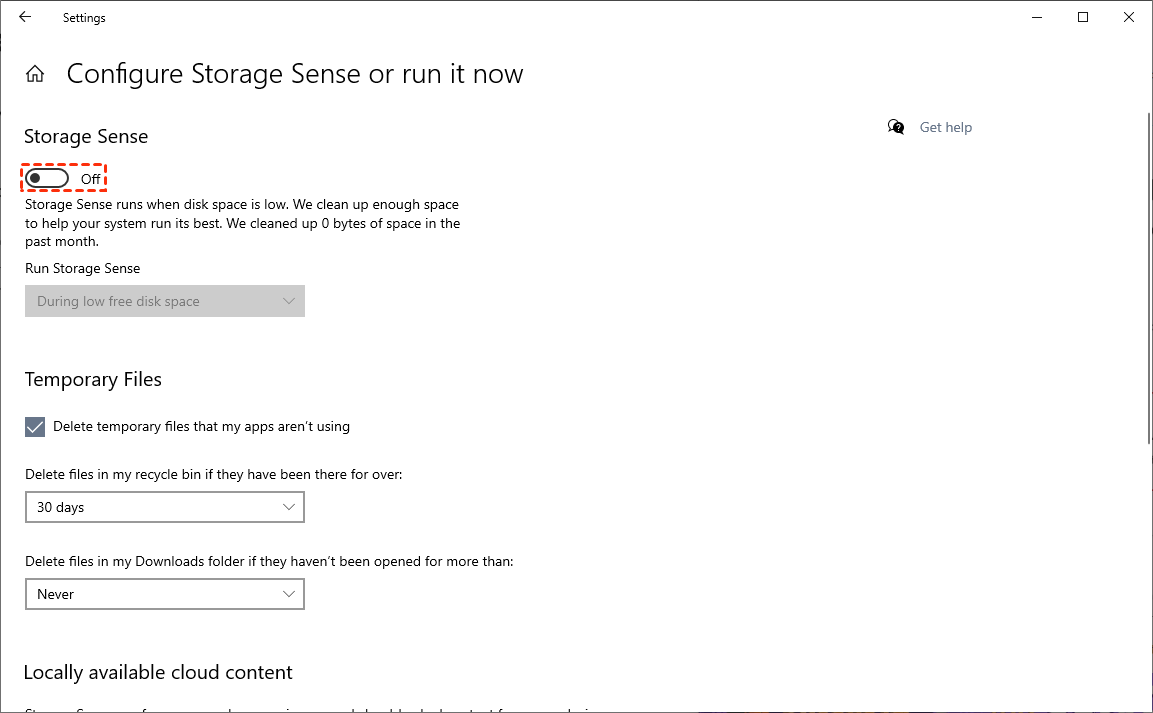
Step 3. Turn off the Storage Sense.
Method 2. Turn off the Task Scheduler
Users who enable Task Scheduler to automatically perform tasks, such as emptying the Recycle Bin, can delete this task to prevent files from being lost again.
Step 1. To start the Task Scheduler in Windows, type "Task Scheduler" in the search box, then select it from the results list.
Step 2. Find the auto-deletion/auto-emptying Recycle Bin task > Disable.
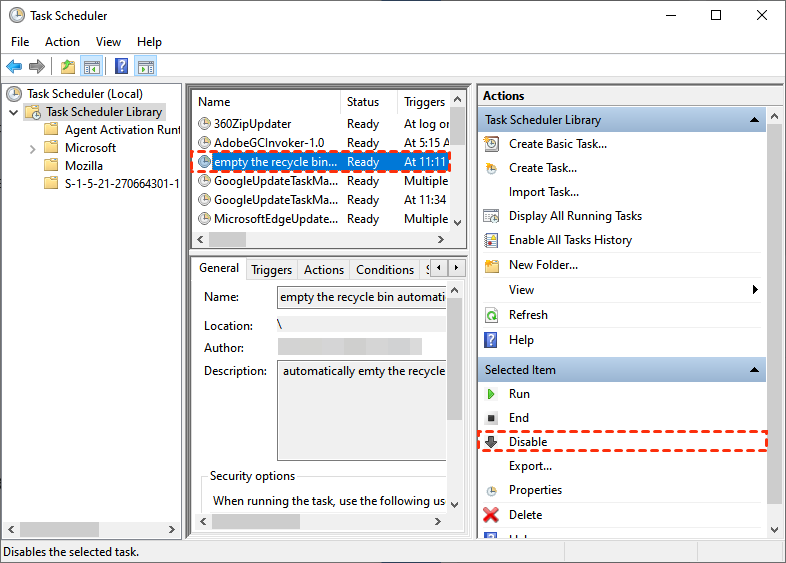
Thus your files won't lost from Recycle Bin again.
Method 3. Backup files automatically
To prevent files from being deleted from the Recycle Bin or lost due to other reasons, you can choose to back up your files on a regular basis.

With Qiling Disk Master, you can back up your files in multiple ways. For better protection, keep copies in different places, such as a local disk, external hard drive, flash drive, shared drive, NAS, or cloud storage.
You can still enjoy various useful features, including the ability to access a vast library of knowledge, get assistance with tasks, and have conversations on a wide range of topics, all while maintaining a seamless and intuitive user experience.
- Scheduled Backup: The system automatically creates backups daily, weekly, and monthly, with the shortest interval being hourly, eliminating the need for human intervention.
- Incremental Backup. A wise scheme allows you to save time and space by automatically backing up only the files that have been changed in a scheduled task.
Related Articles
- Deleted File Not in Recycle Bin | Proven Fixes
Learn why a deleted file may not appear in the Recycle Bin and try three practical ways to restore or recover deleted files in Windows. - [4 Fixes] Desktop Files Disappeared in Windows 7
Fix desktop files disappeared in Windows 7 with four practical methods to restore missing desktop folders, files, and shortcuts. - 6 Ways to Solve Desktop icon Reappears after Delete
This guide explains 6 Ways to Solve Desktop icon Reappears after Delete with clear steps, key checks, and practical tips. - Guide: Use Dir/Attrib Command to Show Hidden Files
Learn how to use DIR and ATTRIB commands to show hidden files in Windows, and how to view hidden files with File Explorer. - Sandisk Recovery Online | Sandisk Pen Drive Data Recovery Online
Review Sandisk Recovery Online | Sandisk Pen Drive Data Recovery Online with recovery choices, preparation steps, and ways to avoid unnecessary data loss. - SDHC Card Recovery - How to Recover Files from SDHC Memory Card
If you've lost files from your SDHC memory card due to unexpected errors, you can recover deleted files with SanDisk SDHC card recovery software.
Products
Articles & Tutorials
- Data Recovery
- Data Backup
- File Recovery
- File Backup
- File synchronize
- System Backup and Restore
- Disk and Partition Clone
- Technical articles
- Disk Master Help
- Windows Deleted File and Disk Recovery Tutorials
- Windows File and Data Recovery Tutorials
- More Windows Tutorials for Install, Security, Files, and PC Tips
- Windows Boot, Repair, and Recovery Environment Tutorials
- Windows Backup Tutorials
- Windows Restore Tutorials
- Windows Clone and Migration Tutorials
- Windows Server Backup, Recovery, and Management Tutorials
- Windows Disk, Partition, and Storage Management Tutorials