How to Fix SSD Not Showing Up in Windows 11/10/8/7
Quick Navigation:
- Possible Reasons why SSD is not Showing up in Windows PC
- SSD not showing up because the Drive Letter is missing or conflicting
- SSD is not initialized
- SSD System is not supported
- What is the Deep Data Recovery Software?
The Solid State Drive (SSD) is a popular data storage device due to its benefits, including low power consumption, silent operation, and fast read-write speed. However, users may encounter an issue where the SSD is not detected or showing up in Windows 11/10/7/8 when plugged in, which can be frustrating. Fortunately, there are solutions available to fix this problem, and by reading on, users can learn how to resolve this issue and get their SSD up and running.
Possible Reasons why SSD is not Showing up in Windows PC
When a Windows 8 SSD storage device is not recognized by the computer, it can be frustrating. The reasons for this issue can vary, and we'll cover them in this section. We'll examine the reasons and provide a step-by-step guide on how to resolve each problem, making it easier to access the SSD storage device. Let's get started!
SSD not showing up because the Drive Letter is missing or conflicting
If the SSD is connected properly to the PC and shows in Device Manager, but doesn't appear in Disk Management or My Computer, it's likely due to a missing or conflicting drive letter on the SSD partition. This issue can be resolved.
Step-by-step Guide to solve missing Drive Letter Caused SSD Not Showing up
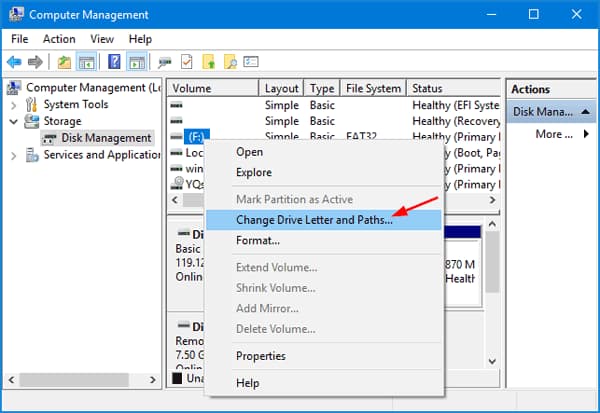
- To access the Disk Management utility, launch it and right-click on "My Computer" or "This PC" in your Windows.
- Here, click on "Disk Management" to open the storage menu.
- Select the partition with the missing drive letter, right-click on it, and choose "Change Drive Letters and Paths".
- To change the drive letter of a drive, click on "Add" to bring up a list, choose a drive letter, and click the "OK" button.
After completing the process, the SSD will be visible in your Windows 11/10/7/8, allowing you to access and utilize its storage capacity.
SSD is not initialized
When a new SSD is plugged into a PC before it's initialized, it won't display, but resolving this issue is very easy. To fix the problem, you need to find the Disk Management in Windows 10/7/8, and then follow the simple steps to initialize the SSD.
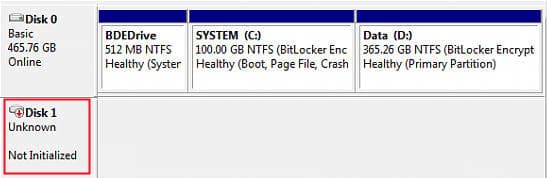
- To access the Logical Disk Manager, press the Windows key + R to open the Run dialogue, then type "compmgmt.msc" and press Enter. This will open the tool, where you may see a message indicating that you need to initialize your SSD storage device before Logical Disk Manager can access it. This is a step you'll need to take before proceeding.
- To resolve the issue of an SSD not displaying, you can select the appropriate partition table type (MBR or GPT) based on your motherboard's specifications and then click "OK" to initiate the fix. This will start the initialization process.
- After the initialization process is completed, create a fresh folder with Disk Management, and the new partition will show up in the Windows Explorer.
SSD System is not supported
To fix the issue of an SSD not showing in Windows, check if the SSD system is compatible with Windows, specifically if it's NTFS or FAT32. If not, delete the drive and create a new partition using one of these file systems to make the SSD visible in Windows.
- To delete a partition, right-click on it and select "Delete". Be aware that this will result in data loss, so if the partition contains important data, you may need to use a data recovery tool to retrieve it.
- When the partition has been deleted, click "Create Partition" and select FAT32 or NTFS as the file system.
- To fix the issue of an SSD not showing up, start by checking the SSD's power cord and ensuring it is properly connected to the motherboard and a power source. Next, enter the BIOS settings by pressing the designated key (usually F2, F12, or Del) and ensure the SSD is detected in the BIOS.
If your SSD doesn't show up in Windows 10/7/8, it's likely due to one of three common issues. Before attempting to fix these problems, it's crucial to protect your data from being lost, as this can have severe consequences. To safeguard your data, consider using a reliable tool like Deep Data Recovery software. This tool can help protect and recover data from your SSD storage device, ensuring your important files are safe. Let's explore this tool further to learn more about its capabilities.
What is the Deep Data Recovery Software?
Deep Data Recovery tool is a reputable and safe data recovery software that makes recovery tasks of any magnitude feel effortless. It is an effective tool that can help you recover data from an SSD storage device, and with its assistance, you don't have to worry about any issues that may arise from fixing problems on your SSD device. It will help you recover all your data.
Step-by-Step Guide to Recover Data from SSD after Not Showing Up
- To recover data from an SSD using Qiling data recovery software, start by downloading and installing the software on your PC. Once installed, launch Deep Data Recovery, and follow the on-screen instructions to begin the recovery process.
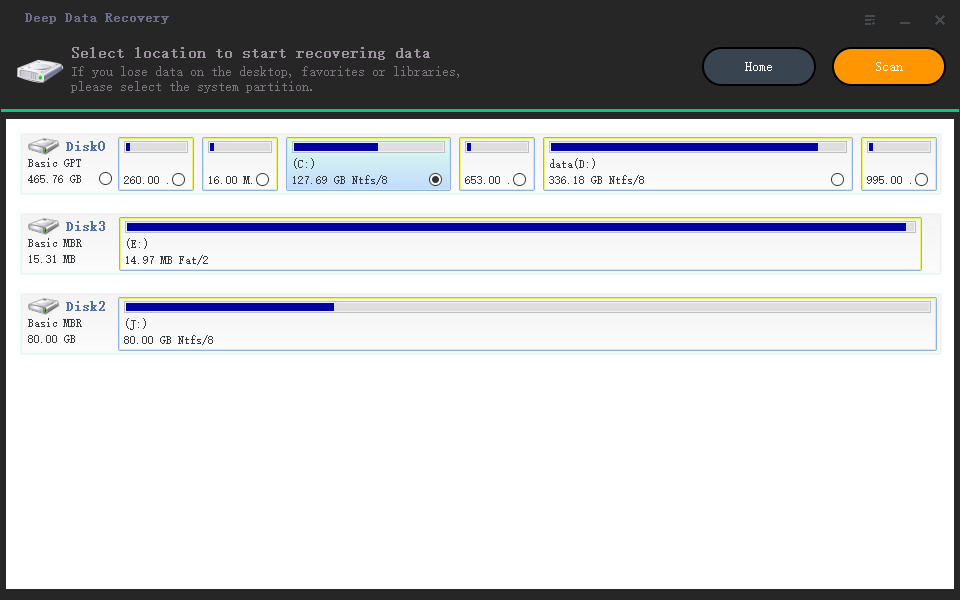
- Select the SSD Storage Device to scan. The undelete or unformat SSD software will display the different partitions and drives connected to the device. Select the specific location that has your important files, in this case, select the SSD storage device. Click "Scan" to start the SSD recovery process.
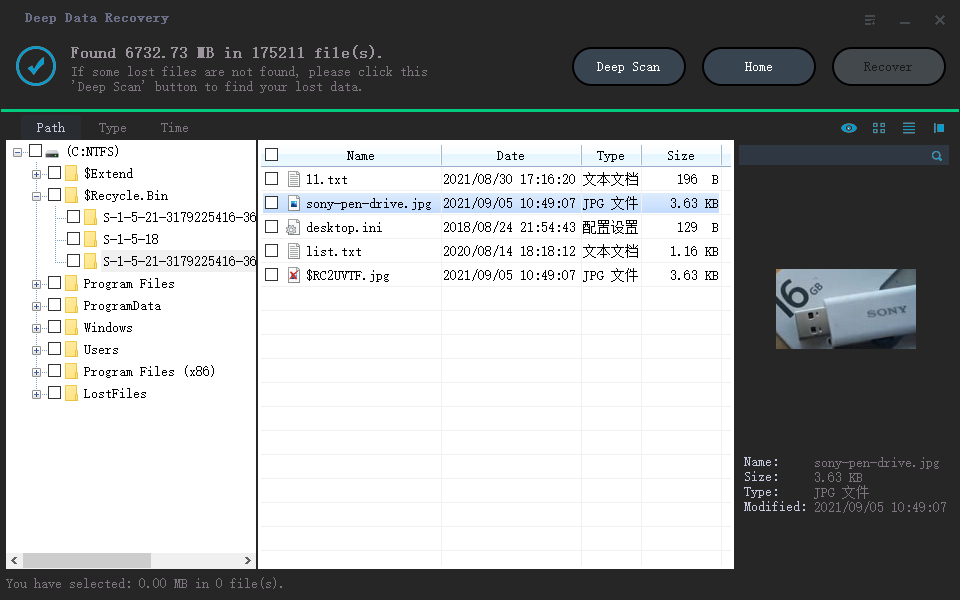
- Preview and recover the data from the SSD device. After scanning, the recovery window will display all recovered files. Browse through to confirm the files to recover. Click the files that you want and when done, click the "Recover" button to recover all selected SSD data. Specify the location where you want to save the recovered data.
When Windows 11 fails to recognize an SSD, it's often due to a faulty driver, incorrect BIOS settings, or a corrupted disk. To resolve this, update your SSD drivers, check your BIOS settings to ensure they're set to AHCI mode, and run a disk check to identify any issues. If data is lost during the process, consider using data recovery software to retrieve it.
Related Articles
- How to Fix External Hard Drive Not Showing Up
- Fix Raw External Hard Drive without Losing Data
- Quick Fix – Pictures Not Showing on SD Card
- [Solved] Deleted File Not Showing in Recycle Bin
- How to Fix USB Drives not showing up in Windows 10
- 7 Ways to Fix Windows 10 Keeps Freezing Up Randomly
- [Solved] Pictures on SD Card Not Showing in Gallery
- [Fix] Convert External Drive to APFS Failed/Greyed Out/Not Available