Copy Windows Server 2019 ISO to USB for Installation or Portable OS
Why copy Windows Server 2019 ISO to USB?
Many people want to burn the Server 2019 ISO to a USB drive to create a bootable drive, which serves two main purposes: to install Server 2019 on a computer or to boot into a live environment for various tasks.
● Troubleshoot your computer as a recovery disk. If your Windows Server 2019 is experiencing crashes and struggles to boot efficiently, consider using ISO files to create a bootable USB. This can help resolve the issue and get your server up and running smoothly again.
● Create an installation media. To create a Server 2019 installation drive on a USB, you can follow a similar process as the scenario described, saving the Server 2019 ISO file to a USB drive to create a bootable installation media. This allows you to install Server 2019 on different PCs without having to burn a CD or DVD or use a physical installation media.
● Make a portable Server OS drive. It enables you to quickly boot into a Windows Server 2019 environment on various devices without the need for a full installation, saving time and resources.
This article will guide you through the process of copying a Windows Server 2019 ISO to a USB drive, covering two different purposes.
Content:
- Copy/burn Windows Server 2019 ISO to USB for installing OS
- Copy Windows Server 2019 ISO for a portable Server system
- Boot from the Windows Server 2019 USB
Copy/burn Windows Server 2019 ISO to USB for installing OS
To create Windows Server 2019 installation media, you can use the Media Creation Tool provided by Microsoft. This tool allows you to download the installation media and create a bootable USB drive or DVD.
- ★Preparations:
- Download the Windows Server 2019 ISO files from Microsoft.
- A USB flash drive over 8 GB is required for Windows Server 2019, as the OS consumes at least 4 GB, and the ISO image needs extra space to accommodate the split chunks that exceed 3 GB.
- Back up your USB drive if it has important files on it, as it will be formatted.
To copy Windows Server 2019 ISO to a USB drive for installing the OS, you need to first make the thumb drive bootable using Diskpart. Insert the thumb drive into the computer and follow these steps:
Step 1. To open the Command Prompt window, click "start", input "cmd" in the search box, and right-click on the search outcome, then click "Run as administrator".
Step 2. Type "list disk" to list all the disks available on your computer. Type "select disk #" where "#" is the number of the disk you want to clean, and press Enter. Type "clean" to clean the disk, and press Enter.
● list disk
● select disk x (x is the number of your USB flash drive)
● clean
● create partition primary
● select partition 1
● format fs=ntfs quick (if you want to create UEFI bootable USB, type "format fs=fat32 quick").
● active
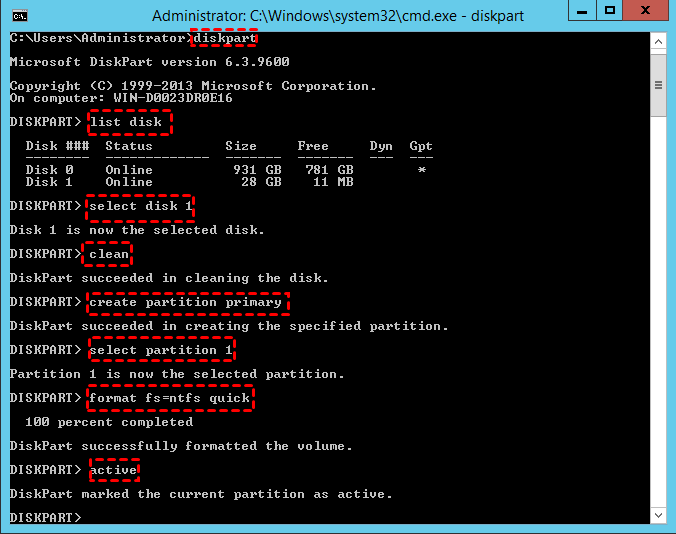
Step 3. Type "exit" and press Enter to close diskpart command window.
Now that your USB drive is bootable, don't close the Command Prompt. Next, mount the Windows Server 2019 ISO and follow the steps to copy or burn Windows Server 2019 files to the USB drive.
Step 4. To create a bootable USB drive from an ISO image, type the command `xcopy D:\*.* E: /s/e/f` in the Command Prompt and press Enter, where D is the drive letter of the ISO image and E is the drive letter of the USB drive. This command will copy all files from the ISO image to the USB drive, making it bootable.
Step 5. To write a bootloader to your USB drive, type the command "D:\Boot\Bootsect /NT60 E: /force /mbr" in the command line. This command will install a bootloader on your USB drive, allowing you to boot from it.
- Note:✎...
- When running the Xcopy command, you may encounter an error message stating "file creation error - the parameter is incorrect" or "the install.wim is too large". This issue is often caused by the 4GB file size limit of the FAT32 file system, which is used by default.
You can install Windows Server 2019 on your PC and the same steps can also be used to install other Windows Server systems such as Windows Server 2016, 2012, and 2008 by copying their ISO to a USB drive.
Copy Windows Server 2019 ISO for a portable server USB
To install Windows Server 2019, you can copy it to a USB drive using the steps above. However, if you want to boot and run Windows Server 2019 from a USB drive or other external drive, you can use the "Windows To Go Creator" feature in Qiling Disk Master Server to create a bootable USB drive from an ISO file or your current system. This allows you to boot a full Windows operating system from a USB drive at any time and anywhere, and has several highlights over other similar tools.
● It can save Windows 11/10/8.1/8/7/XP or Server OS on uncertified USB flash drives. Microsoft's built-in Windows To Go is only available on Windows 10/8.1/8 Enterprise Edition and specific certified USB brands.
● It keeps your USB and computers separate. You can securely use familiar environments from different computers, and when you're done, simply pull out the USB and the computer can run its original system.
● It just needs at least 13 GB capacity. Compared to Microsoft's built-in Windows To Go and other software, this tool saves a lot of space on a USB drive.
To try out Qiling Disk Master Server, you can click the download button to get the Demo edition, and then follow the steps to create a bootable USB.
If you're interested in Windows 11, you can also create a Windows 11 bootable USB.
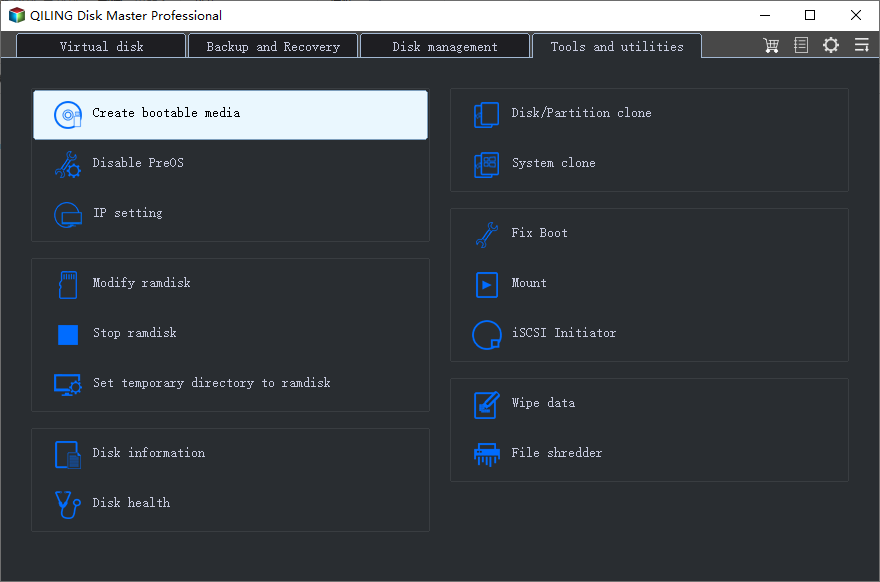
Step 1. To create bootable media using Qiling Disk Master Server, connect a USB drive to your Windows Server computer, install and open Qiling Disk Master Server, and then click "Tools" in the top toolbar and choose "Create bootable media".
Step 2. In this window, select a USB drive.
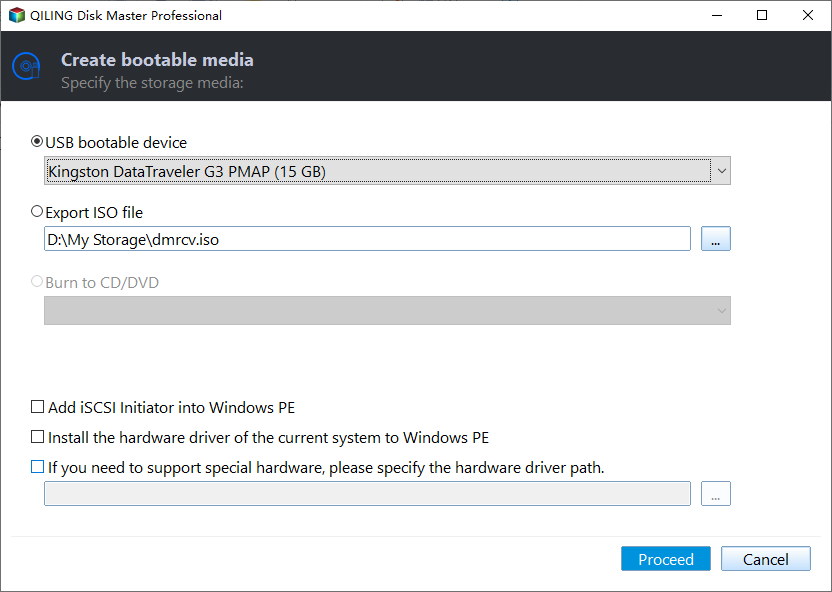
Step 3. This will wipe the data on the selected USB drive, so backup any files you need in advance. Then click "Proceed".
To install Windows Server 2019 ISO to a USB drive and create a portable Server USB drive, follow these steps. This method can also be applied to install Windows Server 2008, 2012, 2016, and other Windows systems to a pen drive, making it a versatile solution.
Boot from the Windows Server 2019 USB
After burning or installing the Windows 2019 ISO to a USB drive, you can insert it into your computer to install or run the operating system. You may also need to enter the BIOS settings to boot the PC from the Windows Server 2019 USB drive.
Step 1. Insert the Server USB, and turn on the PC. When the logo appears on the screen, immediately tap the BIOS key.
Step 2. In the BIOS setup, use the arrow keys to choose the "Boot" tab, and select "Change boot order".

Step 3. Move the Server 2019 USB to the top in the listed drive, save the changes, and exit the BIOS settings. Your computer will then start from the USB.
FAQs about Windows Server 2019 ISO USB
Is it possible to put the ISO file directly into a USB drive?
To make the ISO file on the USB drive bootable, the image file needs to be converted into a bootable USB, or the ISO can be directly burned to a flash drive as a bootable disk, making it easily recognized during the boot process.
How to install Windows Server 2019 using USB?
Insert the bootable USB drive you created earlier into your server and access the BIOS to configure the boot sequence to prioritize USB as the initial boot source. When your server boots from USB, a prompt will appear asking for confirmation - just press any key to continue. Follow the on-screen instructions shown in the initial Windows installation screen, making sure to complete the necessary setup in order, and proceed with installing Windows Server 2019.
Conclusion
This article helps you copy Windows Server 2019 ISO to USB for installation or a portable Server system. Qiling Disk Master Server also offers additional features, such as creating a bootable USB for repairing your computer if it can't boot.
Qiling Disk Master offers a range of editions, including a Server Version for companies, and a Technician Edition for organizations, which covers all Server Version features and provides unlimited usage within one company, saving money. Additionally, the Unlimited and Technician Editions offer the feature to create a portable version of Qiling Disk Master on a removable device, such as a USB flash drive, allowing engineers to run the software on client computers without installation for IT maintenance or support.
Related Articles
- Can I Create Windows To Go USB Drive with Current System?
If you need to create Windows to go USB drive and take your own OS everywhere, you can turn to Qiling Disk Master Standard. This freeware allows you to create Windows 10, Windows 8 and Windows 7 portable USB stick in simple steps. - Two Methods to Convert/Burn ISO to USB in Windows 10/8/7
On this page, we aim to tell how to burn ISO to USB in Windows 11, 10, 8, 7 via 2 free methods. And then you can get a bootable USB drive. - 2 Free Methods to Change Partition Size without Losing Data in Windows
Here, you can learn how to change partition size without losing data with Windows native tool and a free 3rd party partition manager in Windows 10/8/7. - Can I Change Program Files Location & How to do it?
Change the program files location from C drive to another drive by modifying the ProgramFilesDir registry value or using a third-party tool. Learn how to move program files safely. - How to Allocate Unallocated Disk Space to C Drive in Windows 7, 8, 10?
To allocate unallocated space to C drive or other existing partitions in Windows 7, 8, or 10, follow these steps: Right-click on "Computer" or "This PC" and select "Manage." In the Computer Management window, click on "Disk Management". - How to Backup a NAS Server in Windows 11, 10, 8, 7
Storing data on a NAS server is a very popular way, and in order to make sure the data safe, you'd better backup NAS server to another place. Learn how to backup a NAS for you.