Download, Install, Set up Google Backup and Sync Tool
What Is Google Backup and Sync?
Google Backup and Sync is a sync tool that synchronizes files between online Google Drive and a local desktop folder, creating a folder once the sync task is started.
And, this is a two-Changes made to a local desktop folder will be automatically synced to a network Google Drive, and vice versa, so that any differences in files between the two locations are reflected in real-time.
On the one hand, To safely backup your important files, simply upload and store them from any folder on your computer, camera, or SD cards in the cloud, and access them on any device using Google Drive, or view your photos and videos in Google Photos.
On the other hand, Google Drive syncs with your computer, allowing you to access your files even when you're offline.
- Is Google Backup and Sync still available?
- Google Drive for desktop vs Backup and Sync
- How to setup Google backup and sync tool in simple steps
- Easier way to use Google backup and sync tool
- Google Drive for desktop vs. Qiling Disk Master Standard
Is Google Backup and Sync still available?
As of Oct 1, 2021, Google Backup and Sync will no longer be available, and users will be prompted to switch to Google Drive for desktop instead.

To sign in and move folders from Backup and Sync to Drive for desktop, click Sign in, follow the on-screen instructions, and then use Drive for desktop to backup files or sync photos and videos.
Google Drive for desktop vs Backup and Sync
Google Drive for desktop and Backup and Sync share similarities, but also have key differences. According to Google Drive, the explanation is as follows: (Note: I removed the last sentence as it was not clear what you meant by "we will detail them later")

Google Drive for desktop still integrates Google Backup and Sync and Drive File Stream, allowing it to backup files to Google Drive, sync photos and videos to Google Photos, and provide the file stream feature, despite some differences.
- About file copies: Backup and Sync keeps two backup copies, one on the local drive and the other on the cloud, taking up more space and cloud storage. In contrast, Drive for desktop allows you to keep backups only on the cloud.
- Types of offline files: Backup and Sync allows selecting specific folders to make them offline, whereas Desktop allows both specific files and folders to be made offline.
- Way to backup photos and videos: Backup and Sync allows you to backup only photos and videos to Google Drive, but if you also choose to upload them to Google Photos, you'll have two copies on both services. Alternatively, Drive for desktop lets you sync all files, including photos and videos, to Google Drive, or backup them to Google Photos, giving you more flexibility in how you manage your files.
- Other backup and sync features: Backup and Sync allows excluding specific file extensions to save space, and users can choose to delete files between Google Drive and their PC, features not available on the Drive for desktop.
How to setup Google backup and sync tool in simple steps
To set up Google Backup and Sync tool, you may be in one of the following situations: you're setting up the tool for the first time, or you're updating an existing setup. If it's your first time, you'll need to download and install the tool, then follow the prompts to select the folders and files you want to sync, and choose the Google account you want to use.
#1: You don't have Google Backup and Sync. To set up Google Drive Backup and Sync, download and install the software, then follow the on-screen instructions to complete the setup process.
#2: You have Google Backup and Sync installed and well-configured. Many users will find themselves in a situation where they need to migrate their account and data from Bacup and Syn to Drive for desktop, which can be a complex process.
To set up Google Backup and Sync on your computer, first download the software from the Google website. Once downloaded, run the installer and follow the prompts to install the software.
Step 1. To access Google Backup and Sync, search for it in the Start menu and select it, or click the Google Drive icon, which will likely be found on the desktop or in the Start menu.
 ) on the system tray.
Step 2. Google Drive for desktop is replacing Backup and Sync, and to access it, click "Sign in" and then "GET STARTED" to find and sign in with your Google Drive account.

Step 3. The process of moving accounts is starting. My Drive will be moved to your computer, typically as the default location, and you'll click "Got it" to proceed.

Step 3. After moving your My Drive, you can move your folders from Backup and Sync. To do this, click "Check folders", which will scan all the folders on your computer and cloud, allowing you to easily relocate them.

Step 4. After clicking Next, the program will prompt you to select folder options and specify how to sync or backup the chosen folder.

Step 5. You can sync with Google Drive or back up to Google Photos, or even do both, which will use more storage.

Step 6. Repeat Step 5 until you move all the checked folders. Then, click Save on the Almost done page and Open Drive for desktop.

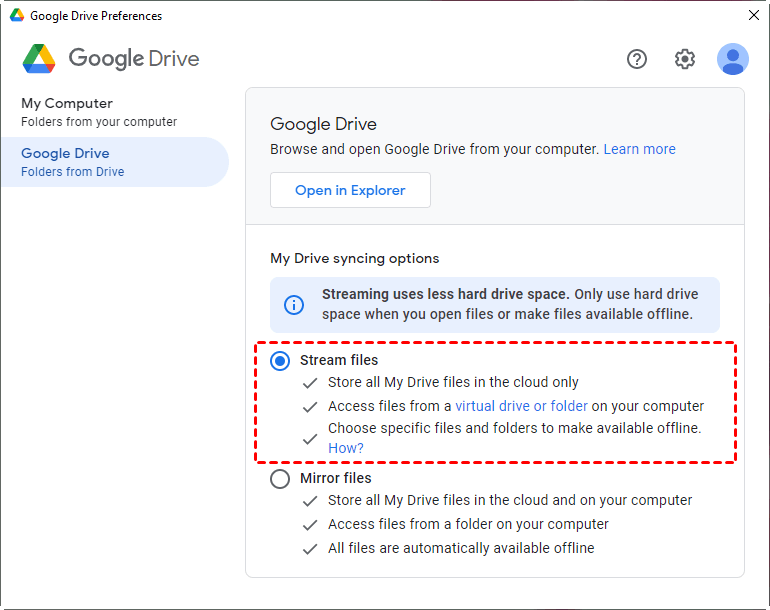
Step 7. After setting up Google Drive, you can configure the sync options by clicking on the Google Drive icon in the system tray, then navigating to Settings > Preferences > Google Drive. From there, you can select the "Stream files" option under My drive sync options, which is recommended as it uses less hard drive space.
✐ Notes:
- To stop this task, simply disconnect your Google account. You can do this by clicking the Google Drive icon, then clicking More (three dots), and selecting "Preferences". From there, choose "Settings" and select "Disconnect account".
- To uninstall Google Drive Backup and Sync, go to the Control Panel and follow the same process as uninstalling other software, and you can also pause or resume the tool through its icon.
- The Google app supports both Windows and Mac operating systems, but its functionality is limited to backing up and syncing files between local storage and Google Drive, excluding the ability to backup and sync files between different operating systems.
Easier way to use Google backup and sync tool
Google Drive for desktop replaced Backup and Sync, but it still doesn't allow syncing folders outside the desktop folder or virtual drive. To make syncing easier and automatic, you'll need to use a reliable sync software to drive the process.
Qiling Disk Master Standard is a great choice for syncing local folders to cloud drives like Google Drive, Dropbox, OneDrive, and Box, and also offers 1TB free storage on Qiling Cloud for 15 days after signing up.
Following are its main features:
✩ Basic Sync: The software allows syncing of local folders to cloud drives like Google Drive, Dropbox, and OneDrive, as well as syncing to external hard drives, NAS devices, and network shares, and vice versa.
✩ Sync schedule: You can schedule the sync task to run automatically at a specific time or interval, such as daily, weekly, or monthly.
To sync local files to a cloud drive via Qiling Disk Master, download, install, and open Qiling Disk Master Standard Edition. For server users, try Qiling Disk Master Server instead.
Step 1. In its Backup and recovery tab, select "File Sync".

Tip: To enjoy more advanced sync modes like Mirror Sync, Real-Time Sync, or Two-Way Sync, please upgrade to higher editions.
Step 2. Click "Folder" to select the folder(s) you want to sync.

Tips:
✿ To add more folders, just click the "+" icon after adding the first folder. This allows you to select one folder at a time, but still enables you to expand your selection by adding additional folders.
✿ With the Professional version, you can also enable Filter settings to include or exclude files or folders, allowing you to sync files with specific file extensions.
Step 3. To expand the drop-down menu of the second column, click on the arrow icon next to it. Then, select "Select a cloud drive" from the menu to proceed with the next step.

Step 4. To access Google Drive from Qiling Disk Master, select "Google Drive" in the pop-up window and click "OK" after installing the desktop app.
Step 5. To make syncing your Google Drive with your PC convenient and automatic, set up schedule settings for this task. Once you've done that, click "Proceed" to sync your Google Drive with your PC.
- To add a comment and enable email notification for this sync operation, click the "Options" button at the bottom. This allows you to distinguish it from other sync tasks and receive an email with the synchronization result.

- Click "Schedule Sync" to sync files or folders daily, weekly, or monthly, and enjoy additional features such as event triggers and USB plug in in the premium version.

Google Drive for desktop vs. Qiling Disk Master Standard
Qiling Disk Master Standard has many features, but its Sync function is notable.
|
Google Backup and Sync |
Qiling Disk Master Standard |
|
|
Charge |
Free |
Free |
|
Supported OS |
Windows, Mac |
Windows PC |
|
Supported device |
Desktop, laptop, notebook |
Desktop, laptop, notebook |
|
Supported cloud drive |
Google Drive |
Google Drive, Dropbox, OneDrive, Box, SugarSync, hubiC, and CloudMe |
|
Sync from local to cloud |
Yes |
Yes |
|
Sync from cloud to local |
Yes |
No |
|
Sync from local to local/NAS/network share |
No |
Yes |
|
Schedule sync |
No |
Yes |
Conclusion
Now that you know how to sync files with Google Drive for desktop, you may prefer a simpler and more automated solution for syncing local files to other cloud drives like OneDrive and Dropbox. Qiling Disk Master is a free file sync software that can make this process easier and more efficient.
The software can be used as hard drive transfer software and has a disk clone feature, allowing users to clone a hard drive to an SSD, replace a laptop's HDD with an SSD, and make an NVMe drive bootable, among other capabilities.
Related Articles
- Sync Files to Google Drive Automatically | 4 Ways Included
- How to Backup PC Files to Google Drive Automatically?
- 6 Tested Solutions to Google Drive Not Syncing in Windows
- How to Monitor a Folder and Move Files Automatically?
Need to copy files from one folder to another automatically? Read this article patiently to get the best automated file mover utility in Windows to assist you. - Low Disk Space warning in Windows 8/8.1– Free up Space Now
Get Low Disk Space warning on Windows 8 or 8.1? Learn how to free up disk space and extend system drive of Windows 8 to solve the issue. - How to Backup Synology to Windows Server
This article will describe why and how to backup Synology to Windows Server and recommend a useful software to backup Synology.