How to Backup Synology to Windows Server
User case: How do I backup my Synology NAS to my Server?
To backup your Synology to Windows Server, consider using the Synology Hybrid Backup Sync (HBS) app, which allows you to store backups on both your Synology NAS and a Windows Server. Alternatively, you can use the Windows Server's built-in backup feature, Windows Server Backup, to backup your Synology data. Another option is to use a third-party backup software like Qiling Disk Master, which can be configured to backup your Synology data to your Windows Server.
You can create your own personal cloud with a NAS to store music, movies, files, and data, keeping all your content secure on your home network, and allowing you to share files, stream, and access your content from anywhere.
This guide will walk you through the process of backing up your Synology NAS to a Windows Server for data protection, ensuring your valuable data is safely stored and easily recoverable in case of any issues.
Why backup Synology to Windows Server?
While Synology NAS devices have robust protection, they can still be vulnerable to risks from natural disasters, hardware malfunctions, and other factors. To safeguard your valuable data, backing up your Synology device is a wise decision, providing a duplicate copy of your important files and offering double protection against data loss.
Best Software to backup Synology to Windows Server
Finding professional Synology backup software can be challenging due to the numerous options available, many of which claim to support Synology backup but only clone NAS files to a Windows Server system, wasting and occupying disk space.
I recommend using Qiling Disk Master Server, a professional backup software that can easily backup Synology to Windows Server or vice versa, allowing for random backups and scheduled automatic backups.
✿ Daily/Weekly/MonthlySet up automatic daily, weekly, and monthly backup runs on your Synology to ensure your data is safely backed up, even if you forget to do so manually. This will help prevent data loss in case of a hardware failure or other issue.
✿ Event TriggersIt allows you to trigger backup events based on specific events, such as User Logon, User logout, System startup, System shutdown, and others.
✿ USB plug in: Once set up, Qiling Disk Master will automatically back up data on the USB or other external storage devices connected to the computer, ensuring that important files and folders are always safe and easily recoverable in case of a system crash or other disaster.back up local data to the USB Drive when the USB Drive is plugged into your computer.
How to backup Synology to Windows Server
Here, we will use the best backup software Qiling Disk Master for creating Synology backup to Windows Server, utilizing its advanced features to ensure seamless and efficient data transfer between the two platforms.
First, please click on the download button below to install this software with a 30-day free trial.
Notes:
▶ You need to decide where to store the Synology backup image. Qiling Disk Master Server allows you to easily backup your NAS to a local path or external hard drive on Windows Server, or even backup Synology NAS to another NAS or cloud.
▶ For Windows PC users, you can download the Qiling Disk Master Standard to backup NAS.
Step 1. Start Qiling Disk Master Server and click Backup > File Backup options to initiate a Synology NAS Windows backup.
Tip: You can also choose System Backup to protect the operating system of Windows Server.

Step 2. To select the data you want to backup, click on either "Folder" or "Files". If you previously selected "System Backup", the operating system will automatically be included in the backup.
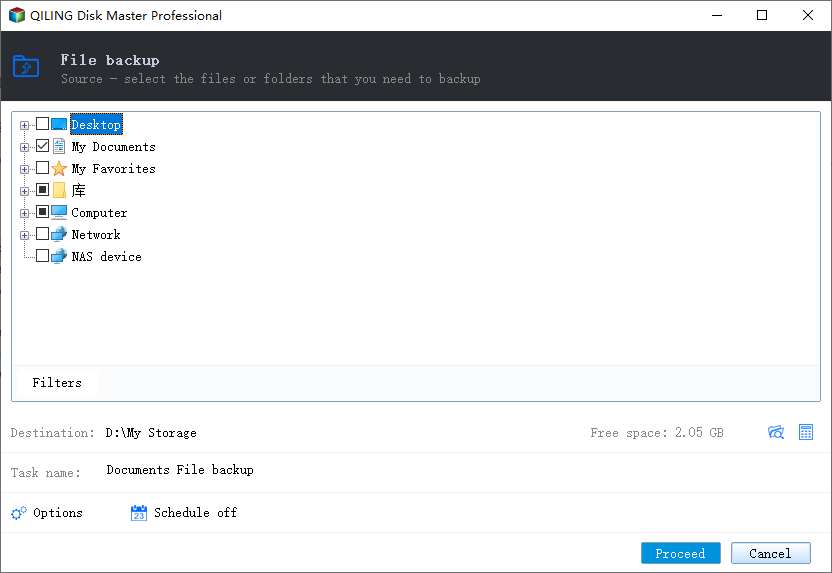
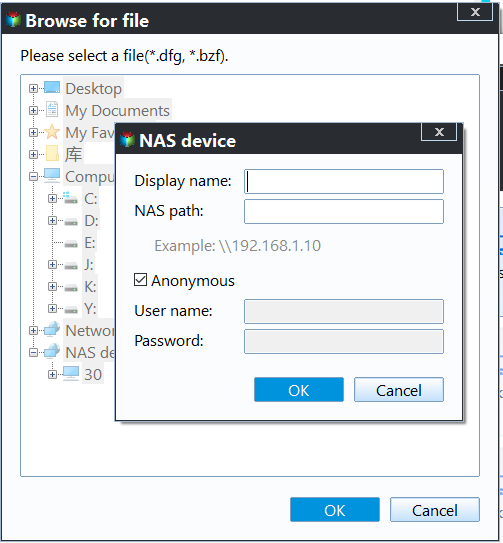
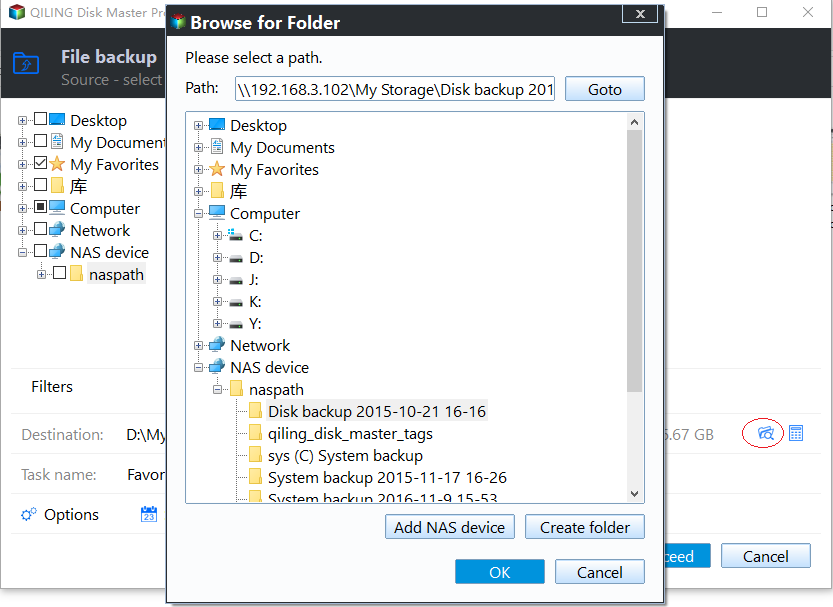
Step 3. To create a Synology backup to Windows Server, click on "Share/NAS" on the pop-up screen, then select "Add Share or NAS Devices" and enter the IP address of the target device, and finally, choose a folder on the target device for backup.
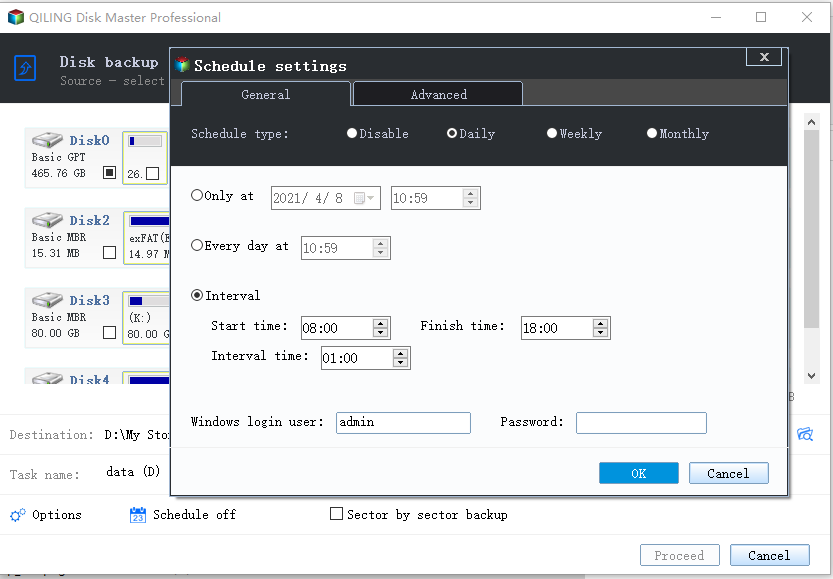
Step 4. To start the backup process, you can click on "Schedule Backup" to configure automatic backups, or proceed with the manual backup. It's also recommended to set up a retention policy to automatically delete old backups and conserve storage space on your Windows Server.
Step 5. Determine where to backup Synology NAS files and folders, then click "Proceed" and choose whether to backup now or later.
Backing up your Synology NAS to Windows Server is a straightforward process. To do this, you can add your Synology NAS files or folders as the backup source by selecting "Share/NAS" and then choose your Windows Server local drive as the backup destination. This allows you to easily transfer data from your Synology NAS to your Windows Server for safekeeping.
Summary
To backup your Synology to Windows Server, consider using Qiling Disk Master Server, a professional software that offers a range of backup features, including System Backup, Disk Backup, Partition Backup, and Files Backup. With its user-friendly interface, this software makes it easy to get started, even for those new to backup and recovery processes. Give it a try to see how it can help you protect your data.
Related Articles
- How to Backup a NAS Server in Windows 11, 10, 8, 7
Storing data on a NAS server is a very popular way, and in order to make sure the data safe, you'd better backup NAS server to another place. Learn how to backup a NAS for you. - Sync Files in Windows Server with Best File Sync Software
Want to sync files among Windows Servers? Read this guide to get the best file sync software to sync Windows Server 2008/2012/2016. - Run Windows Server 2012 System Restore Command Line Correctly
If you don't know how to perform Windows Server 2012 system restore command line, please read on and learn 2 practical methods as well as from easy graphics. - Synology Replication between Two NAS (2 Ways Included)
For data security and transmission, you may need to do Synology replication between two NAS. Two ways are shown in the article to help you complete this task. - Top 3 Methods for Synology NAS Incremental Backup
This article tells you how to do Synology incremental backup with add-on tools like Hyper Backup or Glacier Backup or Qiling Disk Master for richer backup features. - Synology NAS Backup to External Hard Drive [2 Free Ways]
It is necessary to backup Synology NAS to external hard drive for data security and this article provides you with 2 safe and free ways.