Fix Windows 7 Sync Center Problems (8 Ways)
- About Sync Center
- (Fixed) Windows 7 Sync Center Problems with Offline Files
- (Fixed) Windows 7 Sync Center conflicts
- Windows 10 Sync Center Not Working
- Powerful sync software to sync network files offline
- The End
About Sync Center
Sync Center on a Windows computer allows you to sync files from a network server to your local computer, track sync activities, and manage offline files.
Windows 7 and 10 sync center problems are often caused by offline files and file conflicts. To resolve these issues, workarounds are available to address the root causes of the problems.
If you're still having trouble with Windows 7 sync center, you may want to consider using powerful software to sync network files and make them offline. This could be a simpler solution to your problem.
(Fixed) Windows 7 Offline Files Sync Problems
Here are the Windows 7 offline files not working errors and solutions in one paragraph:
Problem 1. Work Offline or Work Online option button disappear
The "Work Offline" or "Work Online" option button disappears from Windows Explorer after transitioning from offline to online or vice versa, and the Client Side Cache (CSC) remains in an offline state until the next computer restart.
Solution: Ensure all parts of the sync path are accessible to users and enable share-level and NTFS permissions for the folder and its subfolders.
Problem 2. Offline Files Access is Denied on Almost Every File
You might encounter other access denied errors that prevent offline files from syncing in Windows 7/10, such as those caused by antivirus software, Windows Defender, or other security programs blocking the necessary files or folders, or by permissions issues with the Offline Files folder or its contents.
- Access Denied. Contact your Administrator
- Folder redirection offline files - access denied
- Windows 7 offline files cannot synchronize access is denied
- Sync failed access denied
- Windows 7 offline files cannot be disabled access is denied
Solution 1: Grant full permissions for this folder
If there are conflict files, the file is displayed as "not available". If a file is shown as available, it can be accessed. This may be due to permission issues, and granting full permission to the folder being shared with others may resolve the issue.
Step 1. Right-click the folder you want to share, and select Properties.
Step 2. Go to the Sharing tab, and select Advanced sharing... And then, tick Share this folder and click Permissions.
Step 3. Add users you want to share with and grant them full control by ticking the "Full Control" option under the "Allow" tab.

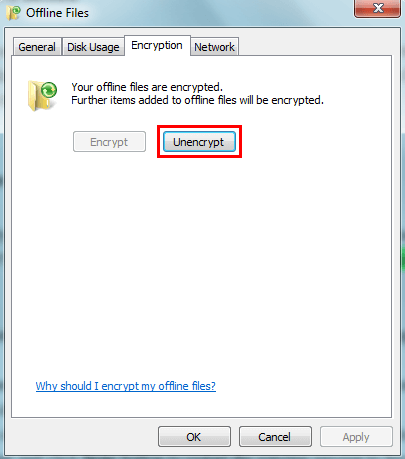
Solution 2: Disable encryption of offline files
File encryption may also be a cause of Sync Center problems. Decrypting Offline Files may resolve this issue. To do this, follow these steps.
Step 1. To open Sync Center, either type "sync center" in the search box and select it, or click the "Start" button, then select "All Programs", followed by "Accessories" and finally "Sync Center".
Step 2. Click Manage Offline Files on the left side.

Step 3. Click the Encryption tab and then Unencrypt.
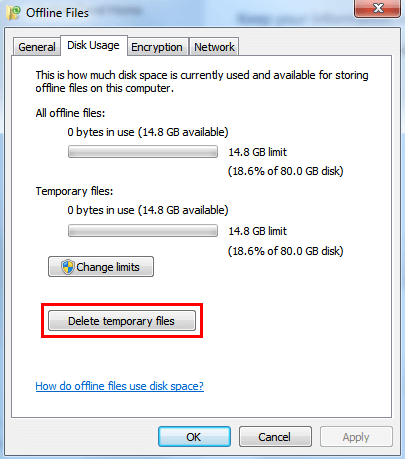
Solution 3: Reset Offline files caches
If the Sync Center does not sync offline files properly, you could consider resetting offline file caches with the following steps.
Step 1. Open Sync Center
Step 2. Click "Manage Offline Files" > "View your offline files" below to clear all contents.
Step 3. Then, switch to the "Disk Usage" tab, click "Delete temporary files", and then Apply > OK.
Solution 4. Reinitialize offline files database or caches in Windows 7
If the resetting is still not working, try to reinitialize the offline files database or caches.
Step 1. Input the regedit in Windows 7 search box, and press Enter.
Step 2. Find the path below.
HKEY_LOCAL_MACHINE\SYSTEM\CurrentControlSet\Services\Csc\Parameters
Step 3. Right-click and choose New, Choose DWORD (32-bit) Value called FormatDatabase, and set the value to 1.
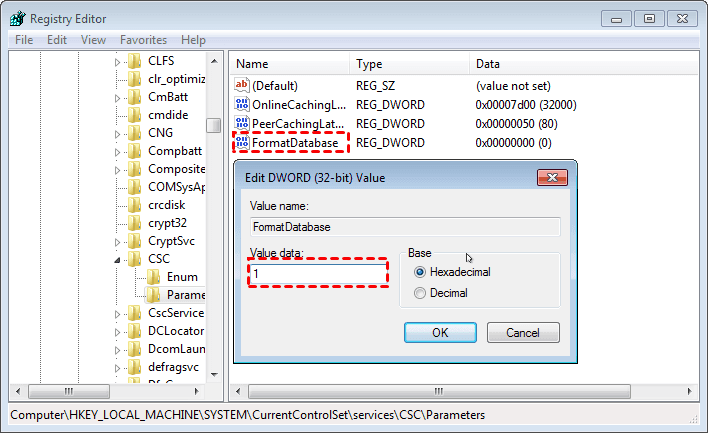
Step 4. Then, reboot the computer(the new key will delete itself after rebooting along with the Offline Files cache)
Problem 3. Offline files are enabled but not yet active.
Sometimes, Offline files may be enabled but not yet active. Restarting the computer can activate Offline Files.
Step 1. Open Sync Center.
Step 2. Then, click Manage offline files > Disable Offline Files, and click OK.
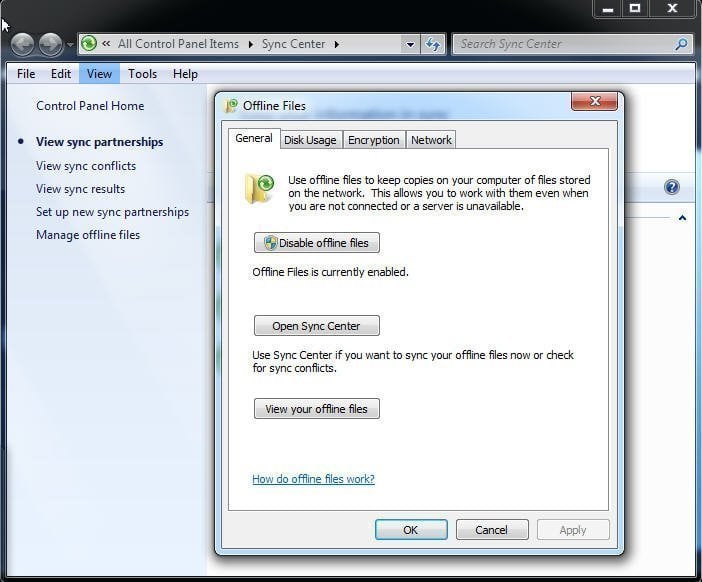
Step 3. It will ask you to restart your PC to make changes take effect, please do as suggested.
Step 4. Go to the CSC folder (C:/Windows/CSC, also called Windows offline files location) and delete all the files in it.
Step 5. To enable offline files, go to the Offline Files window, click the "Enable Offline Files" button, and then restart your PC.
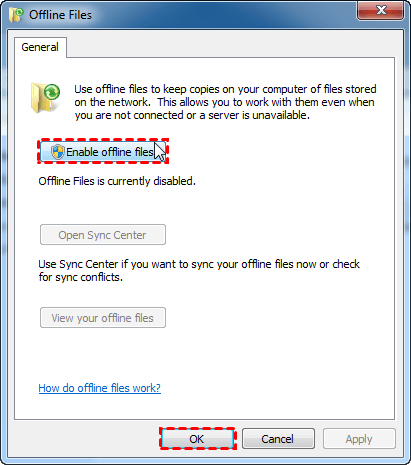
The always available offline feature in Windows 7 should now be functional.
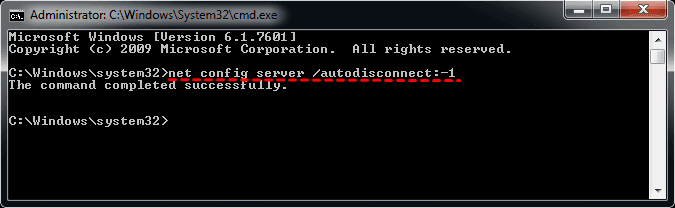
Problem 4. Offline Files showing Disconnected
If your Offline Files is showing disconnected, you could choose to turn off the auto disconnect feature on the client. This would prevent the disconnection from happening.
To disable the auto disconnect feature for the Server service in Windows, open the Command Prompt, type net config server /autodisconnect:-1, and press Enter. This command sets the auto disconnect time to -1, which effectively disables the auto disconnect feature.
(Fixed) Windows 7 Sync Center conflicts
If there's a sync conflict, a yellow triangle with an exclamation on the Sync Center icon will appear. If there are no conflicts, only a green Sync Center icon will be visible. To resolve conflicts, try the following steps:
Step 1. Open Sync Center.
Step 2. Click View sync conflicts on the left side.
Step 3. Select a conflict from the list. And click Resolve. Or right-click the conflict, and choose View options to resolve....
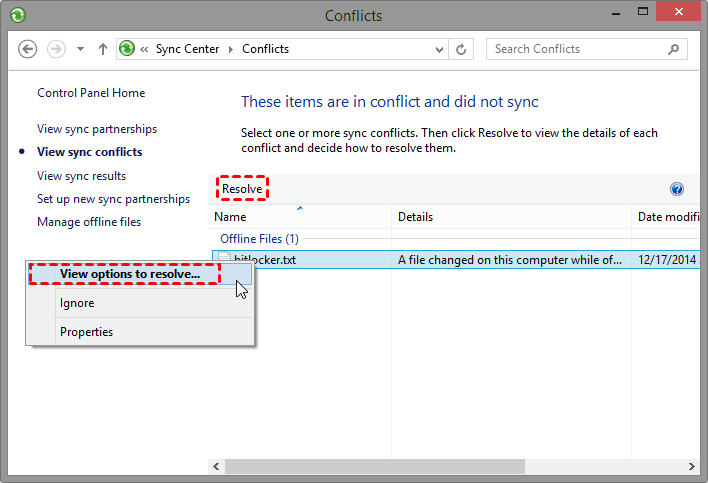
Step 4. Select the file version that you want to sync. Meanwhile, the other versions of the data will be deleted automatically.
- If the last time you modified it was on this computer, or you don't know what the file is and it doesn't really matter, select the top option.
- If the option was on a computer elsewhere, select the middle one.
Step 5. Go back to Sync Center, click the View sync partnerships in the upper left, and then Sync All.
Windows 10 Sync Center Not Working
Windows 10 users may experience issues with the Offline Files feature and Windows Information Protection, resulting in a sync problem that prevents files from being opened offline.
Solution: You can open the file by using an application that is not managed by Windows Information Protection, or access the online files after connecting to the network, as offline files do not support Windows Information Protection.
If you're experiencing sync center problems in Windows 10, try the suggested solutions. If they don't work, you can also consider using a different sync software.
Powerful sync software to sync network files offline
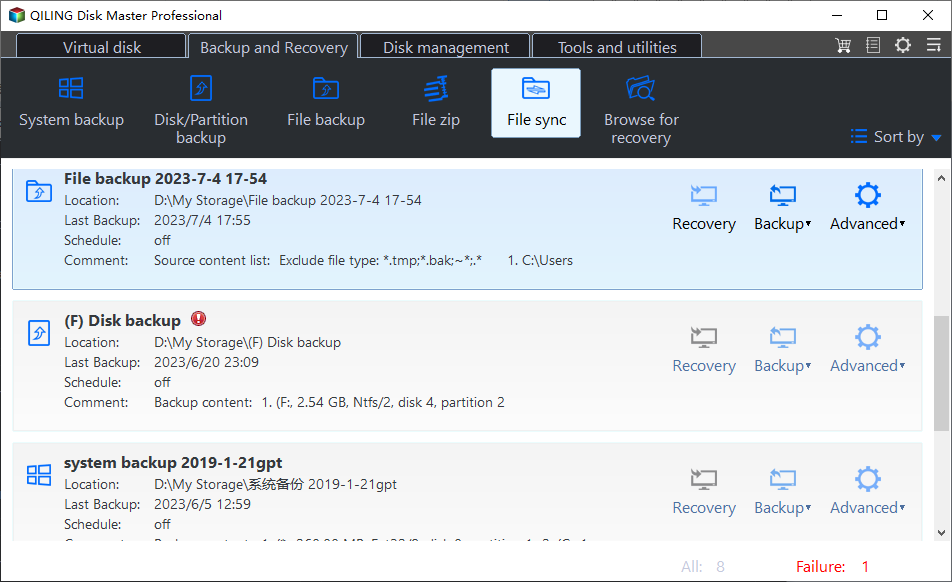
Qiling Disk Master Professional is a powerful file sync tool for Windows PCs, offering various sync features and automatic sync tasks, compatible with Windows 11, 10, 8.1, 8, 7, Vista, and XP.
- Diverse sync methods: File Sync, File Sync, File Sync, and File sync are options available for syncing files. The choice between them depends on the desired sync direction, frequency, or file copy security.
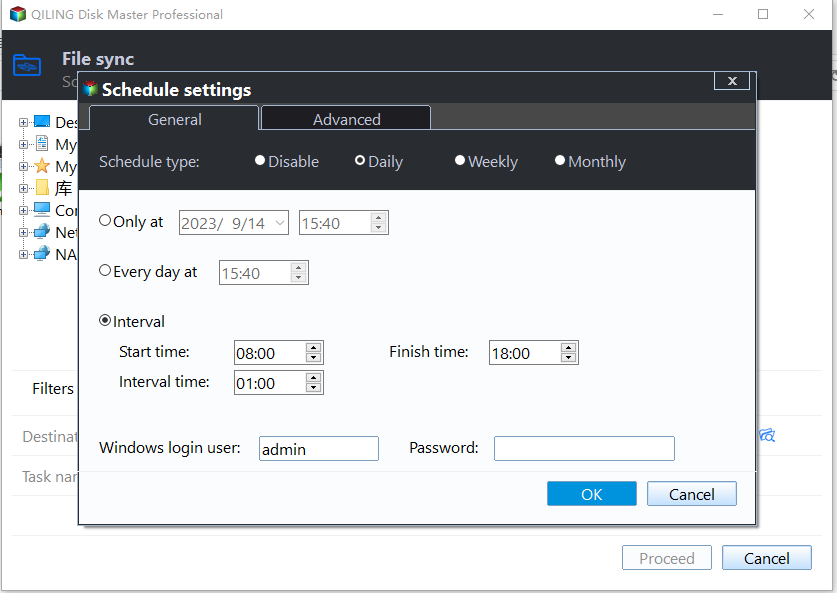
- Schedule sync: The device allows for various trigger options, including daily, weekly, monthly, event triggers, and USB plug-in, catering to different frequencies of file changes or specific events or devices. The USB plug-in option is particularly convenient, automatically copying files when a USB device is connected.
- Rich sync destinations: It enables syncing network files to various local storage options, including local drive, external disk, USB, network drive, or another computer.
To keep all data up to date, it's suggested to use the Real Time Sync feature in Windows 7/8/10/11. A 30-day free trial is available for a try. Server users may consider Qiling Disk Master Server.
You can learn details and sync network files offline in real-time easily.
Step 1. Launch the best file sync software - Qiling Disk Master Professional. Click Backup and recovery > File Sync subsequently.
Step 2. To add a share or NAS device, press the Folder button, then select Share/NAS, and click Add Share or NAS Device. Enter the display name, IP address, user name, and password, and confirm by clicking OK. Finally, select the shared folder you want to sync offline.
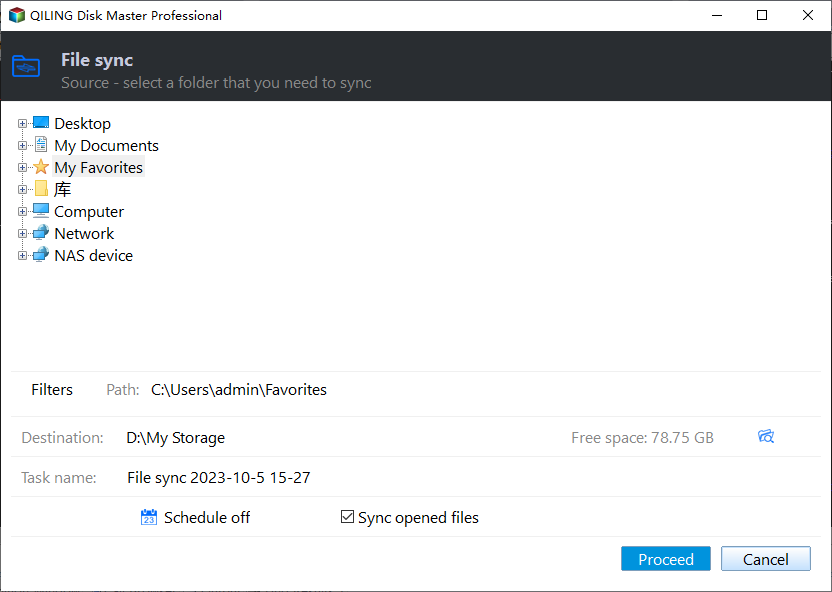
Step 3. Click the second box > This PCTo store network files and folders, select a local drive to save them to, and optionally click the "Save as" button to specify a location and file name.Options To comment on the sync task, check the file integrity in the destination during synchronization, etc. and then click.Proceed to sync network files offline.
Once you set up the sync task, all the specified folders and files will be synced automatically whenever any changes occur to the network files or folders, making it a smart and automatic process.
You can view files and folders from other computers as long as they are located on the same Local Area Network (LAN) and the computer has permission to access them.
If you're looking to create a regular backup, consider using Schedule Sync in File Sync, File Sync, or File sync, as a simpler alternative. If you're unsure which one to choose, refer to the following suggestions.
- File Sync One-way file sync methods, including Backup and File Sync, only sync files from source to destination, without syncing files in the opposite direction. This means that any changes made to the destination will not be reflected in the source.
- The File Sync method does not sync deletions by default.
- The File Sync method will sync deleted, new, and modified files, avoiding any changes in the destination, making it the safest method.
- The File sync method synchronizes all changes between the two sides, updating each side with any changes made on the other, if any exist.
- Two-Data synchronization can be done in a one-way manner, where only one folder is synced at a time, but it can also sync multiple folders using the one-way file sync method.
The End
Windows 7 Sync Center issues are often caused by problems with Offline Files and file conflicts. To resolve these issues, you can try the above-mentioned 8 methods or consider using a more powerful sync software, such as Qiling Disk Master Professional, which can sync files in real-time or on a regular basis.
File Sync offers a range of sync methods to meet your needs, including keeping file copies intact with no modifications. It also features a disk clone option for copying data from one hard drive to another.
Related Articles
- Top 6 Ways to Fix Windows 7 Offline Files Not Working Problem
How to fix Windows 7 offline files not working problem? This guide provides 6 methods to help you fix it. - Fixed: Offline Files Sync Pending in Windows 10
You will learn 5 solutions to fix offline files sync pending and an easier way to sync network files locally. - User Guide to Enable Offline Files in Windows 10 and Sync it
You will learn the one-step-shop to use offline files properly, including enabling or disabling offline files in Windows 10 and syncing network files locally. - How to Backup File Versions in Windows 7 with File History Similar
Previous Versions is a useful tool built in Windows 7 that works like Windows 7 version of File History - create an snapshot of files or view and restore earlier versions of files. - How to Sync Files and Folders in Windows 7 Computer
Files sync can help people make a copy of needed files so that the files can be used in different places. Here you can learn how to synchronize files in Windows 7 computer in two different ways. - How to Sync Folders over Network? - Qiling Disk Master
You will learn how to sync folders between 2 computers over network, whether it's on the same LAN or not, and there are 3 methods in total.