Top 2 Ways to Move Windows 10 Boot Partition to SSD Without Reinstalling
- Why Move Boot Partition to Another Disk?
- Best OS migration software - Qiling Disk Master
- Move Windows 10 to SSD with System Clone
- Transfer Windows 10 to New SSD with Disk Clone
- Conclusion
Why Move Boot Partition to Another Disk?
Moving the Windows 10 boot partition to another drive is an emergency situation that requires a step-by-step guide to troubleshoot. There are specific situations where this might be necessary, such as when the current boot partition is running low on space or when you want to free up space on the current drive. Fortunately, this can be done, and we'll show you how to do it.
- If you want to speed up your computer or free up more space, you can move your Windows installation to a new drive. This might be necessary if you're experiencing slow response times and want to transfer Windows 10 to a faster SSD, or if you're getting low disk space errors and need to change the boot partition to a larger drive.
- If you're experiencing issues with your Windows 10 system, such as error loading operating system or system boot failure, you can try booting from a cloned hard drive or SSD that contains the Windows 10 OS. This can help you get back up and running without having to reinstall the operating system.
Best OS migration software - Qiling Disk Master
Windows 10's built-in backup software can protect system files and personal files, but it lacks cloning features to transfer the OS from one drive to another, such as from a hard drive to a solid state drive.
You can easily move your Windows 10 boot partition using Qiling Disk Master Professional, a reliable software that allows safe and issue-free migration, ensuring a bootable system after cloning, compatible with Windows XP, Vista, 7, 8, 8.1, 10, 11, including 32-bit and 64-bit versions.
With the help of Qiling Disk Master, you can enjoy numerous benefits, including being able to recover data from dead or damaged disks, clone disks to create exact copies, and transfer data between disks with ease. This powerful tool also allows you to migrate operating systems and applications to new disks, making it a convenient solution for upgrading or replacing old hardware.
- The software will clone all contents from the Windows 10 system boot partition, including system files, settings, installed programs, and personal files, to ensure a secure boot on the cloned partition.
- All partitions containing system files and boot files will be cloned, like C drive, EFI System partition, Recovery partition, etc.
- Enabling SSD Alignment can optimize the overall performance of the SSD and its lifespan when transferring Windows 10 to the SSD.
Moving the boot partition for Windows 10 is a straightforward process that saves time and effort, as it doesn't require system reinstallation. There are two ways to do this:
- System Clone: Clone only Windows 10 system files.
- Disk Clone: Clone entire hard disk including the Windows 10 boot partition.
Move Windows 10 to SSD with System Clone
To move your boot partition to an SSD using the System Clone feature, follow these steps: .
Before moving boot partition, make some preparations:
✎To optimize Windows 10 performance, start by freeing up storage space on your system boot partition by deleting unnecessary files and programs. Before making any changes, ensure you have backed up all your important data.
✎A new SSD. Connect it to the Windows 10 computer, make it can be detected by Windows.
✎A Windows 10 installed computer.
✎Download the powerful OS migration software - Qiling Disk Master Professional 30-day free trial. Install and execute this software. This software will help you migrate your operating system to a new hard drive or solid-state drive. It will guide you through the process and ensure a smooth transition, minimizing the risk of data loss or corruption.The free trial version of the software can only demonstrate clone features, but users cannot actually use them to clone data. This means that users can see how the cloning process works, but they cannot perform the actual cloning themselves.upgrade to enjoy.)
To perform a Windows 10 migration to an SSD, follow these steps: First, ensure the SSD is properly connected to the system, either by installing it as a secondary drive or replacing the existing hard drive. Next, back up all important data to an external drive or cloud storage to prevent loss during the migration process.
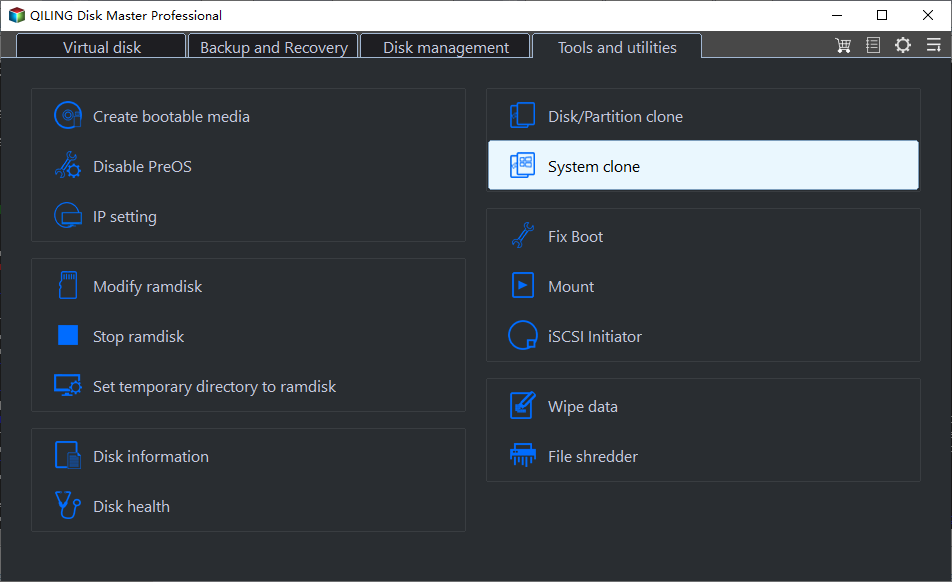
1. To move the system boot partition, go to the Clone tab and select System Clone.
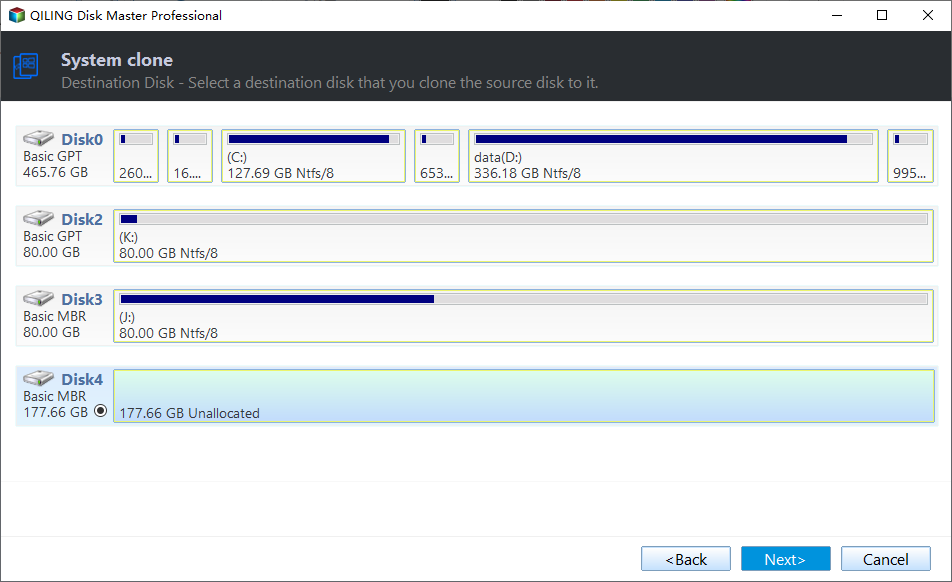
2. Select the new SSD as the destination to save the Windows 10 boot partition, then click Next.
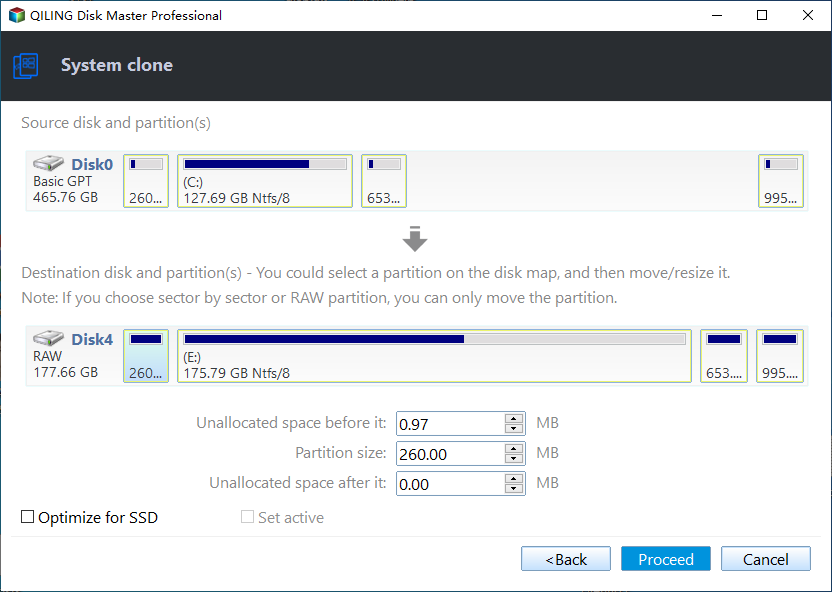
3. To safely and easily move the Windows 10 EFI partition, recovery partition, and C drive to an SSD, click the "Proceed".>
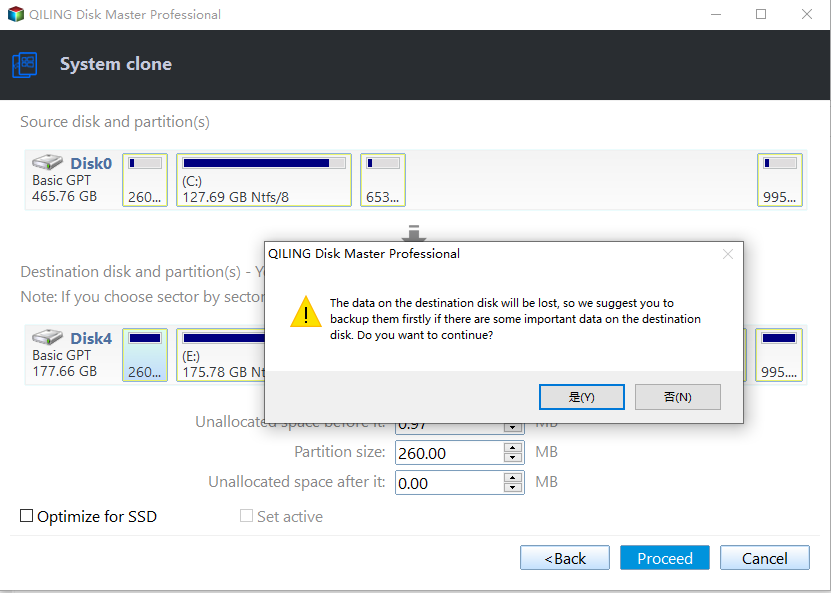
4. If you have important files on your SSD, back them up first, then click "Yes" to proceed with the process.
★Tips:
✍Cloning the system partition with all sectors, including bad ones, can take a long time, but ensures a complete copy. Leaving this option unchecked will skip bad sectors, potentially saving time but possibly missing important data.
✍When cloning the Windows 10 boot partition to an SSD, ensure that the "Align SSD" or "Optimize for SSD" option is selected to optimize the SSD's reading and writing performance and extend its lifespan.
✍To move the boot partition in Windows 7, 8, 8.1, and early Windows versions, follow these steps: Create a Windows installation media, boot from it, and go to the 'Repair your computer' option. Select 'Command Prompt' and run the 'diskpart' command to list all disk drives.
The great OS migration software will soon show you the best ending for your Windows 10 migration to SSD.
Once the system cloning is finished, you can set up to boot from the cloned SSD by following these steps:
- Shut down the computer.
- Remove the original system hard drive and put the new hard drive (HDD or SSD) into the slot to change the boot disk (ignore the operation if you move to a new partition on the same disk);
- To change the boot order and set Windows 10 to boot from the larger HDD/SSD, enter the BIOS by pressing the key that triggers the BIOS setup (usually F2, F12, or Del) as the computer boots up. Once in the BIOS, navigate to the Boot Order or Boot Priority section and select the larger HDD/SSD as the primary boot device.
Windows 10 has been able to change the boot partition to another drive, a feature that has been available up to this point.
Transfer Windows 10 to New SSD with Disk Clone
Here are the steps to copy a boot drive to another drive using the Disk Clone feature in Windows 10:
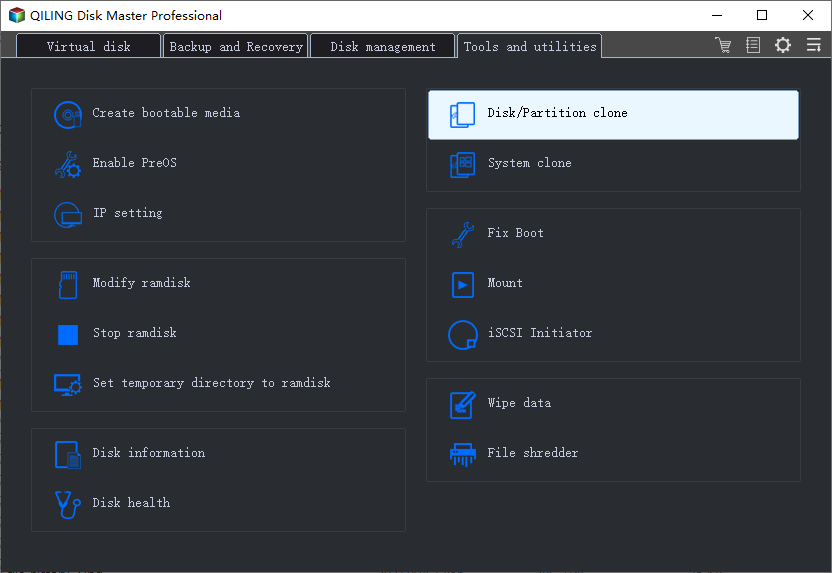
Step 1. Choose Clone tab, and then select Disk Clone.
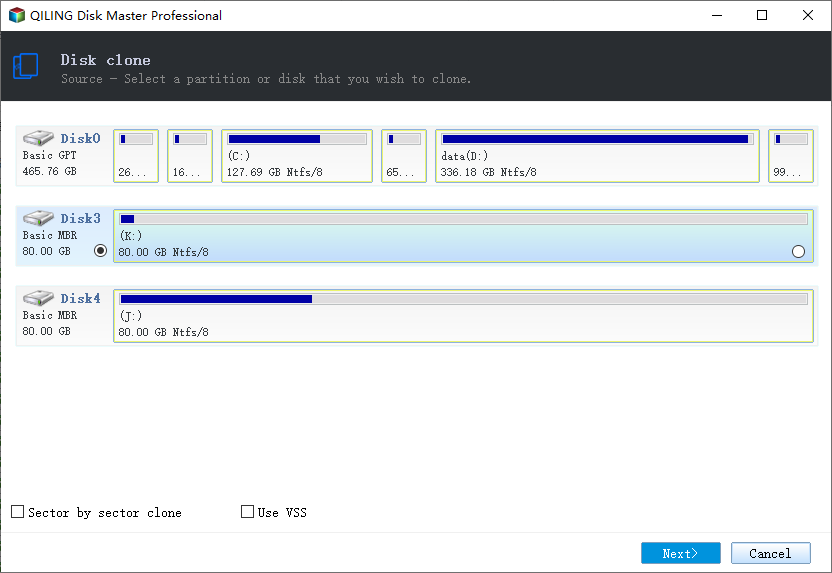
Step 2. To start the Windows 10 system disk as the source disk, select the Windows 10 system disk (HDD or SSD) and click Next.
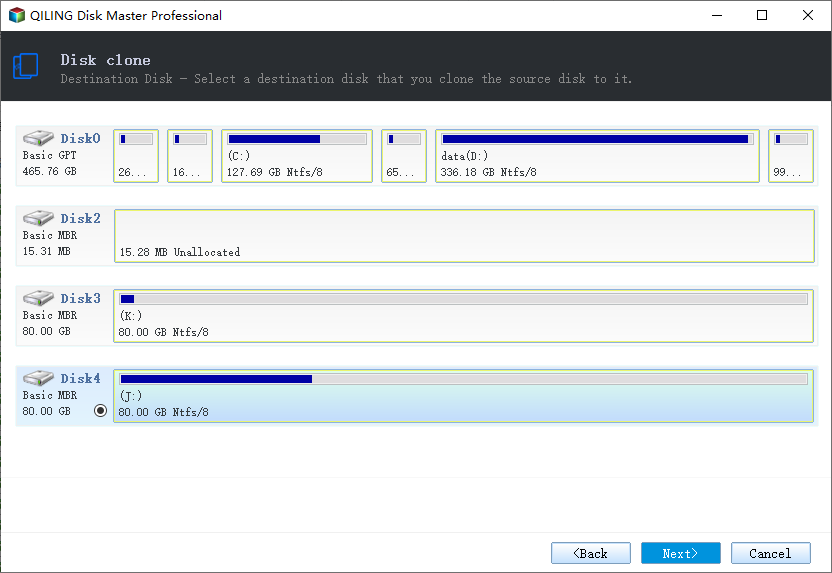
Step 3. Select the new SSD as the destination disk, and hit Next.
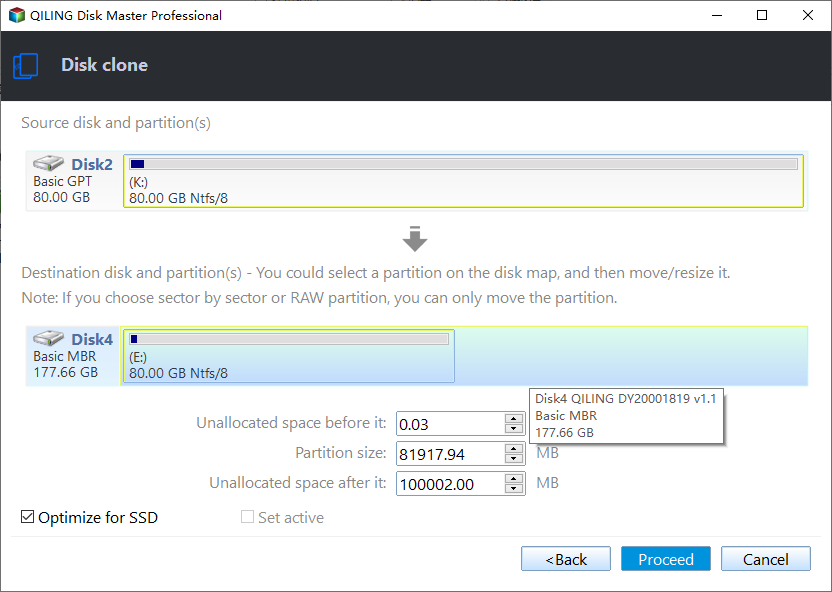
Step 4. Tick SSD Alignment and press Proceed to move boot partition in Windows 10.
★ Tips:
✍ The SSD Alignment and the Sector By Sector Clone are identical to the System Clone, as stated.
✍ Edit Partitions This feature allows you to adjust the partition size and location when cloning a disk to a larger disk, enabling you to fully utilize the storage capacity of the larger disk.
This program also supports cloning MBR to GPT disk or GPT to MBR disk easily in Windows 10/8/7.
Conclusion
You can move your Windows 10 boot partition to an SSD using Qiling Disk Master without having to reinstall Windows or set up complex configurations. The process is easy and time-saving. There are two ways to do this, both of which allow you to keep your operating system intact.
You are allowed to clone Windows 10 to a smaller SSD as long as the destination SSD can hold all the data on Windows 10's boot partition, and Qiling Disk Master offers additional features such as creating system images, merging or splitting backup images, real-time syncing files or folders, and command line cloning.
For server usage, you can try using Qiling Disk Master Server or Technician Plus edition. Qiling Disk Master is a good option to consider.
Related Articles
- Move System Reserved Partition to Another Drive Effortlessly
- Top Two Ways to Install Windows 10 to SSD
- How to Move Program Files to Another Drive on Windows 10/8/7
- How to: Change SD Card Serial Number Without Formatting in Windows
Here comes the best way to change SD card serial number without formatting on Windows 10, 8, 7. - Scheduled Backup
Qiling Centralized Disk Master provides four schedule modes: Once, Daily, Weekly, Monthly to backup system, disk, and partition. - How to Put Windows 10 on SSD from HDD without Reinstallation?
Move Windows 10 from HDD to SSD with cloning or migration methods, then boot from the SSD without reinstalling the system.
Products
Articles & Tutorials
- Data Recovery
- Data Backup
- File Recovery
- File Backup
- File synchronize
- System Backup and Restore
- Disk and Partition Clone
- Technical articles
- Disk Master Help
- Windows Deleted File and Disk Recovery Tutorials
- Windows File and Data Recovery Tutorials
- More Windows Tutorials for Install, Security, Files, and PC Tips
- Windows Boot, Repair, and Recovery Environment Tutorials
- Windows Backup Tutorials
- Windows Restore Tutorials
- Windows Clone and Migration Tutorials
- Windows Server Backup, Recovery, and Management Tutorials
- Windows Disk, Partition, and Storage Management Tutorials