How to Resize GPT Partition Windows 10 without losing data?
Why need to resize GPT partition in Windows 10?
GPT (GUID Partition Table) is an alternative to MBR (Master Boot Record) disks, offering greater flexibility and larger storage capacity. Unlike MBR disks, which are limited to 2 TB and 4 primary partitions, GPT disks can support hard drives larger than 2 TB and up to 128 primary partitions. If you're using a GPT disk, you may need to adjust partition sizes due to these expanded capabilities.
●Make the distribution of the GPT partition capacity reasonable: Some partitions may become too small and fill up quickly due to the growing amount of data, while others have ample free space. To address this imbalance, it's possible to move free space from one partition to another, thereby improving the overall disk space distribution.
●"Low disk space" warning appears: You're receiving a "low disk space" warning on Windows (C:) despite having available space on the drive, and the C drive bar is red in File Explorer. This is not a good sign, but deleting files on the system drive is not recommended as it may delete crucial system files, causing system crashes. Instead, consider extending the partition to free up more space.

●Only one big partition exists on GPT hard disk: On most new computers, the hard drive is divided into only one big partition, usually the C: drive. To create a separate partition, you can shrink the C: drive to spare unallocated space, which can then be used to create a new partition.
How to resize GPT disk partition in Windows 10/8/7?
To resize a partition on a GPT or MBR disk, you can utilize either the built-in Disk Management tool in Windows or a third-party partition software.
Method 1. Resize GPT partition via Disk Management
The Disk Management utility in Windows allows users to view and manage disk layout, file system, and status, and also enables creating, deleting, formatting, extending, or shrinking partitions with ease. It can be used to shrink or extend GPT partitions.
▶Shrink GPT partition:
- The "Shrink Volume" feature only works on NTFS or RAW partitions, and is compatible with GPT or MBR basic hard drives.
- The unallocated space from shrinking an existing partition will be located immediately behind the volume that was just shrunk, and cannot be moved.
Step 1. To access the Disk Management console, start by clicking on "Start" and then selecting "Run". In the Run dialog box, type "diskmgmt.msc" and click "OK". Alternatively, you can right-click on the "My Computer" or "This PC" icon and select 'Manage'. From there, navigate to the Disk Management console by clicking on "Disk Management" under the "Storage" section in the console tree.
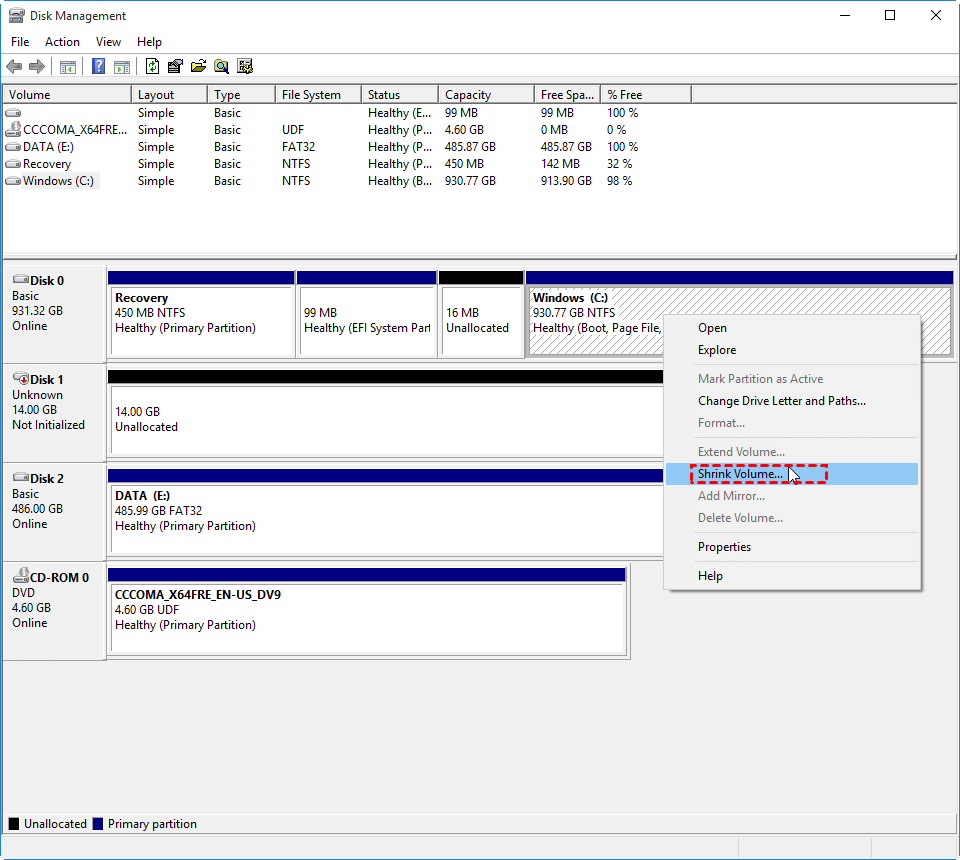
Step 2. Right-click the partition you want to shrink, verify it's of the NTFS file system, and choose "Shrink Volume" to see how well it can be shrunk by Windows.
Step 3. To shrink a partition, first, you need to select the partition you want to shrink in the list. Then, it displays the Shrink dialog box where you can set the size of the new partition by entering the desired size in megabytes.
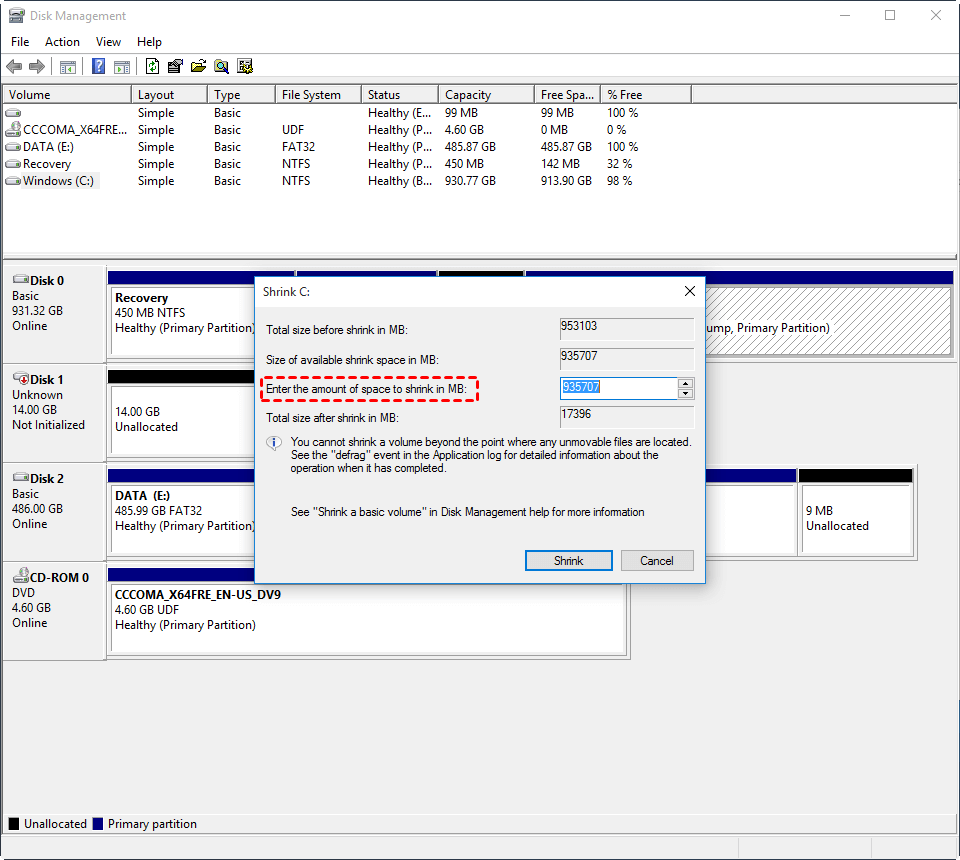
Step 4. To reduce the GPT disk partition size, click the "Shrink" button. This action will allow you to decrease the size of the GPT disk partition.
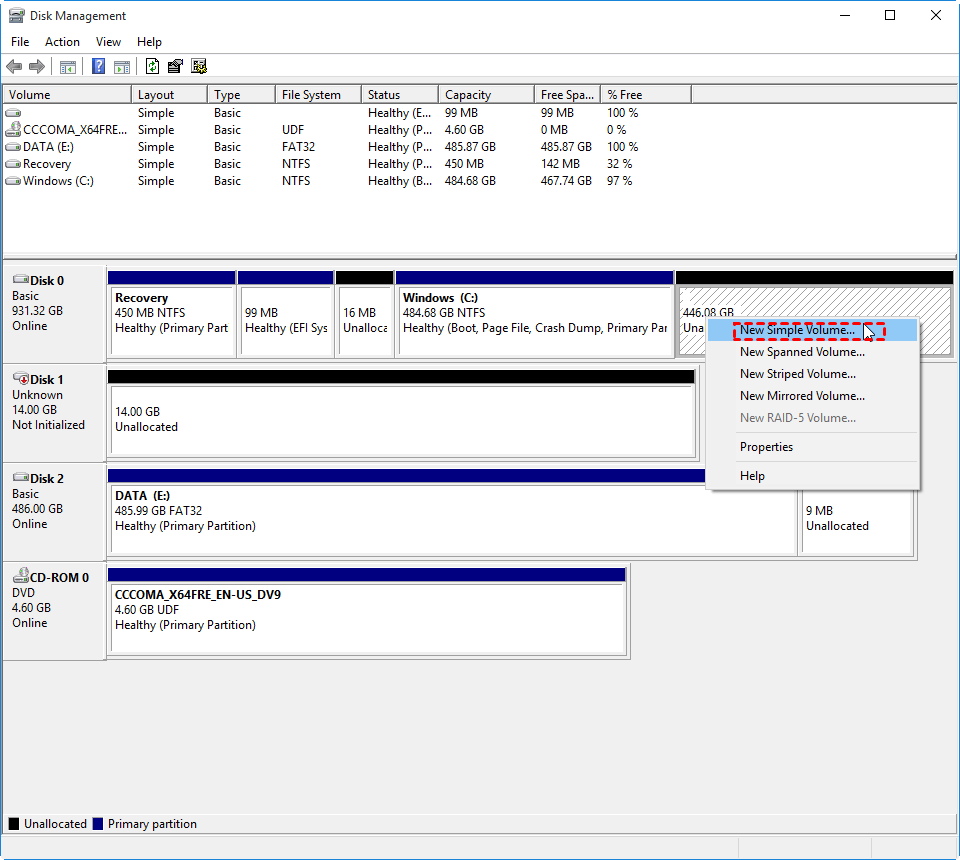
When the operation is complete, the new unallocated space appears on the GPT disk, allowing you to create a new partition using the "New Simple Volume Wizard".
▶Extend GPT partition:
- The "Extend Volume" function only works on NTFS or RAW partitions and requires an adjacent unallocated space to be extended.
The "Extend Volume" option in Disk Management is often greyed out due to its limitations, particularly when there is no adjacent unallocated space next to the target volume, making it difficult to extend a partition.
To delete the adjacent partition, you need to delete the partition that is adjacent to the unallocated space, so that you can extend the adjacent partition to the unallocated space. For example, if you have partitions C, D, and unallocated space on your GPT disk, you would delete partition D to create adjacent unallocated space, and then extend partition C to fill the newly created unallocated space. This process allows you to reclaim the space and extend the adjacent partition to its full potential.
Note: Deleting the D partition will completely wipe out all data stored on it, so it's essential to back up any important files or data beforehand if necessary.
Step 1. Right-click D volume and select "Delete Volume".
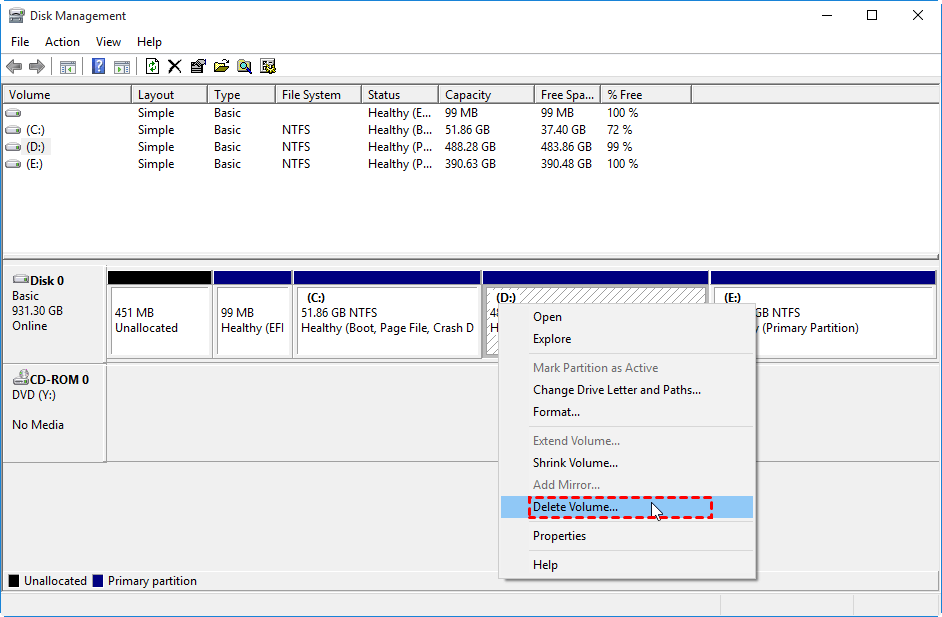
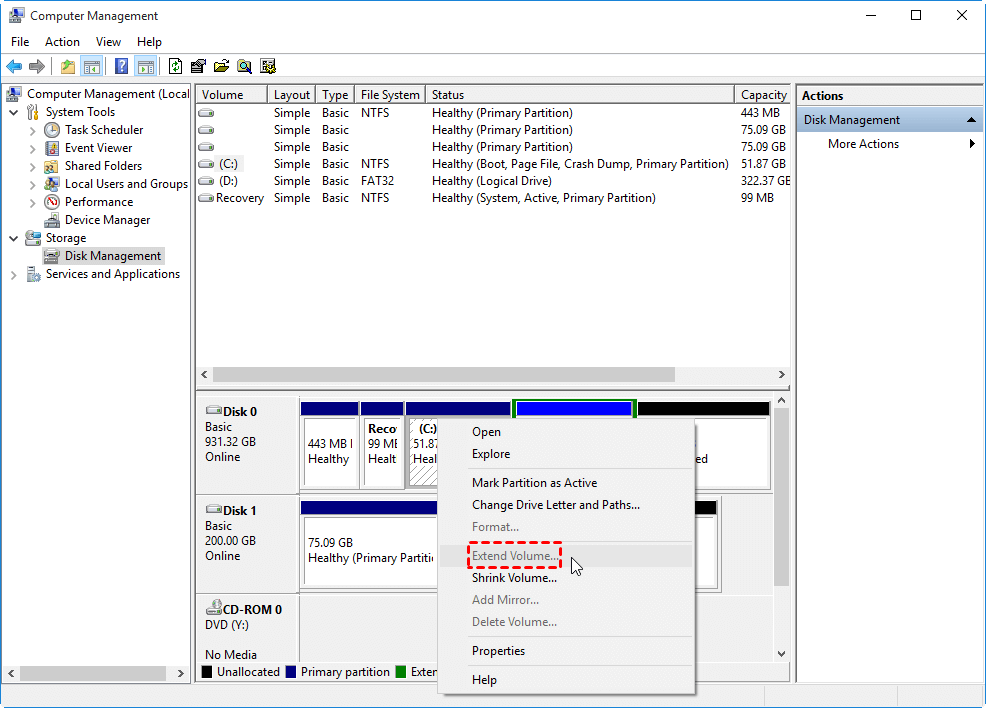
Step 2. To confirm the operation, click "OK". After completion, you'll see unallocated space next to the C drive. Then, right-click on the C partition and select "Extend Volume".
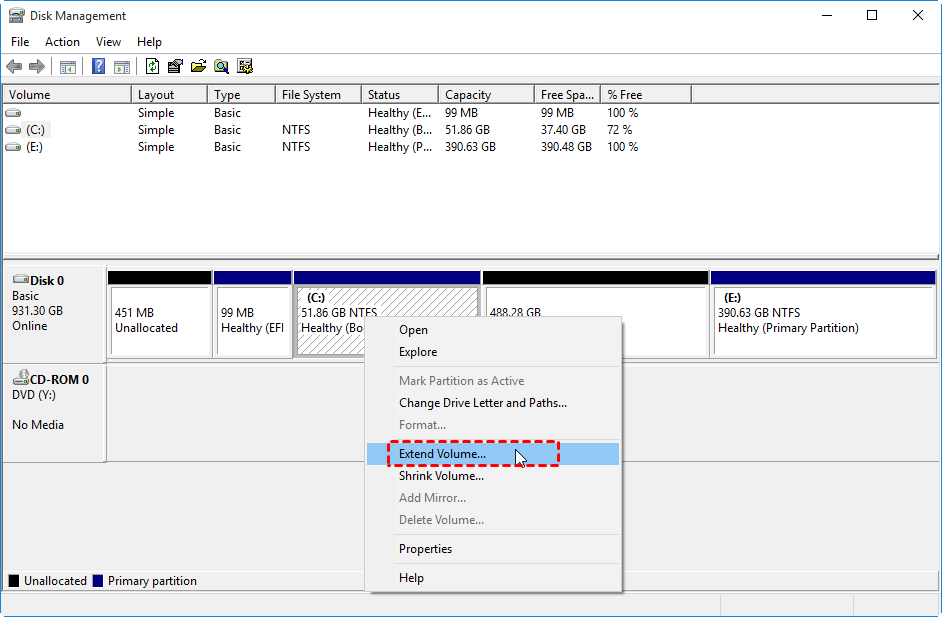
Step 3. Follow the wizard to extend system partition on GPT hard drive.
Method 2. Change GPT partition size without data loss via freeware
If the GPT disk partition you want to resize meets the specific requirements, using Disk Management is a good option. However, if the partition is not NTFS or does not have adjacent unallocated space, a more versatile tool like Qiling Disk Master Standard is recommended, as it can overcome the limitations of Disk Management and provide more flexibility in resizing and managing partitions.
✔Resize NTFS and FAT32 partition;
✔Move partition to make unallocated space contiguous to the to-be-extended partition;
✔Merge two adjacent partitions;
✔To merge unallocated space into another existing partition, you can use a partition manager tool. This process involves identifying the unallocated space and the partition you want to merge it with, then using the tool to combine the two.
Here, we will demonstrate how to extend GPT system partition with the non-adjacent unallocated space via the "Merge Partitions" function. We will use the Disk Management tool in Windows to merge the unallocated space with the GPT system partition.
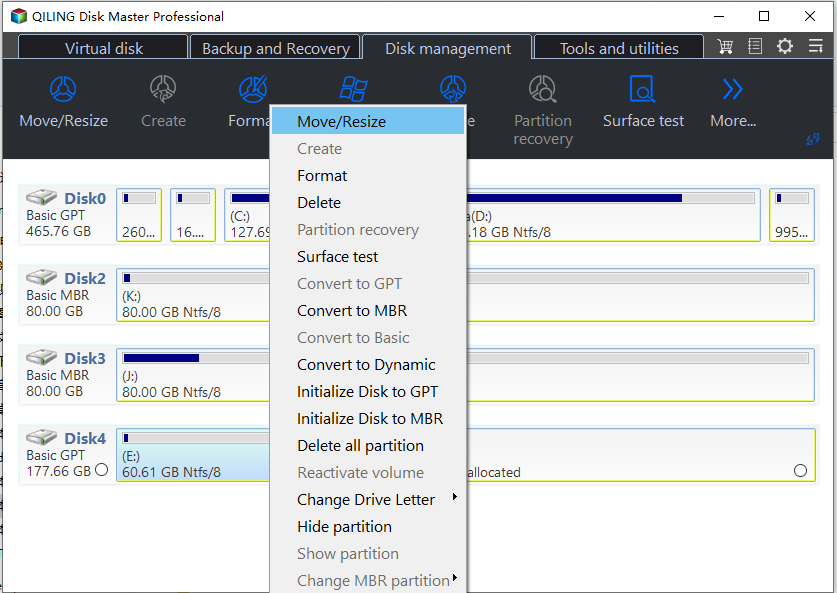
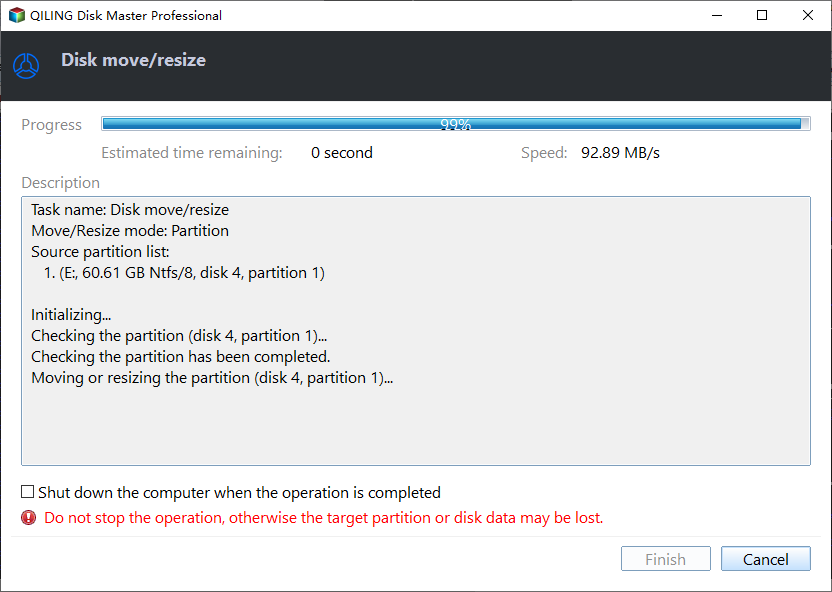
1. To resize partitions, install and run Qiling Disk Master Professional, then right-click the C drive and select "Move/resize Partitions".
2. Drage to the unallocated space.
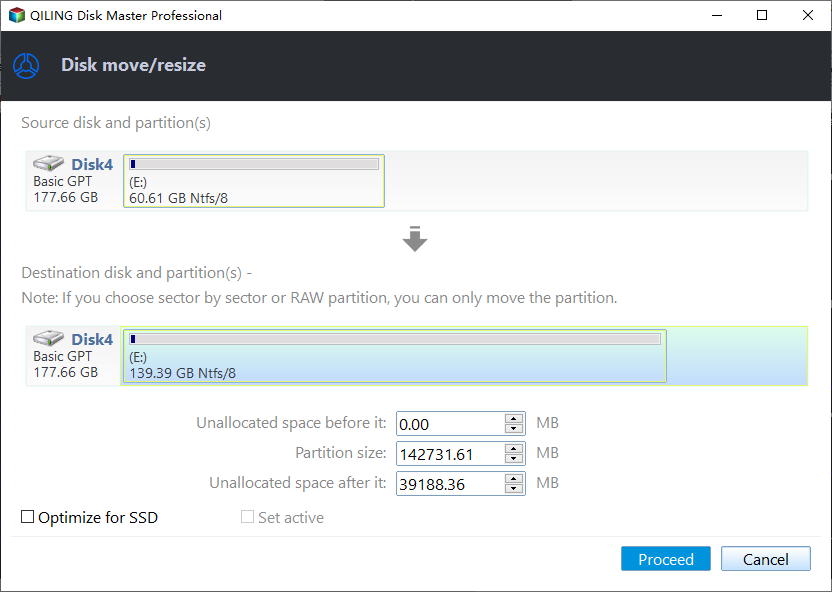
3. Click "Proceed" to commit the pending operation.
Summary
While Windows Disk Management can help resize GPT partitions, it comes with some restrictions. For a more reliable and feature-rich solution, the Qiling Disk Master Standard is a better choice, allowing you to resize partitions, clone partitions or hard drives, transfer OS to SSD, and more, without losing data. Additionally, the Server edition of Qiling Disk Master is available for Windows Server users.
Related Articles
- How to Convert System Boot Disk to GPT without Losing Data?
Need to convert system disk to GPT, but not want to reinstall the OS? Here, you can learn how to convert MBR system disk to GPT without losing data or Windows operating system in Windows step by step. - Best SyncBack Alternative - Qiling Disk Master in Windows 10/8/7
In this post, you will find the best SyncBack alternative – Qiling Disk Master to help you to backup, sync, clone and restore data as you want, just find the way to protect your data safely. - How to Test Hard Drive Health on Windows PC
Regularly testing hard drive health can help you avoid many PC and hard disk issues that might cause more serious problems. To check hard drive health, you can follow this guide, which will show you how to perform a simple test to ensure your hard drive is running smoothly. - How to Transfer Windows OS from GPT Disk to SSD without Reinstalling?
How to transfer OS from GPT disk to SSD drive without reinstalling? Everything you might need to know can be found in this post. - How to Merge Partitions on Disk?
Qiling Disk Master allows you to merge 2 or more partitions on a disk into a larger partition without data loss, making it easier to manage your disk space. - How to Migrate Windows 7 from HDD to SSD for Free?
The Qiling Disk Master Standard allows you to migrate Windows 7 to SSD drive without reinstalling Windows. And you don't need to worry that you cannot boot from the new disk after migrating Windows OS from HDD to SSD.