How to Restore Windows 10 Backup to Dissimilar Hardware
Scenario: Windows 10 system image restore to different computer
You can create a system image and use it to restore the same computer when needed. However, if you need to restore the Windows 10 backup to dissimilar hardware, you may need to use a tool like Qiling Disk Master, which can create a bootable USB drive or CD/DVD that contains the system image, and then use it to restore the system on the new hardware. This process can be more complex and may require additional steps, but it allows you to restore the system on a different computer.
- To move Windows 10 to your new computer, you'll need to back up your files and settings, then reinstall Windows 10 on the new computer and restore your files and settings from the backup. You can use the built-in Windows Backup and Restore feature or a third-party backup software to create a backup of your files and settings.
- You want to upgrade the motherboard and CPU without reinstalling.
- To migrate Windows 10 OS, you can use the built-in feature called "Reset this PC" which will erase all data on the computer. Alternatively, you can use a tool like Qiling Disk Master to create a backup of the current OS and then install a new copy of Windows 10.
- To deploy a Windows 10 image to computers with dissimilar hardware, you can use a tool like Microsoft's System Center Configuration Manager (SCCM) or a third-party imaging tool like Qiling Disk Master. These tools allow you to create a master image of Windows 10 on a reference computer, and then deploy that image to other computers with different hardware configurations.
When trying to restore a Windows 10/11 backup to another PC with different hardware, compatibility issues may arise due to the hardware differences. However, there are workarounds to facilitate the process. One possible solution is to use the Windows 10/11 built-in backup and restore feature, which allows you to create a backup that is compatible with different hardware configurations. Another option is to use a third-party backup software that supports hardware-independent backups.
- Can you restore Windows 10 to another computer with dissimilar hardware?
- How to backup Windows 10 and restore on another computer
- Steps of Windows 10 image backup restoring to different hardware
Can you restore Windows 10 to another computer with dissimilar hardware?
✤ Issue I: Hardware compatibility
When reinstalling Windows on a new computer, you may encounter errors about "hardware abstraction layer" and "hal.dll" or a BSOD saying "Stop 0x0000007B" due to the operating system being set up with drivers specific to the old computer's motherboard and chipset, causing incompatibility with the new hardware.
The built-in Backup and Restore tool in older operating systems like Windows XP, Vista, 7, and 8 often results in errors, but newer systems like Windows 11 and 10 may have a better experience. However, even in these newer systems, users may still encounter various errors when using the built-in Backup and Restore tool.
To minimize recovery and boot issues, you may need to use a backup tool that supports dissimilar hardware restore, which allows for a backup to be restored on different hardware.
✤ Issue II: License type
To determine if your license can be migrated to a different computer, check your license type. If it's a floating license, it can be moved.
OEM licenses are tied to the motherboard and can only be migrated between the same hardware, whereas Retail licenses can be transferred between different hardware.
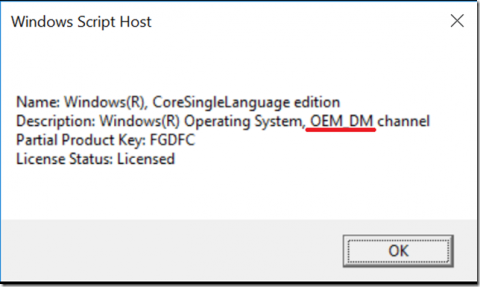
To check your Windows license type, press the Windows key + R to open the Run dialog, type "Slmgr /dli" and press Enter. This will open a window displaying your license information, including the type of license you have.
How to backup Windows 10 and restore on another computer
If Windows tools can't fix existing issues, third-party backup software is needed. I use Qiling Disk Master Professional, which supports any Windows version from XP to Windows 11, and offers all necessary features in one place, including system backup, creating bootable media, and universal restore.
The Universal Restore function allows you to securely restore a system image to a computer with different hardware, making it useful for physical-to-virtual (P2V) and virtual-to-physical (V2P) migrations.
✤ Preparations before migration:
If your target computer can boot properly and has a system installed, install the free Standard edition of Qiling Disk Master on the source computer to create a system image, then install and register the Professional edition on the target computer to enable the Universal Restore feature.
If your target computer can't boot normally, install the Professional edition on the source computer to create a system backup and bootable media. Then, use the media to boot the target computer into WinPE and perform a system restore.
Here's a free trial of the Professional edition:
✎ Tips:
- To deploy a system image to multiple computers, consider using the Qiling Image Deploy tool, which can simplify the process.
- Save the created backup image at an accessible place for the target computer, such as a removable device or network location, for easy access.
Steps of Windows 10 image backup restoring to different hardware
If the target computer can't boot normally, you'll need to create a bootable media to install Qiling Disk Master, which will allow you to perform a Universal Restore. However, if the target computer can boot normally, you can simply install Qiling Disk Master directly on the target computer to perform the Universal Restore.
Step 1. To create a bootable media and install Qiling Disk Master, you need to insert the bootable media, press the specific key at startup (such as Del, Esc, F2, etc.) to enter the BIOS, and set the bootable media as the first boot option. This will guide you into the Qiling Disk Master interface.
Step 2. To restore Windows 10, click Restore on the left panel and then click Select Image File to choose the Windows 10 backup image, typically a .fvd file.

To add a network location for Windows 10 backup saved on a network drive, select "Share/NAS" and then "Add Network Location". Enter the display name, IP address, username, and password of the network drive, and you can then select the backup image.

Step 3. Select the "Restore this system backup" option and check the "Universal restore" box at the bottom.

Step 4. To restore a backup to a destination disk, select the desired disk from the available options and click "Next" to proceed with the restoration process.

Step 5. To restore a Windows 10 backup to dissimilar hardware, preview all the operations and ensure the Universal Restore option is checked. After confirming, proceed with the execution and click Finish once completed, thereby completing the restoration process.

Tips:
- The Universal Restore option is enabled by default if the program detects any hardware differences between the source and target computers.
- This program also suggests you to check SSD Alignment box if the destination disk is an SSD.
Verdict
Qiling Disk Master Professional simplifies the process of restoring a Windows 10 backup to a different hardware configuration by allowing you to create a backup image, make bootable media, and then restore the image on the target PC, making the process straightforward and easy to follow.
This operation guidance can be applied in other operating systems as well, and Qiling Disk Master is also a disk clone software that can help you migrate Windows 10 from HDD to SSD without reinstalling.
Related Articles
- Restore Windows 10 from Recovery USB (4 Ways included)
- How to Use System Restore from Boot in Windows 10/8/7?
- 2 Ways to Restore Windows 10 System Image to New Hard Drive
- How to Solve System Restore Points Gone in Windows 10?
- Windows 10 System Restore Stuck on Initializing or Restoring Files︱Fixed
- Quickly Partition an External Hard Drive with Free Partition Assistant
Partitioning an external hard drive becomes a common question. This article is structured on how to partition an external hard drive with partition assistant.