Create System State Backup for Windows 10 [2 Free Ways]
What is System State Backup?
System state backup is a process that saves your Windows system files, allowing you to recover your system in case of a failure due to lost system files or registry. This can be achieved using native backup utilities, such as Windows Server Backup or the WBAdmin command, specifically the "start systemstatebackup" command, to complete the backup.

The process of backing up data may take an hour or more, with each backup (full or incremental) ranging in size from 8GB to 12GB, according to Microsoft Windows. The backup typically includes a variety of files.
- The registry.
- Sysvol (on a domain controller only).
- Cluster database (on a cluster node only).
- Active Directory (on a domain controller only).
- Component Services Class registration database.
- Performance counter configuration information.
- Certificate Services (on certification authority only).
- Boot files, including system files, and all files protected by Windows File Protection (WFP) are protected from being modified or replaced by unauthorized programs. This ensures that the system remains stable and secure, and prevents malicious programs from tampering with critical system files.
To create a full backup of your Windows 10 computer, you can use the built-in Windows Backup and Restore feature, which allows you to back up your system, personal data, and installed programs. This can be done by going to Settings > Update & Security > Backup, and following the prompts to set up a backup. Alternatively, you can use a third-party backup software, such as Qiling Disk Master, which can provide more advanced features and options for backing up your computer. Regardless of the method you choose, it's a good idea to regularly back up your data to ensure that it is safe in case of a system failure or other disaster.
You can use the native backup software "Backup and Restore (Windows 7)" on Windows 10, or third-party software like Qiling Disk Master Standard to create backups.
Way 1: Create System Image for Windows 10 with Built-in Tool
Windows 7's Backup and Restore feature allows you to create a system image on a USB drive or external drive, which can be easily accessed in Windows 10 if you've used it previously. To do this, go to Control Panel, then System and Security, and select Backup and Restore (Windows 7). From there, you can create a system image by selecting the drive you want to back up and choosing the location for the image. This will allow you to restore your system to its previous state in case of a problem.
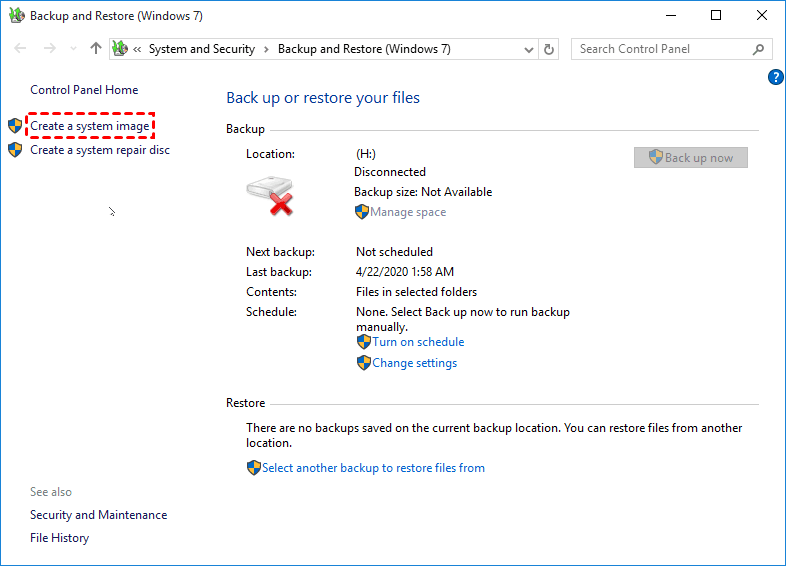
1. To access Backup settings in Windows 10, type "backup settings" in the search box, select it, and then click on "Go to Backup and Restore (Windows 7)" under the "Looking for an older backup" section.

2. In the Backup and Restore (Windows 7) window, select Create a system image at the left panel.
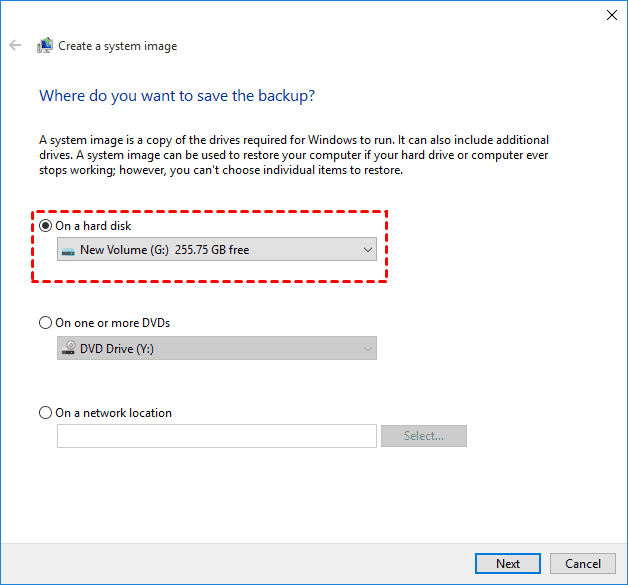
3. To back up your computer, select the external drive or USB as the backup destination, or use one or more DVDs or a network location to store the backup images.
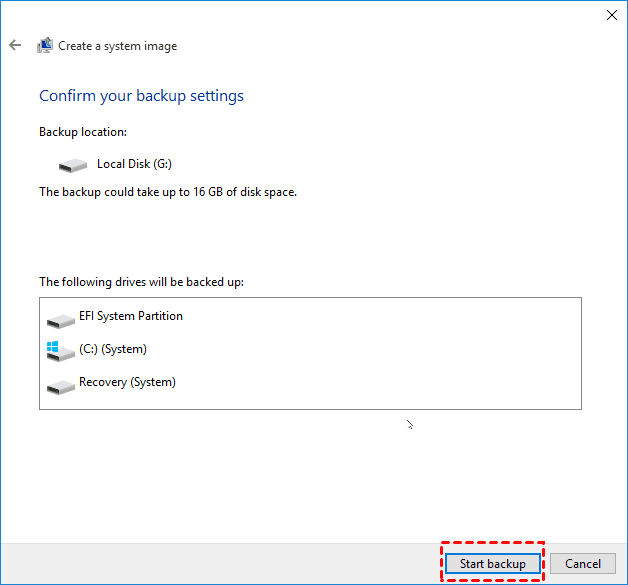
4. To create a system state backup in Windows 10, select all system partitions, including the C drive, EFI system partition, and Recovery partition, which will be selected automatically. Confirm the selection and click Proceed to initiate the backup process.
In Windows 10, creating a system state backup involves using the Backup and Restore (Windows 7) tool, which allows you to create a system image, but does not support scheduled backup settings. As a result, you'll need to manually backup your system after making significant changes, and even then, the process may not be stable, leading to Windows 10 backup failed errors. A more reliable option may be to use a third-party software.
Way 2: Create Windows 10 Full Backup with Third-party Tool (Auto & Smart)
Apart from the Windows built-You can use Qiling Disk Master Standard, a free Windows 10 backup software, to create a system state backup in Windows 10/8.1/8/7/XP/Vista. You can choose to back up your system daily, weekly, or monthly, depending on how often you make changes to your files.
Now, you can keep all the changes made in the previous backup and don't need to worry about any data loss. However, this may lead to a backup disk full issue in the long run, as the backup image continues to grow. This issue can be mitigated by compressing the backup image, backing up only the used sectors of the file system and changed files, and so on.
Download and install the software on your Windows 10, then use it to create a system image on a USB or external hard drive to prevent data loss in case of computer failure.
Step 1. After installing Qiling Disk Master Standard, the best Windows 10 backup software, connect your USB or external drive to your computer, ensuring it is detected by the system.
Step 2. Choose the Backup tab, then select System Backup.

To backup an entire hard drive in Windows 10 without losing data, use the Disk Backup feature, which will include all items in the system partition and data in other partitions, allowing you to backup multiple hard drives simultaneously.
Step 3. To save the system backup image file, click the folder-shaped button to select a destination path, such as a USB drive or external disk, and suffix the file with .fvd. You can also rename the Task Name to differentiate it from other backups.
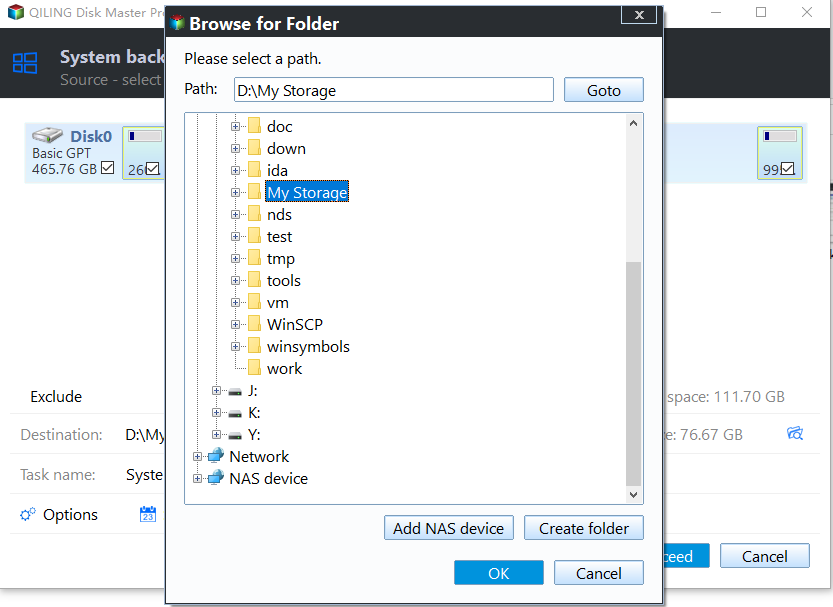
The partitions associated with system files will be selected automatically, so you don't have to manually select them.
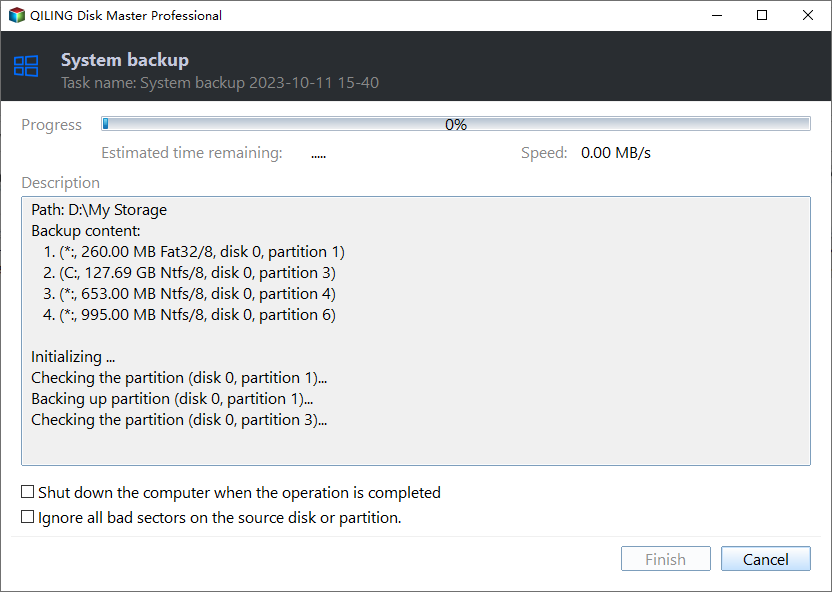
Step 4. To create a system state backup in Windows 10/8/7, click the Proceed button and set backup settings at the lower left corner.
- Options: You can customize the backup process by adding comments, splitting the backup into smaller files, and encrypting the image to ensure security. Additionally, you can adjust the compression level to balance between space savings and processing time.
- Schedule Backup: The system backup task can be set to run daily, weekly, or monthly, and can also be triggered by events or USB plug-in. However, the last two options require an upgrade to Qiling Disk Master Professional or other editions to be available.
- Backup Scheme This option allows you to automatically delete old backup images based on quantity, time, or frequency, and also enables incremental or differential backup to only save changed files.
The system state backup image file will be stored on your USB drive or external disk successfully, allowing you to restore your Windows 10 system or individual files if needed.
Summary
In Windows 10, a system state backup can still be created, originally referring to a snapshot of a server computer. This can be done using either the native software or third-party software, with the latter offering more flexibility and features, such as automatic backup, incremental or differential backup, and compression options.
You can easily migrate Windows 10 to an SSD by using a disk clone software, which makes an exact copy of your system. This process eliminates the need to restore a system image to the new SSD before booting from it.
Related Articles
- Use Wbadmin Start Systemstatebackup to Backup Your Computer
Learn how to use Wbadmin start systemstatebackup command to backup system state of your computer from an elevated command prompt so that you can perform disaster recovery when system crashes. - How to Take System State Backup in Windows Server 2008 (R2)
You will learn 3 methods to take system state backup and recovery in Windows Server 2008 (R2), including using Windows Server backup utility, command line or third-party server backup software. - Use Windows 10 WBadmin to Create System Image Backup
You will learn how to use Windows 10 Wbadmin backup or easier alternative to create system image backup. Learn both software and select one to protect your computer! - Quick Fixed: Mark Partition as Active Greyed out on Windows 10/8/7
Have you ever encountered marking a partition as active greyed out? In this article, we will show you why mark a partition as active greyed out and how to fix it. - How to Clone SSD to HDD in Windows 10 with Freeware
Looking for a way to copy SSD to HDD in Windows 10/11? This page shows a simple way to migrate data from SSD to HDD. - How to Clone Hard Drive in Windows 10 64/32 Bit?
You may want to clone Windows 10 64 bit hard drive for data protection or hard drive upgrade. No matter which is your case, Qiling Disk Master enables you to clone hard drive easily while ensuring secure boot.