Solved | Windows 10 Keeps Restarting after Update [5 Fixes]
- Scenario: Windows 10 Keeps Restarting after Update
- How to Fix Windows 10 Update Keeps Restarting
- Solution 1. Cancel Automatically Restart
- Solution 2. Remove Bad Registry
- Solution 3. Fix Driver Issues
- Solution 4. Boot Computer via Bootable Disk
- Solution 5. Refresh/Reset Windows 10
- Avoid Windows 10 upgrades keeps restarting issue happening again
- Conclusion
Scenario: Windows 10 Keeps Restarting after Update
My Windows 10 computer keeps restarting to finish installing 2018-02 Cumulative Update for Windows 10 Version 1709 for x64-based Systems over and over again. After each restart, I look at View installed update history and it says "Requires a restart to finish installing". Is there anything I can do to help this update install successfully or stop it from restarting over and over again. Thanks!
Windows 10 users often experience a frustrating issue where their computer continuously reboots after an update, resulting in an infinite boot loop, especially after upgrading from Windows 8.1, 8, 7, or updating on Windows 10 itself.
The good news is that there are methods to fix the Windows 10 upgrade keeps restarting issue, and by reading on, you can find the solution to this problem.
How to Fix Windows 10 Update Keeps Restarting
The issue of a laptop restarting after a Windows 10 upgrade is often caused by two common factors: bad registry entries and corrupted drivers. To resolve this issue, it is essential to remove any bad registry entries and fix the damaged drivers, which should help to prevent the laptop from continuously restarting.
Before attempting to remove bad registry entries and fix damaged drivers, try a quick fix by canceling the automatic restart.
Solution 1. Cancel Automatically Restart
1. Press the F8 key repeatedly until the boot menu appears, then select Safe Mode from the list of options.
2. Boot the computer from Safe Mode, then search for "sysdm.cpl" after Windows boots up, and open the system properties.
3. To disable automatic restarts, click on "Advanced" and then "Settings" under "Startup and Recovery", and uncheck the box next to "Automatically restart".
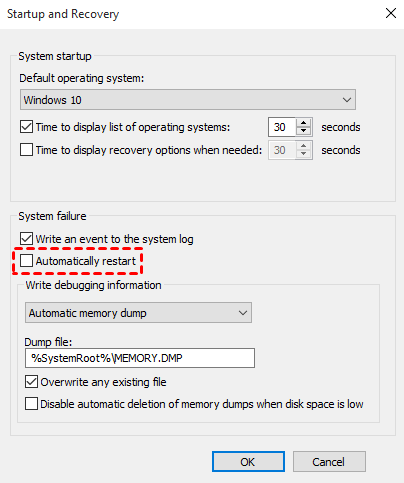
4. Click OK and reboot the computer.
Solution 2. Remove Bad Registry
📢Attention: This action may be dangerous, modifying Registry improperly can result in serious issue, so you better create a full system image backup before hand.
1. Open Run window and type regedit to open Registry Editor.
2. Then, navigate to HKEY_LOCAL_MACHINE\SOFTWARE\Microsoft\WindowsNT\CurrentVersion\ProfileList.
Tip: To avoid any issues, it's recommended to back up your registry key. This can be done by going to "File" and clicking on "Export…".
3. To remove ProfileList IDs with ProfileImagePath found in them, scan through the list and delete any IDs that contain the string "ProfileImagePath" in their ProfileImagePath field.

4. Exit Registry Editor.
5. Rebooting your computer is a simple troubleshooting step that can sometimes resolve issues like the endless booting problem. When you reboot your computer, it reloads the operating system and starts fresh, which can sometimes resolve issues caused by software glitches or conflicts. So, if you're experiencing an endless booting problem, try rebooting your computer to see if it resolves the issue.
Solution 3. Fix Driver Issues
There are reports that Windows 10 conflicts with AMD graphics, which may cause a computer to get stuck in an endless boot loop, possibly due to outdated driver issues, and attempting to fix the graphics drivers might resolve the problem.
1. To check for hardware issues, open the Control Panel, go to the Performance and maintenance tab, and select System. Then, click on Device Manager and look for any hardware with a yellow exclamation point beside it, indicating a potential problem.
2. Right-click on the device with a yellow exclamation point and select Properties. In the Properties window, click the Troubleshoot button and follow the on-screen instructions to resolve the issue.
3. If Step 2 doesn't work, right-click on the device, click Properties and choose Update Driver, then reboot your computer to see if the yellow exclamation point disappears.
4. If Step 3 doesn't resolve the issue, you might need to reinstall the driver as a final troubleshooting step.
Solution 4. Boot Computer via Bootable Disk
If Windows 10 keeps restarting, try booting and running your PC from a bootable disk. To do this, create a recovery drive on a healthy Windows 10 computer using the built-in utility. This can help resolve the issue.
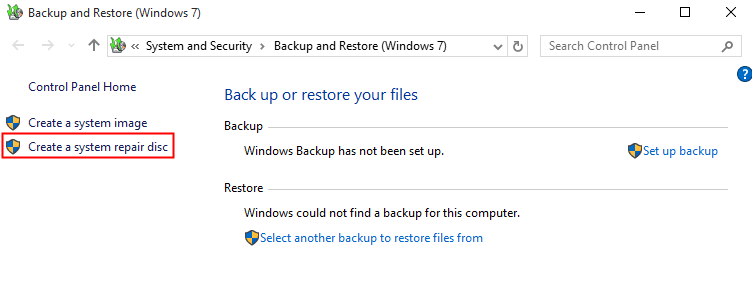
1. To access backup settings, type "backup settings" in the search box and select it, then scroll down to click "Go to Backup and Restore (Windows 7)".
2. Click "Create a system repair disc" at the left panel of Backup and Restore (Windows 7).
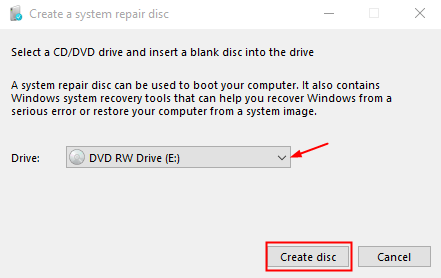
3. Please select a CD/DVD drive and insert a blank disc into the drive as instructed.
4. To create a Windows 10/11 recovery disc with a CD/DVD, click the "Create disc" option. This will initiate the writing process, which typically takes only a few minutes to complete.
5. Insert the system repair disc, press the specific key during startup, and change the recovery drive as the first boot in BIOS to boot from it.
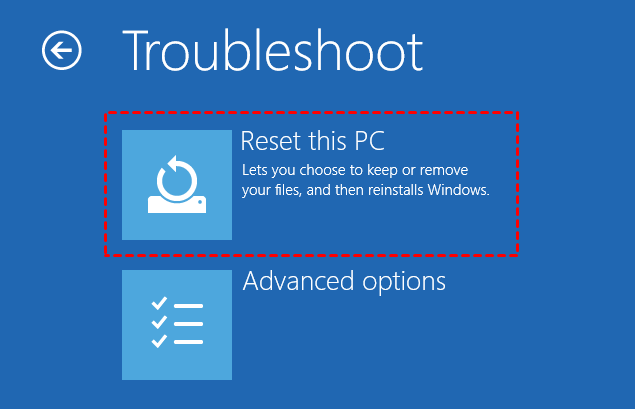
6. To access the Windows 10 recovery options, choose a keyboard layout and select the "Troubleshoot" option. This will allow you to access the recovery options you need.
Solution 5. Refresh/Reset Windows 10
If none of the above steps resolve the Windows 10 update keeps restarting issue, you can try refreshing or reinstalling your PC as a last resort.
1. To resolve the issue, turn off your PC and then turn it on. Press and hold the Power button as soon as you see the rotating loading circle, and repeat this process a few times until you see the "Preparing Automatic Repair" screen.
2. After diagnosing your PC, you will see the Automatic Repair screen. Choose Advanced options to continue.
3. Choose Troubleshoot and then select Refresh your PC or Reset your PC. Alternatively, you may need to go to Advanced options to access the Refresh your PC option.
Refresh your PC will keep the data, but remove installed apps, while Reset will erase all files. Backup your PC in advance to avoid losing data. You can refer to this guide: How to Backup Windows 10 for Fresh Install.
Avoid Windows 10 upgrades keeps restarting issue happening again
After resolving the issue of Windows 10 upgrade keeping restarting, consider taking preventative measures to avoid this issue or similar ones in the future, and the best measure is to make an image backup.
With an image backup, you can quickly recover from system issues like infinite loading or continuous reboot, reverting to a previous good state, thereby minimizing downtime and stress.
It is recommended to use free Qiling Disk Master to backup your computer.
- It is an easy-to-use software that comes with many powerful features.
- It supports you to backup system, partition, disk, and files.
- With Qiling Disk Master, you can create a backup of your computer's current state, which can be used to restore your system to its previous condition in case of any issues.
- Even when you can't boot your computer, you can still restore from a bootable disk.
Free download Qiling Disk Master Standard and have a try:
To backup your computer, start by identifying the files and data you want to save. This may include important documents, photos, videos, and other personal files.
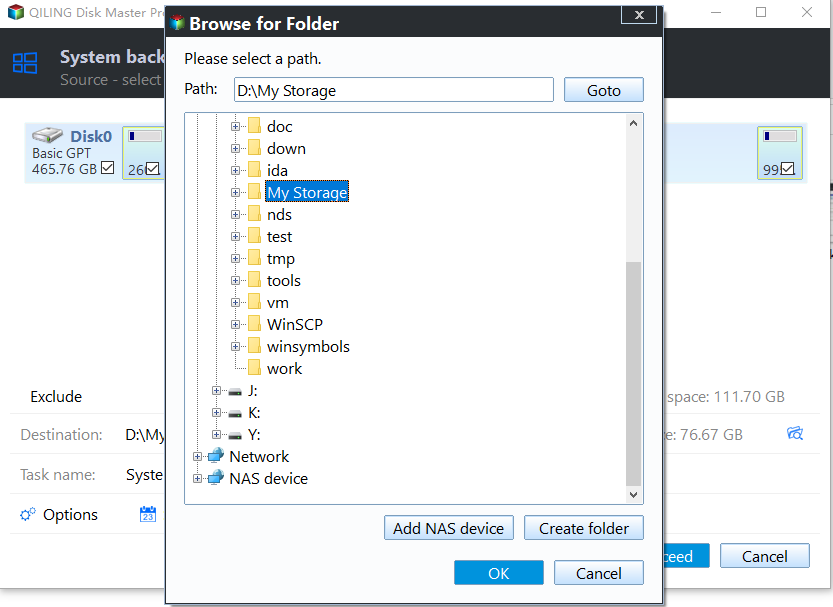
1. Download Qiling Disk Master, open it, click Backup and select System Backup.

2. To use Qiling Disk Master, simply select a destination path, and the software will automatically choose the source for you. This flexibility allows you to back up your Windows system to a variety of storage devices, including USB drives, internal hard drives, NAS, cloud drives, and more.
3. You can schedule regular backups to keep your backup up to date, which will automatically backup your system on a regular basis, taking incremental backups that use minimal backup disk space.
4. At last, click Proceed.
After creating a system image backup with AOEMI Disk Master, you won't have to worry about Windows 10 upgrade failures and subsequent restart loops. If the issue persists, you can restore your system to its previous state with the backup, ensuring a smooth recovery. Additionally, the advanced version of AOEMI Disk Master allows you to restore your system to dissimilar hardware, providing flexibility in case of hardware issues.
Conclusion
To fix the issue of Windows 10 keeping restarting after an update, try one of the methods mentioned. If you're looking to prevent this issue or others like it from happening again, consider scheduling automatic backups in Windows 10. This can also be helpful for users who plan to upgrade or update their computer, as it allows them to back up their system in case of failure.
Related Articles
- How to Reinstall Windows 10 without Losing Data (3 Ways)?
Sometimes, you may need to reinstall Windows 10/11 to solve system issues. This guide will show you how to reinstall Windows 10/11 without losing data step by step. - How to Reset or Refresh Windows 10 without Losing Programs
This article tells you how to refresh Windows 10 without losing programs and data. It seems a good idea to reinstall Windows 10 when serious system problem occurs. Read on to learn more. - How to Backup Windows 10 Computer to External Hard Drive?
Backing up Windows 10 to external hard drive is a good way to prevent hardware failures or system crashes. This post will show you how to prepare the external drive and execute the backup successfully. - Computer Stuck on Restarting Screen - 8 Effective Ways
To safely fix "computer stuck on restarting screen" in Windows 10 or 11, you need to get the reasons, backup your system, and try the following 8 effective methods. - Quickly Migrate Windows 10 to SSD without Reinstalling OS
With the Qiling Disk Master Standard, you can migrate Windows 10 to SSD drive directly instead of performing a clean installation.Check out the step-by-step guide on how to transfer Windows OS to SSD now. - How to Safely Move Programs from C Drive to D Drive in Windows 10?
Learn how to move programs from C drive to D drive or another drive in Windows 10 without reinstalling, thus you can easily and effectively solve C drive full issue.