How to Resize/Move Partition Windows 11 without losing data?
How do I move partitions in Windows 11?
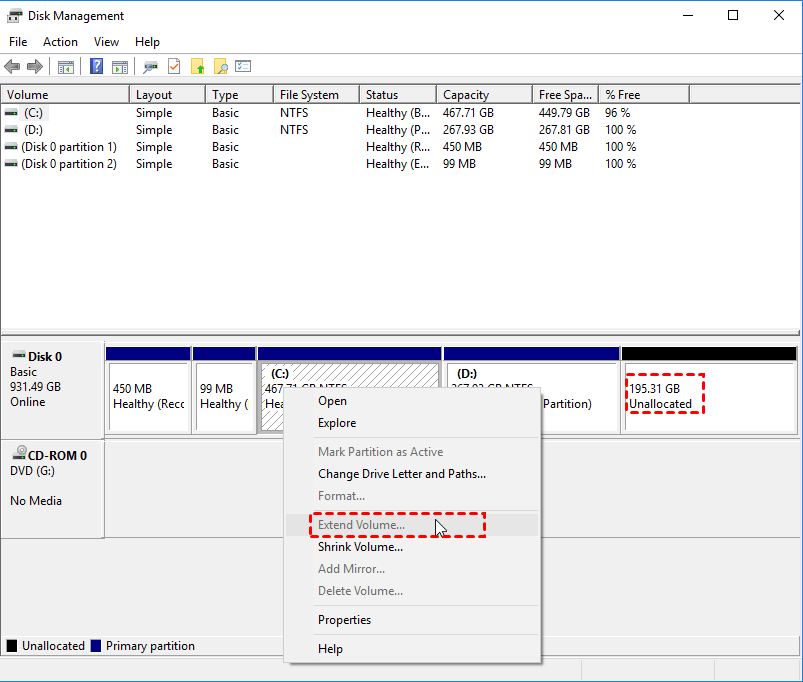
To extend your C partition and include the extra unallocated free space, you need to move the unallocated space next to the C drive. To do this, you can use the "Shrink" option on the D drive to free up space on the right side of it, then use the "Extend" option on the C drive to add that newly freed space to it. This will make the unallocated space and C drive adjacent, allowing you to extend the C partition. However, be cautious when shrinking the D drive as it may result in data loss if not done correctly. It's recommended to back up your data before proceeding. If you're not comfortable with this process, consider seeking professional help.
☛ Why do we need resize/move partition Windows 11?
If you're new to computers, you might not partition your hard drive effectively the first time, leading to a situation where your C drive is full while your D drive is empty after prolonged use. This can cause your computer to slow down, prompting you to resize the partition via DiskPart or Disk Management to adjust the unreasonable partition size, especially to extend the C drive.
With the help of GParted and the built-in resize feature, shrinking a partition is relatively straightforward. However, extending a partition can be more challenging, as it requires sufficient unallocated space directly behind the partition to be extended, otherwise, the operation may fail, leaving users with the same issue as the user above, unable to enlarge their partition.
To make the unallocated space and the to-be-extended partition adjacent, you need to move partitions to make them adjacent, but Windows built-in features cannot achieve this, a third-party partition manager can solve this problem perfectly.
How do I move and resize a partition in Windows 11, 10, 8, 7?
To resize a partition in Windows 11 using DiskPart or Disk Management, you need to have unallocated space adjacent to the target partition, which can be achieved by moving other partitions to make space available for resizing.
► Part 1. Move partition
To move a partition on Windows 11, you can seek assistance from third-party software. A recommended option is Qiling Disk Master Standard, a free partition manager that supports various Windows operating systems, including Windows 11/10/8/7, XP, and Vista. With this tool, you can resize or move partitions in just a few clicks, ensuring your data remains safe throughout the process. By downloading and utilizing Qiling Disk Master Standard, you can easily manage your partitions and avoid any potential data loss.
Step 1. Install and launch Qiling Disk Master Standard.
The main interface displays all partitions, showing a piece of unallocated space behind the D partition.
Step 2. Select the target partition.
To extend the C drive, you need to move the unallocated space to the left side of the D partition. This can be done by right-clicking on the D partition and selecting "Resize/Move Partition".
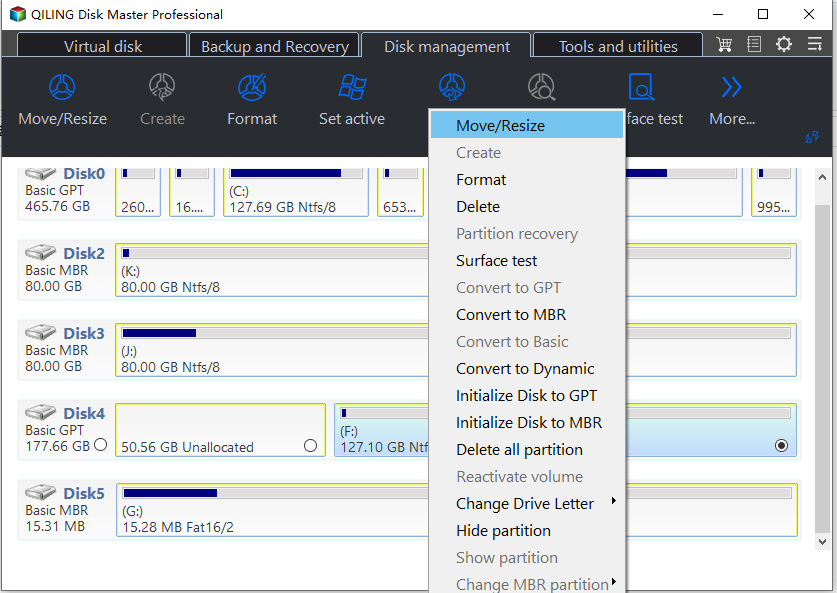
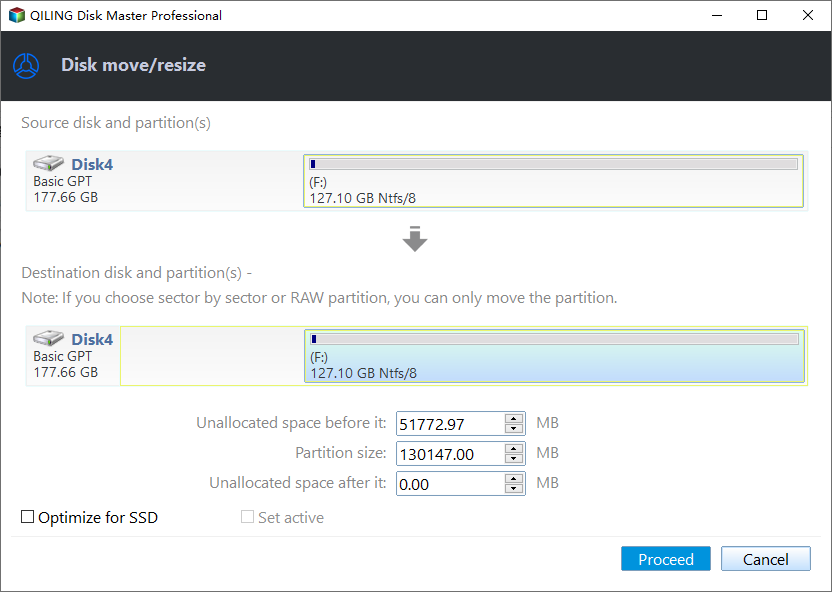
Step 3. Move the partition.
In the pop-Drag the mouse pointer on the D partition from the start to the end of the partition.
Step 4. Confirm and apply the operation.
The disk management tool will then swap the positions of the D partition and the unallocated space, effectively moving the D partition to the end of the disk. This will be reflected in the main interface, where you will see the D partition and the unallocated space have switched places. To finalize the operation, click the "Proceed" button.
After the C drive and unallocated space are adjacent, you can begin to resize the partition in Windows 10. To do this, you can use the built-in Disk Management tool.
► Part 2. Resize partition
You can use Disk Management (DM) to resize a partition by shrinking or extending its volume, but it has limitations. It can only extend NTFS and RAW partitions, and there must be unallocated space behind the target partition. However, Qiling Disk Master Standard can merge non-adjacent unallocated space into the target partition, and resize various file systems, including NTFS, RAW, FAT32, and exFAT. This makes Qiling Partition a top priority for easier and more efficient size adjustments.
Note: Qiling Disk Master also supports resizing encrypted partitions effortlessly.
『 Shrink partition 』
Shrinking a partition can help release unallocated space for specific purposes. To do this, you can follow a few easy steps.
Step 1. Launch Qiling Disk Master Standard.
The home interface displays information about all hard disks and partitions. To resize a partition, right-click on it and select "Resize/Move Partition".
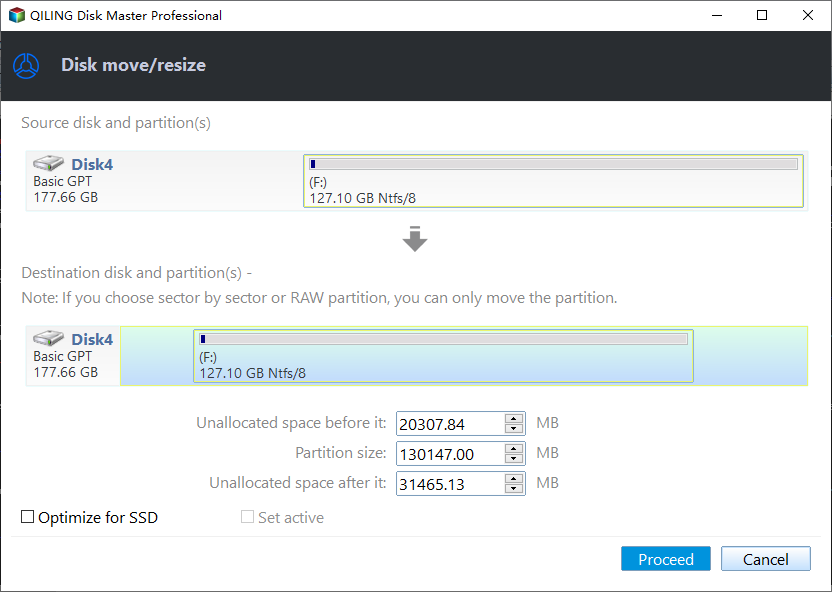
Step 2. Change the size of the patition.
Please adjust the length of the green bar by dragging the rings on both sides to determine the size to shrink.
Step 3. Then, click "Proceed" to start the shrinking process.
『 Extend partition 』
Way 1. Using "Resize Partition"
To resize a partition, you can use the `resize2fs` command. This command is used to resize the filesystem on a partition, and it must be run on the partition that you want to resize. The command takes two arguments: the first is the filesystem that you want to resize, and the second is the new size of the filesystem.
Step 1. Locate the partition you want to enlarge.
Right-click on it and select "Resize/Move Partition".
Step 2. Enlarge the partition.
Now, you find there's a segment of white bar next to the green bar. The white bar is the unallocated space. Drag the ring to adjust the size you want to add and then click "OK".
Step 3. Hit "Apply" on the upper left to start the extension.
Way 2. Using "Merging Partitions"
When there's no unallocated space next to a partition, you can try merging partitions, which can combine non-adjacent unallocated space into another partition or merge two partitions into one, making it more flexible and convenient.
Step 1. Locate the partition.
Right-click the partition you want to enlarge, choose "Merge Partitions".
Step 2. Tick the unallocated space.
Step 3. Commit the operation.
To proceed, go back to the main interface and click "Proceed" to commit the pending operation.
Note: If you want to enlarge a partition but there is no unallocated space on your hard drive, you can upgrade the Qiling software to the Professional version, which has a powerful function called "Allocate free space" that allows you to move free space from one partition to another directly.
Summary
Qiling Disk Master Standard makes resizing and moving partitions in Windows 11 a breeze, unlike Disk Management or DiskPart. With just a few clicks, you can move, enlarge, or reduce partitions as needed. Additionally, the Disk Clone Wizard feature allows you to copy the entire drive to another drive, such as from an HDD to an SSD, while the wipe hard drive clean feature ensures your data remains secure if you're replacing your disk with a new one.
Related Articles
- How to Move Folders from C Drive to D Drive in Windows 11/10/8/7?
How to move folders from C drive to D drive in Windows 11, 10, 8, and 7? This article will tell you what folders can be moved and provide five useful methods to you. Hope at least one of them is workable for you. - What to Do When Shrink Volume Greyed Out in Windows 7/8/10?
When using Disk Management to shrink a volume in Windows 10/8/7, you may find shrink volume greyed out. In such case, what to do? This article will give you different solutions. - QILING Safe Disk Server
QILING Safe Disk keeps your confidential data in a strongly encrypted form on your disk and provides you with transparent access to it from any application. - Welcome to QILING Support Center
QILING tech support center, QILING Disk Master support - Stepwise Guide: How to Install Windows 11 ISO on VirtualBox
You can learn how to easily install a Windows 11 ISO on VirtualBox and also discover a free method to backup VirtualBox to a safe place to prevent it from being corrupted. - Windows 11 Move Documents Folder to Another Drive
This post will show that in Windows 11 move Documents folder to another drive to reclaim more free space on the C drive.