System Restore Could Not Start in Windows 7
The problem
System Restore is a crucial recovery tool in Windows. It helps you to retrieve system files, program files, and registry information when you suffer from system failures. But what about the time when System Restore itself fails?
Some users find System Restore did not complete successfully in Windows 7. Some users even get stuck in the beginning, only receiving a message “System restore could not start”. How comes System Restore not starting in Windows 7 and how to fix it?
Quick fixes to System Restore not starting in Windows 7
If you encounter the problem that System Restore could not start in Windows 7, you can try different fixes according to your situation:
- Fix #1: Disable antivirus software
- Fix #2: Run System Restore from Safe Mode
- Fix #3: Configure Disk Space Usage
- Easier way to perform system restore in Windows 7, 8, 10, 11
Fix #1: Disable antivirus software
The problem of System Restore not working in Windows 7 can mostly be caused by an antivirus program. In this case, you should disable the antivirus software temporarily.
Fix #2: Run System Restore from Safe Mode
If there are other programs or services running on your computer which prevent System Restore from starting, you can try to perform System Restore from Safe Mode:
1. Restart your computer and tap F8 to access the Advanced Boot Options menu.
2. Use the arrow keys to select Safe Mode and press Enter.
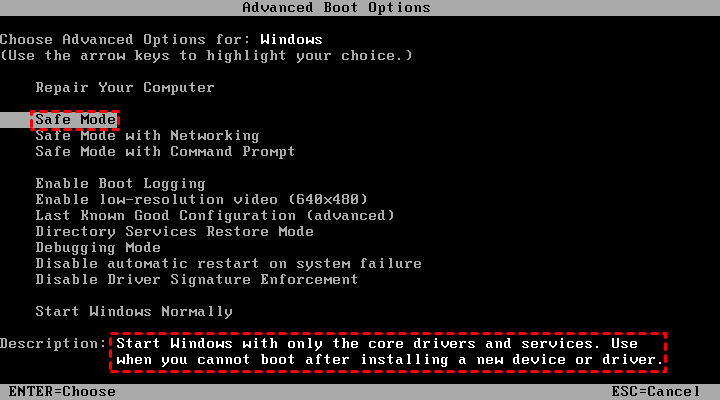
3. When Windows finishes loading, open System Restore and follow the wizard to complete the process.
Fix #3: Configure Disk Space Usage
Low disk space may also cause System Restore failed in Windows 7. In this situation, you can configure Disk Space Usage for system protection as described below:
1. Right click “Computer” on the desktop and hit the “Properties” option.
2. Select “System protection” from the left-hand column. In the pop-up window, click “Configure”.

3. In the next window, drag the slider to adjust the maximum disk space used for system protection. You may increase from the default 3 percent to over 5 percent to make enough room for restore points. Click “OK” to save the change.

Easier way to perform system restore in Windows 7, 8, 10, 11
When you are troubled by the problem that System Restore could not start in Windows 7, you may wonder if there is a backup & recovery utility superior to the built-in tool. Certainly there is! Qiling Disk Master Standard, the best free backup software, offers you better performance and more flexible options.
- It enables you to create image backups for the system, disk, partition or even selective files.
- You are allowed to do incremental and differential backups to improve the backup efficiency.
- You can create bootable media with Qiling Disk Master, which enables you to perform system restore under Windows PE in case of boot failure.
Download this wonderful freeware to have a try.
Note that Qiling Disk Master can only restore the image files created by itself, so you have to run System Backup before the recovery. Now follow the instructions below to perform system restore in Windows 7:
Step 1. Launch Qiling Disk Master. Click “Home” on the left pane, find the system backup task, and select “Restore” from the expanded menu.

Step 2. Select “Restore this system backup” and click “Next”.

Step 3. Confirm operations on the “Operation Summary” page and click on “Proceed” button.

Tips:
- The program automatically selects the original system partition(s) as the destination drive(s). You can change the default destination drive(s) by checking “Restore system to other location” in Step 2.
- If you want to restore the system image files to different computers, you should tick “Universal Restore” in Step 3 to ensure the system is bootable after recovery. You need to upgrade to Qiling Disk Master Professional to enjoy this feature.
Verdict
The problem that System Restore could not start in Windows 7 is frustrating. You may choose Qiling Disk Master as an alternative to perform system backup & restore. It can also help you out when you find System Restore could not start in Windows 10, for it supports all Windows PC operating systems.
What’s more, Qiling Disk Master is the best Carbon Copy Cloner Windows alternative that enables you to clone hard drive or only OS. Why not try it now?
Related Articles
- How to Easily Move Boot Partition in Windows 7/8/10?
You will get the 3 ways to move boot partition in Windows 7, and the best way to avoid boot partition and system partition on different drives. - How to Refresh Windows 7 without Losing Data?
How to refresh Windows 7 without losing data? you will find best way to refresh Windows 7 and keep all your personal files, settings, installed programs, etc. - Easiest Way to Restore Windows 11, 10, 8, 7 from Recovery Partition
When Windows system fails to boot, you can restore Windows from recovery partition. Here is a guide to walk you through every step of the way. - Windows 7 Starts in Safe Mode But Not Normal (Tested Fixes)
Learn how to fix the common problem that Windows 7 starts in safe mode, but not in normal mode from this page. Five solutions are mentioned.