Upgrade Windows 7 32 bit to 64 bit without Losing Data
- Can you upgrade Windows 7 32 bit to 64 bit?
- Step 1: Check the current hardware's compatibility
- Step 2: Backup files to external hard drive to prevent data loss
- Step 3: Upgrade Windows 7 32 bit to 64 bit free (Clean Install)
- Step 4: Activate Windows 7 64 bit to reuse product key
- Step 5: Restore files from backup with Qiling Disk Master
- Does this work for upgrading 32 bit to 64 bit in Windows 10?
- The way forward
Can you upgrade Windows 7 32 bit to 64 bit?
You cannot directly upgrade Windows 7 32-bit to 64-bit in place. A 64-bit Windows system requires a clean installation, which removes installed programs and may overwrite personal files if you do not back them up first.
The benefit of moving to 64-bit Windows is that it can use more memory and run 64-bit applications, provided that your CPU, drivers, and hardware support it. A 32-bit Windows system usually can use only about 4GB of RAM, while 64-bit Windows can use much more depending on the edition.
Therefore, the safe path is to check compatibility, back up your files to an external drive, clean install Windows 7 64-bit, activate Windows, and then restore your files from the backup.

In all Windows versions, switching from 32-bit to 64-bit requires a clean install instead of an in-place upgrade.
To upgrade Windows 7 32-bit to 64-bit without losing personal data, back up files to an external hard drive in advance. The clean install will remove installed programs, so you also need to prepare installers, license keys, and 64-bit drivers before starting.
|
💻 Step 1: Check compatibility |
Open System Information and check whether the computer is x64-based. Also confirm that important devices have 64-bit drivers. |
|
📃 Step 2: Backup files |
Launch Qiling Disk Master Standard, click Backup > File Backup, select important files or folders, and save the backup to an external drive. |
|
🍀 Step 3: Clean install |
Open Windows 7 USB DVD download tool, click Browse…Full steps |
|
🎯 Step 4: Activate Windows |
Type slui.exe in the search box and hit Enter…Full steps |
|
📑 Step 5: Restore files |
Launch Qiling Disk Master, click Restore > Select Image File, choose the file backup image, and restore your files to the new 64-bit system. |
Step 1: Check the current hardware's compatibility
Before installing Windows 7 64-bit, check whether your computer can run a 64-bit operating system. This avoids wasting time on a clean install that the hardware cannot support.
Check system type of your computer
To clean install Windows 7 64-bit, first check your computer's system type. If it is an x64-based PC, the CPU supports a 64-bit system. If it is an x86-based PC, you cannot install Windows 7 64-bit on that computer.
To check system type:
1. Open the Start menu.
2. Search for System Information and press Enter.
3. Check the System Type item. An x64-based PC supports Windows 7 64-bit, while an x86-based PC does not.

Note: The key point is whether the processor is x64-based.
• 64-bit operating system, x64-based processor: already running a 64-bit system.
• 32-bit operating system, x64-based processor: can clean install Windows 7 64-bit.
• 32-bit operating system, x86-based processor: cannot install Windows 7 64-bit.
Verify CPU and driver compatibility
You cannot switch from 32-bit to 64-bit without formatting or reinstalling Windows. Before the clean install, verify that your CPU supports 64-bit Windows and that 64-bit drivers are available for key devices.
To check CPU compatibility, download Coreinfo from Microsoft, then use it to see if your processor includes features like PAE, NX, SSE2, and CX16. Simply type "coreinfo" in the command line window, press Enter, and use Ctrl + F to search for each of these features one by one.

To check driver compatibility, visit the device manufacturer's support website and look for 64-bit versions of the drivers for your graphics and sound cards.
After confirming hardware and driver compatibility, continue with file backup. This is what prevents data loss during the clean installation.
Step 2: Backup files to external hard drive to prevent data loss
Backing up files to an external hard drive is necessary before upgrading Windows 7 32-bit to 64-bit, because the clean install can remove personal files and installed programs. Qiling Disk Master Standard can help create a file backup image.
With File Backup, you can back up selected files or folders to an external hard drive, USB flash drive, network drive, cloud drive, NAS, or another storage device. After installing Windows 7 64-bit, you can restore files from the backup image.
Qiling Disk Master can still be used to continuously protect data in Windows 7 64-bit, with features such as daily/weekly/monthly schedule backup and incremental backup to help manage backups and prevent backup disk full issues.
Download the software and connect an external hard drive with enough free space to store the backup image.
1. Launch Qiling Disk Master Standard and click "Backup" > "File Backup" to proceed.

2. Click "Folder" or "Files" to select the files or folders you want to back up. Then click the folder-shaped button to choose the external hard drive as the backup destination.
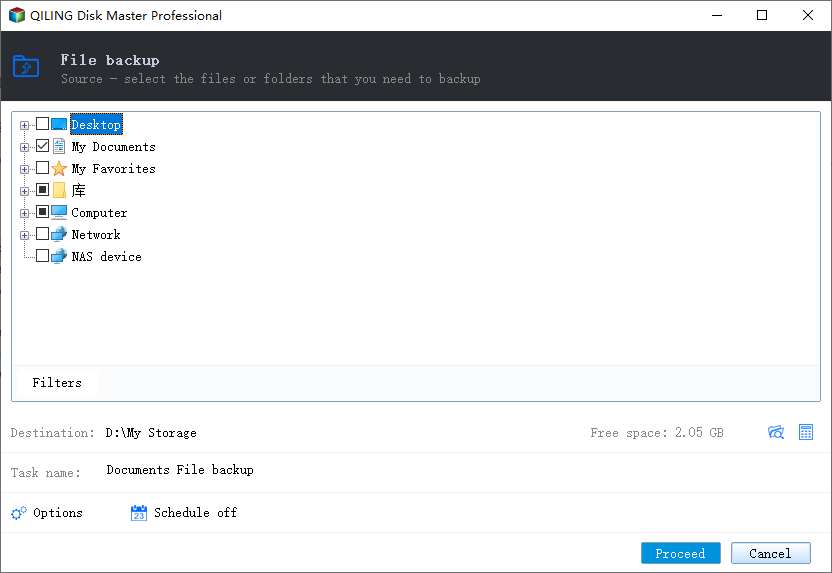
3. Confirm the source and destination, and click "Proceed" to back up files to the external hard drive.
Step 3: Upgrade Windows 7 32 bit to 64 bit free (Clean Install)
To move from Windows 7 32-bit to 64-bit, create Windows 7 64-bit installation media and then perform a clean install.
Create Windows 7 installation media
To create Windows 7 installation media, you'll need to prepare three essential things first.
① Windows 7 64-bit ISO image file. Prepare a valid Windows 7 64-bit ISO and product key. If needed, use the original download page.
② A USB flash drive with at least 5GB of space. Back it up first because the creation process will format it.
③ Windows 7 USB/DVD Download Tool. This utility can create a bootable USB drive from the ISO file.
After preparing these items, create the bootable USB drive as follows.
1. Open the Windows 7 USB/DVD Download Tool, click "Browse" to locate the Windows 7 64-bit ISO file, and then click Next.

2. Choose USB as your media type.

3. Insert the USB flash drive, select it, and click Begin copying. The tool will format the USB drive and create a bootable installation device, so back up the USB drive first if it contains important data.

Upgrade Windows 7 32 bit to 64 bit step by step
1. Insert the bootable USB drive, restart the computer, and set the USB drive as the first boot device in BIOS or the boot menu. Press any key if prompted to boot from USB.
2. Wait for Windows 7 installation files to load, then set up the language and other preferences, and click "Install Now" in the next window.

3. Accept the license terms and click Next.
4. Select the Windows 7 installation type: Custom.

5. Select the partition where the 32-bit Windows 7 system is installed. You can format that partition for a clean install, or delete the old system-related partitions and select the newly created unallocated space to install Windows 7 64-bit.
Notes:
★ Formatting or deleting the wrong partition will erase data. Confirm that your file backup is complete before continuing.
★ If you install Windows without formatting the old system partition, some old files may be moved to Windows.old, but this is not a substitute for a real backup.
Step 4: Activate Windows 7 64 bit to reuse product key
After the clean install, Windows 7 64-bit may require activation. If online activation does not work with your existing Windows 7 product key, try phone activation through the Windows activation wizard.
1. Type slui.exe in the search box and hit Enter.
2. Click Show me other ways to activate now in the Windows activation interface.
3. Click Use the automated phone system.

4. Select the nearest location and click Next.
5. Follow the phone system instructions, provide the installation ID, enter the confirmation ID, and click Next to complete activation.
Step 5: Restore files from backup with Qiling Disk Master
After Windows 7 64-bit is installed and activated, reinstall Qiling Disk Master if needed. Then click "Restore" and "Select Image File" to locate the backup image, and follow the wizard to restore your files or folders.
For detailed steps on restoring files from a Windows 10/8/7 backup, refer to the article "3 Ways to Restore Files from Windows 10/8/7 Backup".

Does this work for upgrading 32 bit to 64 bit in Windows 10?
The same rule applies to Windows 10: you cannot directly switch from 32-bit to 64-bit in place. You need to back up files, create 64-bit installation media, and perform a clean install.
- Check whether the processor is x64-based and whether 64-bit drivers are available.
- Back up files with Qiling Disk Master Standard before the clean install.
- Create a bootable disk with the Media Creation Tool, install Windows 10 64-bit, and then restore your backed-up files.
- If phone activation is required, refer to Microsoft's official method.
If you are currently using Windows 10 and want to move to a 64-bit system, the main difference is how you create the installation media. Use the Media Creation Tool to download files and create a bootable USB drive, or use an ISO file with another bootable media tool.
1. Connect a USB drive with at least 8GB of available space. This will be used to install the operating system.
2. Go to Microsoft's Windows 10 download page and download the Media Creation Tool by clicking the Download tool now button.

3. Double-click MediaCreationTool.exe to open the Windows 10 Setup window, read the license terms, and click Accept.
4. Tick Create installation media for another PC in the following window. Then click Next.

5. Select the language and other preferences, choose your USB drive as prompted, and click Next at each step.
The way forward
To upgrade Windows 7 32-bit to 64-bit, a clean install is the only option. To protect your data, back up files to an external hard drive before installation and restore them after Windows 7 64-bit is ready.
After the upgrade, keep a regular backup plan for the new 64-bit system. Qiling Disk Master can create scheduled backups and keep recent backup versions for recovery.
To free up disk space, you can delete old backup images with the Backup Scheme feature, available in the Professional edition of Qiling Disk Master.
Related Articles
- Full Guide to Upgrade to Windows 10 without Losing Files
Are you in need of upgrading to Windows 10 and don't want to lose your personal files? Find a complete guide to achieve the goal from this page. You can keep reading to learn more details. - Windows 7 Enterprise End of Life: How to Upgrade to Windows 10
You will get clear ideas about Windows 7 enterprise end of life and how to prepare for the extended support end. Please scroll down to learn more. - How to Backup Windows 7 for Windows 10 Upgrade
Learn two free ways to back up Windows 7 before upgrading to Windows 10, so your files and system data stay protected during migration. - What Is File Level Backup and How to Do It in Windows 10/8/7?
You will get the file-level backup meaning and how to backup your crucial data with this method in Windows 11, 10, 8, 7. Block-level file backup supported. - Password Protect USB Drive in Windows 10 Easily (2 Ways)
You can learn 2 easy ways to password protect USB drive in Windows 10, including Windows built-in feature and the professional third-party software. You can read on to know the detailed information. - Best Free PowerShell Robocopy Equivalent in Windows 7/8/10
How to get PowerShell RoboCopy equivalent in Windows 7/8/10? In this article, you will find the best free Robocopy alternative to protect your data easily.