Windows 7 Backup Disk Full - Manage Space Correctly
Windows 7 Backup Is Not Managing Space Correctly
To resolve the issue, you can either delete old backups, free up space on the backup disk, or change the backup location to a different drive. You can also consider upgrading to a larger backup disk or using a cloud-based backup solution to free up space on the local drive. Would you like me to guide you through the process of deleting old backups or changing the backup location?
- Data file backup: 190.33 GB
- System image: 130.91 GB
- Other Files: 2.39 GB
- Free sapce: 2.33 MB
- Total size: 323.63 GB
You changed the backup settings to let Windows manage the space used for backup history, but it seems to have exceeded the maximum size allowed (97.09 GB) and now occupies 130.91 GB. You're wondering if there's a way to automatically delete old backup files to free up space.

If you regularly create a system image using Windows 7 Backup and Restore, the software will automatically manage backup disk space for you.
The system stores system images on a backup disk, using a shadow copy storage area that can hold up to 30% of the disk's storage capacity. When this area is full, the oldest backups are deleted to make room for the latest ones.
However, if you keep creating one time backup jobs, the old backups will not get deleted automatically, so you will get the backup disk full error. Don't worry about it much and I'll introduces you how to manage backup disk full issue in the next part.
Manage Space Correctly When Windows 7 Backup Disk Full
If you're experiencing the Windows 7 backup disk full issue, you can try deleting backup images using either the Backup and Restore feature or the Disk Cleanup feature to free up space.
Way 1: Manage Backup Disk Space Manually through Error Message Window
If you get the error message, click it to manage backup disk space, which will take you to the Manage Windows Backup Disk Space window.

If you close this window, you can access the Backup and Restore window, where you can click on "Manage Space" under the Backup section, which will direct you to the Manage Windows Backup Disk Space page.

To delete old backups, you could do the following:
#1: Through Data file backup section. To manually delete backup files, click on the "View backups..." button under the "Data file backup" section, select the backup file you want to delete, and then click the "Delete" button.

#2: Through System image section. To change the system image settings, click on the "Change settings..." button under the System image section. Then, select the option "Retain only the most recent system image created on..." and click "OK" to apply the changes.

Way 2. Delete Backup Files with Disk Cleanup
1. To run disk cleanup in Windows 7, simply type "disk cleanup" in the search box and press Enter. This will open the Disk Cleanup tool, which will scan your computer and identify files that can be safely deleted to free up space.
2. Choose the backup drive, and hit OK.
3. In the Disk Cleanup window, select the items to delete, such as the Recycle Bin, downloaded program files, and temporary internet files. Then, click the "Clean up system files" button, choose the drive you want to clean up, and click "OK".
4. To free up more disk space, switch to More Options, click Clean up... under the System Restore and Shadow Copies section and click OK to confirm the operation.

5. Press the "Delete" button to delete all old shadow copies except for the latest one.
To avoid the Windows 7 backup disk full error, you can set up a scheduled task to automatically delete old backup images when the disk reaches a certain percentage of free space. This way, you can ensure that there's always enough space for new backups without having to manually delete old ones.
Prevent Windows 7 Backup Disk Full at the Beginning
If you create a one-time backup, you may receive a "backup disk full" error message. To avoid this, it's best to set up automatic system image backups with preset rules for deleting old backup files. However, you can only choose to include a system image when backing up files using the built-in Backup and Restore software, as Microsoft does not offer scheduled backups for the operating system.
Thus, you need to use a third-Qiling Disk Master Professional is a party backup software that can backup system and automatically delete backup files. It allows users to do more than they think, including backing up the system.
- You can schedule tasks based on daily, weekly, or monthly intervals, or trigger them by specific events, such as system shutdown, and also use the USB plug in feature.
- You can preset the backup cleanup to delete old backups automatically by quality, time or daily/weekly/monthly.
- Using incremental or differential backup, normal or high compression levels, and automatic or customized splitting can help reduce backup size and disk space usage, making it easier to prevent Windows 7 backup from running out of space.
- You can restore a system image to a new hard drive or SSD, even if it's smaller.
- You can restore a system image to a new computer with different hardware using the Universal Restore feature, which resolves driver compatibility and other issues after the restore process.
The app has an intuitive interface that makes it easy for all users to navigate and use, allowing anyone to try it out by downloading it now.
This free trial version only works within 30 days. If you're concerned about data security and continuous protection, consider upgrading to the official pro trial, which currently offers a 20% discount.
Here are the steps to create a system image in Windows 10 with step-by-step methods:
Step 1. Perform Qiling Disk Master Professional, Select System Backup under Backup tab.

Step 2. Rename the Task Name and choose a destination disk to save the Windows 10 system image file. Connect an external hard drive if you want to backup Windows 7 to it.

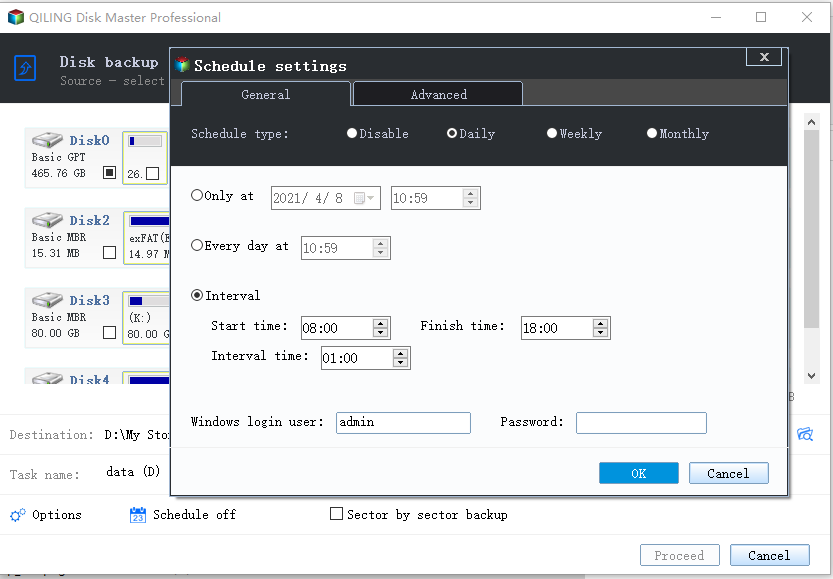
Step 3. To set up a schedule automatic backup system, create a new task in the Task Scheduler and set the trigger to "Daily" or "Weekly". Set the action to run a batch file or a program that will perform the backup, and set the backup retention to a specific number of days or a specific date.
To enable automatic backup on your system, select the desired frequency from the options provided, such as Daily, Weekly, Monthly, or Event triggers, or opt for the USB plug in feature in the Schedule Backup settings.
To regularly delete old backups, go to the Backup Scheme and select By quality, By time, or By daily/weekly/monthly automatic backup cleanup.
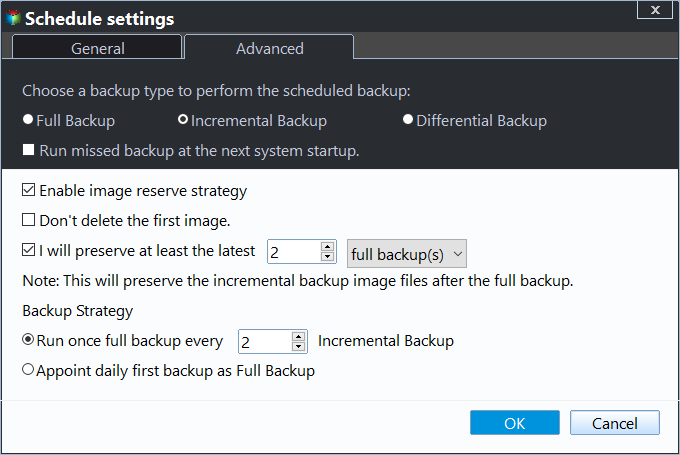
To alleviate Windows 7 backup running out of space, you can use incremental or differential backup in the Backup Scheme, and also consider options such as normal or high compression level, automatic or customized splitting, and intelligent sector backup.
Step 5. To create a Windows 10 system backup on a regular basis and manage backup disk space automatically, click the "Proceed" button. This will initiate a system backup on a regular schedule, ensuring that your Windows 10 system is backed up consistently, and also manage the disk space used by the backups, making sure that it doesn't consume too much space on your computer.

Tip:
◉ You can click Options to comment on the system backup task, enable email notification, encrypt the backup image, use VSS, etc.
The Epilogue
The Windows 7 backup disk full error can be frustrating, especially when you have to manually delete backup files every time the disk is full. To avoid this hassle, it's recommended to set up automatic system backups in Windows 7 and also preset a backup retention policy, so that the system can handle the backup process and storage management for you.
To manage backups for all clients within a LAN from a single central console, consider using Qiling Centralized Disk Master. This tool also allows for simultaneous deployment of system images to multiple computers using Qiling Disk Master Technician, with options to preset computer names, IP addresses, and enable universal restore for secure boot and network connection after restoration.
Related Articles
- Let Windows 7 Backup and Restore Automatically Delete Old Backups
Annoyed about too many backups on your Windows 7 PC? This tutorial will introduce you how Qiling Disk Master work on Windows 7 backup and restore automatically delete old backups. - How to Delete System Restore Points in Windows 7/8/8.1/10
You may want to delete system restore points to free up disk space on your drive. Here you will find a more powerful way to automatically do this work for you. - Windows 7 Incremental Backup - Only Backup Changed Files
You will learn the Windows 7 incremental backup meaning and how to create it step by step, 2 ways in total. - [Solved] Windows Server 2008/2012/2016 Backup Disk Full
Why does Windows Server Backup disk full error occur and how to solve it? This article shows you how to free up backup disk space in Server 2008, 2012, 2016, etc. and offers a workaround to avoid the issue in the long term. - Best Bootable Hard Drive Eraser for Windows 11/10/8/7
This tutorial provides the best bootable hard drive eraser freeware for Windows 11/10/8/7 and offers a step-by-step guide on how to use it to wipe your hard drive clean. The process will completely erase all data on your hard drive, leaving it completely blank. - [Fixed] Bootmgr Is Missing after Marking a Partition as Active
You could notice bootmgr is missing after marking a partition as active and you cannot boot into Windows anymore. Then, what is bootmgr and how to fix the issue? Here, some most useful solutions are listed for reference.