Easiest Way to Clone Hard Drive in Windows 8, 8.1 to New HDD, SSD
The need to clone Windows 8 hard drive
You're planning to upgrade to a new hard drive and want to clone your current Windows 8 installation to the new drive for better performance.
- If you have a Windows 8 installation disk, you can install Windows 8 on the new hard drive, but you'll still need to copy and paste files from the old drive to the new one, which can be a time-consuming process.
- You can create a recovery drive and perform a restore on the new hard drive, but it may not boot smoothly.
- Upgrading to a smaller SSD means you can't restore your backup to it because the destination drive needs to be equal to or larger than the old drive.
You're looking for a way to directly clone your Windows 8 hard drive to a new drive, including the Windows system and all other files, and also clone to a smaller SSD if needed.
To clone a Windows 8 hard drive to a larger HDD or a smaller SSD, disk cloning software is the most effective method. If you're looking for an easy solution, Qiling Disk Master Professional can clone the system, applications, settings, and data to the new drive.
Best cloning software for Windows 8/8.1
Qiling Disk Master Professional is a comprehensive backup, restore, and clone software for Windows 8/8.1 that offers several advantages, making it the best choice for Windows 8 hard drive cloning.
- It helps you clone entire hard drive to new HDD or SSD directly, including operating system, installed applications and all data.
- This tool enables cloning a larger hard drive to a smaller solid-state drive (SSD) as long as the used space on the HDD is smaller than the SSD's capacity.
- The "SSD Alignment" option can help accelerate the reading and writing speed for the SSD if you want to clone a hard drive to an SSD.
- This software supports both MBR and GPT/UEFI disks, allowing you to clone system disks between two MBR disks, clone GPT disks to GPT disks with operating systems installed, or clone MBR disks to GPT disks and vice versa.
If you clone a system drive, the cloned SSD can be used as a bootable replacement for the old drive. To avoid interruptions and data loss, close running programs before starting the clone and do not disconnect either disk during the process.
How to clone HDD to SSD in Windows 8/8.1
To clone a Windows 8/8.1 hard drive to a new SSD, use Qiling Disk Master Professional. This process will overwrite the destination disk, so back up the target drive first if it contains important data. The same basic steps also apply to Windows 10 and Windows 11.
Step 1. Download, install and launch Qiling Disk Master Professional.
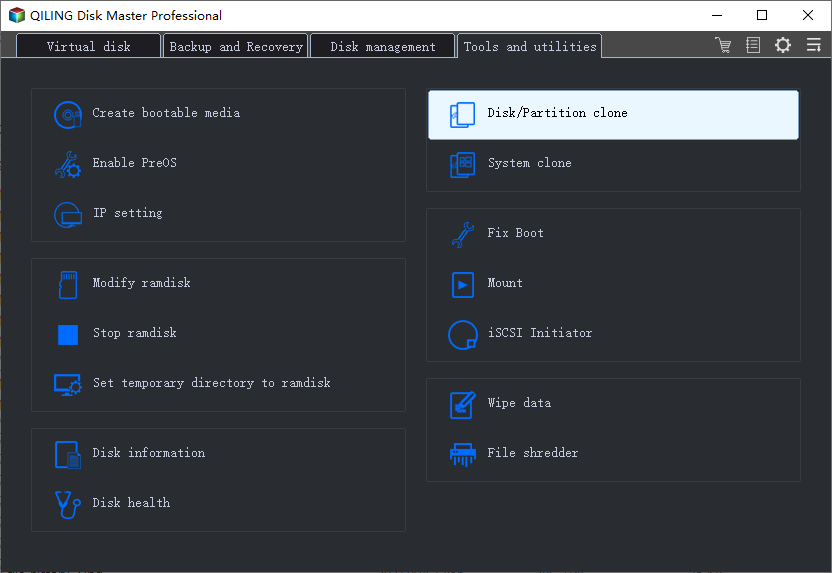
Step 2. Click Clone and then choose Disk Clone.
Notes:
● You can also choose Partition Clone to only move the partition you need, which can save space and time.
● The System Clone feature allows you to clone a system disk to an SSD, resulting in a bootable cloned SSD.
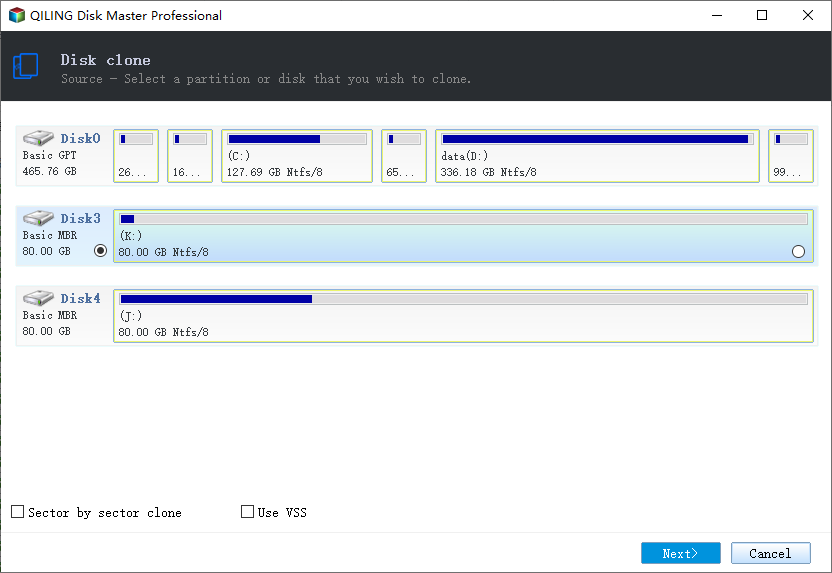
Step 3. Select the source hard drive you plan to clone (here is Disk0) and then click Next to continue.
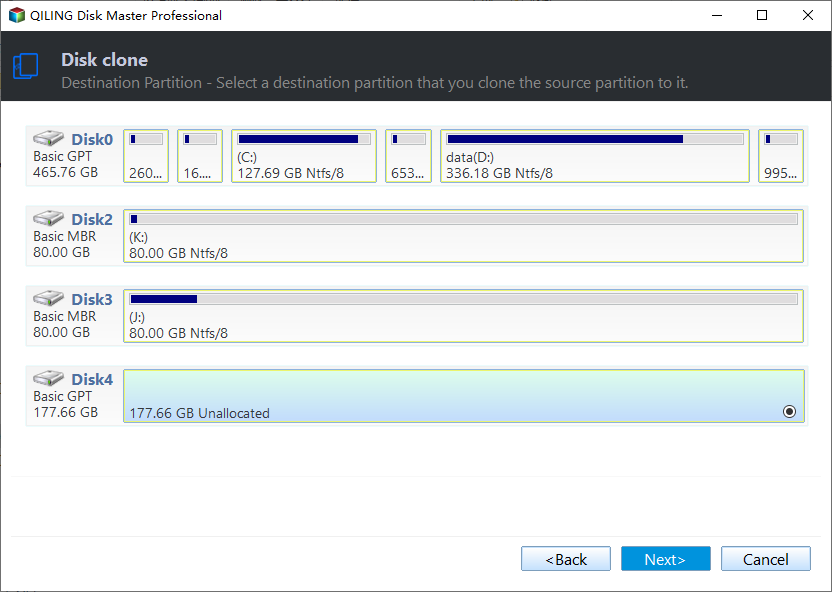
Step 4. Select the target hard drive (here is Disk1) and click Next to go on.
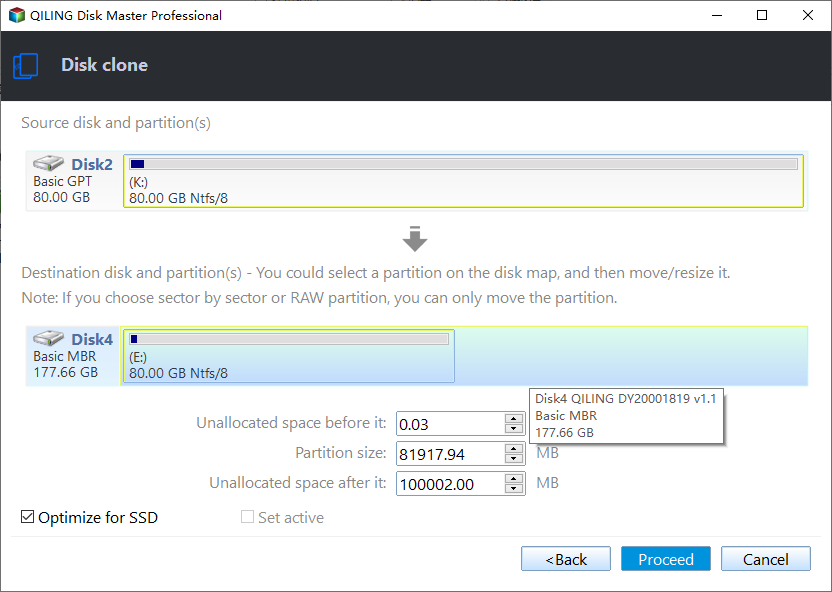
Step 5. To accelerate the reading and writing speed of the destination SSD, tick the "SSD Alignment" box, and then click "Proceed" to clone the hard drive to SSD in Windows 8.
Notes:
● "Clone sector by sector" clones all sectors on a hard drive, used or not, taking longer time. This option is recommended when cloning an encrypted disk or when the source disk's data is damaged, but still restorable.
● "Edit Partitions (advanced version)" enables users to adjust the partition size of the target disk to prevent unallocated space after cloning a disk to a larger one, and also allows conversion between MBR and GPT disk formats.
Step 6. Click Finish when the cloning process reaches 100%.
Tip on how to transfer Windows 8 to another computer:
To transfer Windows 8 to a different computer, create a system or disk image backup first. If the target computer cannot boot, create bootable media and restore the image there. During restore, enable the Universal Restore feature so the restored system can boot on different hardware.
Conclusion
You can easily clone your hard drive (HDD) to a solid-state drive (SSD) in Windows 8/8.1, and this also applies to Windows 10 and previous systems like Windows 7/XP/Vista, using Qiling Disk Master Professional. With just a few clicks, you can move everything you need to the new hard drive or SSD, or even just move a single data partition to another partition or disk.
This software also provides system backup, file backup, disk backup, and partition backup, so you can protect the old drive before cloning and keep scheduled backups for the new drive afterward.
Related Articles
- How to Easily Clone SSD to HDD in Windows 8/8.1? (4 Steps)
You will learn how to easily clone SSD to HDD or clone HDD to SSD in Windows 8/8.1 with the help of professional disk cloning software - Qiling Disk Master Professional. - Backup Windows 8 to External Hard Drive and Protect Security
You will learn how to backup Windows 8 to external hard drive in two practical ways. And you don't need to worry about downtime and avoid data loss caused by system crash or other issues - How to Delete Backup Files in Windows 8 Automatically?
This article provides you with 2 practical ways to delete backup files in Windows 8 and one flexible way to manage disk space. - Download Clonezilla Alternative for Windows 11/10/8/7 for Easy Clone
Clonezilla is free and open-source disk cloning software based on command lines. To make it easy, fast and safe HDD or SSD cloning for beginners, download this piece of Clonezilla alternative for Windows. - [Windows]What Is Unallocated Space And How to Get It?
Here, you are going to learn what is unallocated space and how to get it on Windows 11, 10, 8, 7. - Fix "Windows detected a hard disk problem" in Win 10/7/8
This article explains possible reasons and solutions for the Windows detected a hard disk problem error in Windows 11, 10, 8, and 7.
Products
Articles & Tutorials
- Data Recovery
- Data Backup
- File Recovery
- File Backup
- File synchronize
- System Backup and Restore
- Disk and Partition Clone
- Technical articles
- Disk Master Help
- Windows Deleted File and Disk Recovery Tutorials
- Windows File and Data Recovery Tutorials
- More Windows Tutorials for Install, Security, Files, and PC Tips
- Windows Boot, Repair, and Recovery Environment Tutorials
- Windows Backup Tutorials
- Windows Restore Tutorials
- Windows Clone and Migration Tutorials
- Windows Server Backup, Recovery, and Management Tutorials
- Windows Disk, Partition, and Storage Management Tutorials