Windows 7 Backup Encryption and Your File Encryption Key
The case
User case 1:
Yes, you can encrypt your Windows 7 Backup with BitLocker To Go, which is a feature in Windows 7 that allows you to encrypt and decrypt removable drives, including your USB thumb drive. This way, your backup will be both backed up and encrypted, providing an extra layer of security. To do this, you'll need to create a BitLocker To Go password and then select the option to encrypt the drive when you run the Windows 7 Backup. This will ensure that your data is both backed up and protected with encryption.
User case 2:
You installed Windows 7 Ultimate and were prompted to back up encryption keys, but you hadn't used any drive/file encryption tool, leading you to suspect your system was compromised. You're trying to figure out what could have caused this action. Is there anything else you'd like to know or any specific information you're looking for to resolve this issue?
You tried using the cipher command to check for recently encrypted folders/files, but it showed nothing, and you're wondering why.
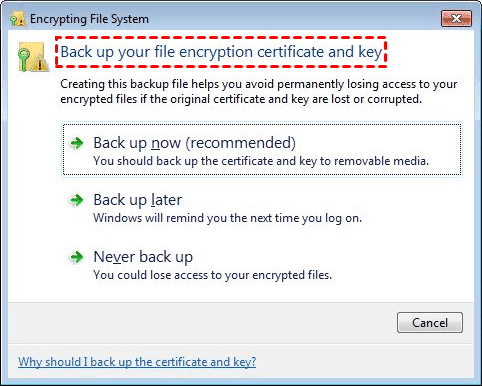
Encrypting files is a way to protect personal data, but users may be asked to backup their file encryption certificate and key in Windows 7.
Don't worry about it too much and I'll show you workarounds for Windows 7 backup encryption and solutions to Windows 7 backup your files encryption key.
Can I perform Windows 7 backup encryption?
Unfortunately, Windows 7's built-in backup software, Backup and Restore and File History, do not offer the option to encrypt Windows image backups.
You can either directly encrypt your backup image using third-party file backup software or encrypt the entire disk using BitLocker Drive Encryption, taking care that the latter may result in data loss in case of a system crash or disk failure.
Encrypt backup image in Windows 7 with third-party software (Directly)
To perform a Windows 7 backup with encryption, you'll need a reliable encryption backup software, such as Qiling Disk Master Professional. With this tool, not only can you easily encrypt your backup image, but you can also customize a password that's easy to remember, keeping your data secure and private. This way, you can enjoy the benefits of a secure backup without worrying about unauthorized access, and only share the password with those you trust.
- Encrypt backup automatically Whether backing up the system, disk, partition or files, you can use daily, weekly, monthly, event triggers or USB plug-in feature.
- Backup only changed files with incremental backup or different backup.
- Always keep enough space for new backups You can automatically delete old backup images using a backup cleanup method, such as setting a schedule or retention period, to free up disk space.
- Backup and encrypt image files without booting into Windows: The tool enables you to create bootable media or a recovery environment, which can help you boot your computer and create a backup or encrypted image file within the recovery environment.
Download the software now to get started. It is compatible with Windows 11/10/8.1/8/7/XP and Vista, including both 32-bit and 64-bit versions. For server users, you can try Qiling Disk Master Server.
Here's how to create a Windows 7 system backup and encrypt the backup:
Step 1. To initiate a system backup using Qiling Backup, navigate to the Backup section and select System Backup from the available options. This will initiate the backup process, allowing you to create a comprehensive backup of your system.
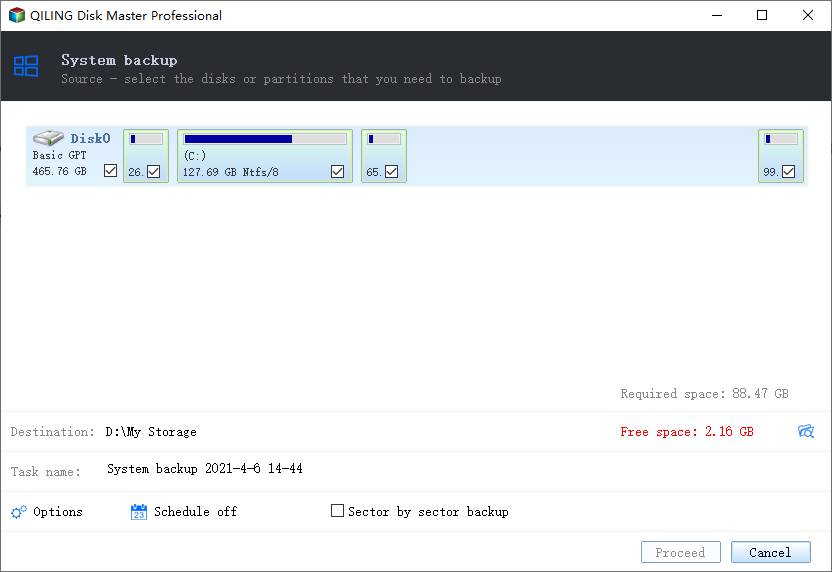
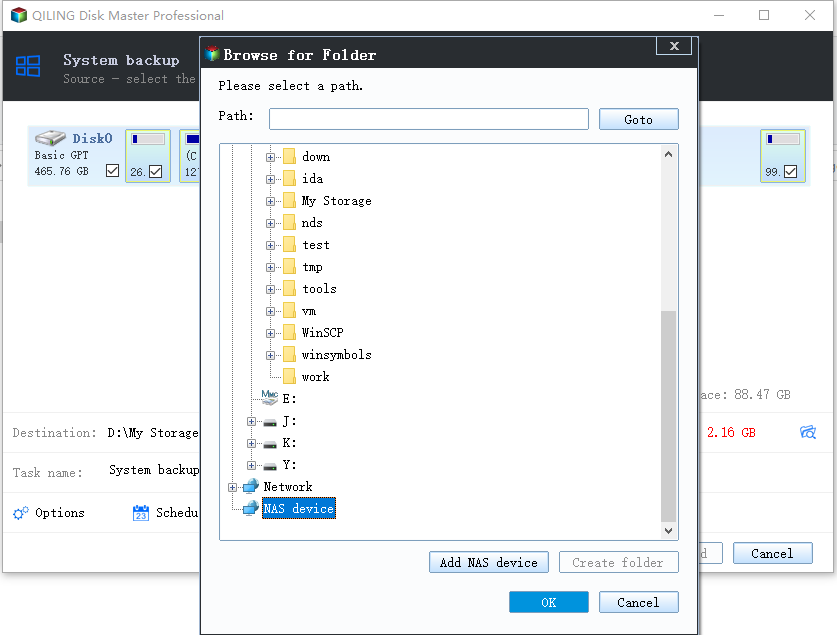
Step 2. Choose a destination for the Windows 7 system image file and customize the Task Name if necessary.
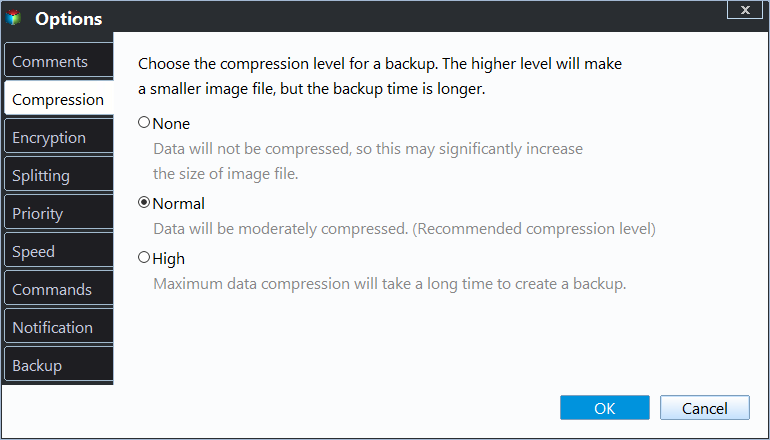
Step 3. To enable encryption for backups, click on Options, then General, and select Enable encryption for backups. Enter your password twice and click OK. This will also give you the option to split, compress, comment, use VSS, and enable email or SMS notification.
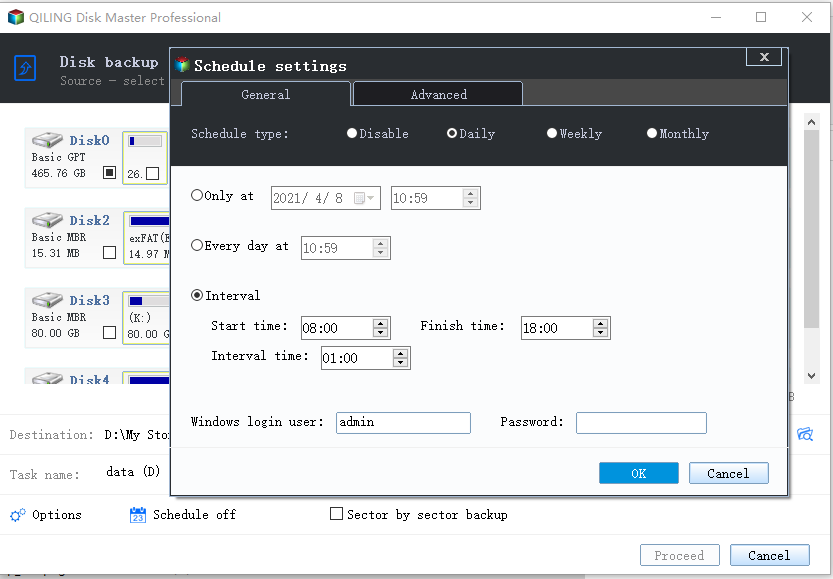
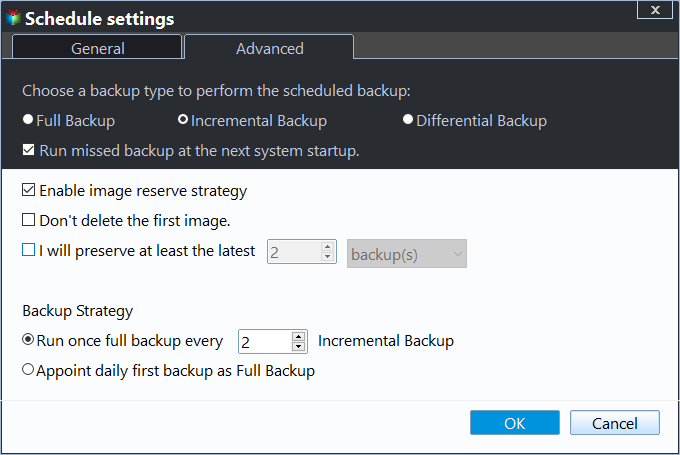
Step 4. To automate the backup process, you can set up a schedule and a backup scheme to run the task automatically, ensuring it runs without your intervention.
✿ Schedule Backup allows you to automatically back up your system on a regular basis (daily, weekly, or monthly) or use event triggers, and also features a USB plug-in option. This last feature is recommended if your target drive is USB and you don't want it to be always connected.
✿ Backup Scheme: It mainly consists of 3 backup methods (Full, Incremental or Differential Backup) and 3 cleanup methods (By quantity, By time, and By daily/weekly/monthly retention). These methods can be particularly useful when the backup drive is relatively small, helping to meet urgent backup needs.
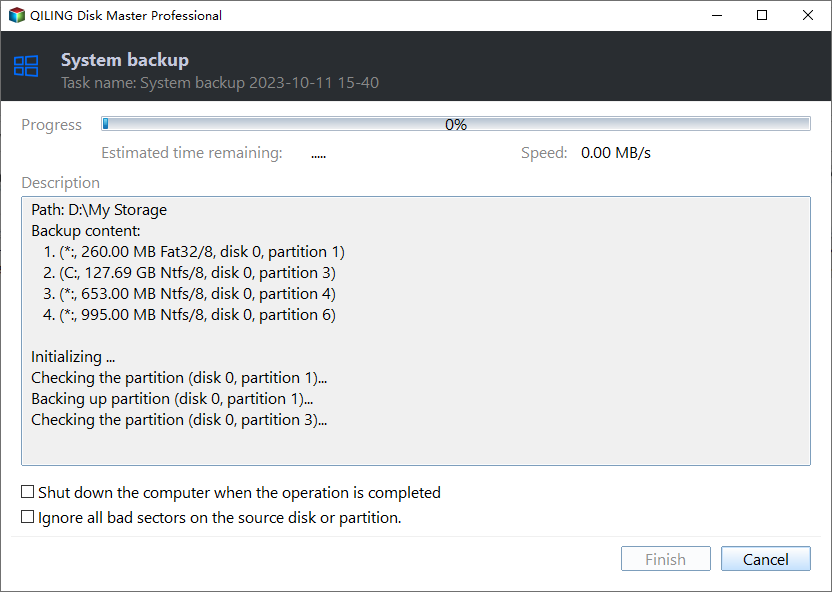
Step 5. To create a Windows 7 system image and perform Windows 7 backup encryption, proceed by clicking "Proceed" in the prompt that appears, which will initiate the creation of a system image and encryption of Windows 7 backups.
Encrypt entire backup drive in Windows 7 with Bitlocker Drive Encryption
Step 1. To manage BitLocker in Windows 7, type "Bitlocker" in the search box and select "Manage BitLocker" from the results.
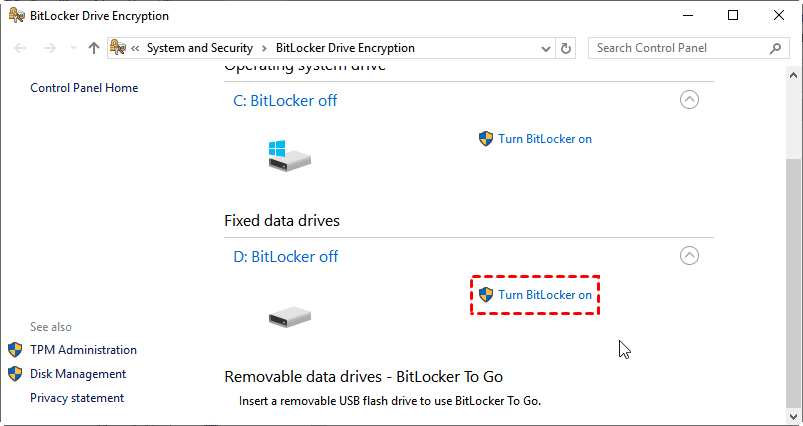
Step 2. To enable BitLocker on the Windows 7 backup drive, first locate the drive that contains the backup, then expand it. Once expanded, click on the option to Turn BitLocker on.
Step 3. Input your passwords, and click Next.
Step 4. Save the BitLocker Recovery Key to a destination of your choice and click Next.
Step 5. Follow the on-screen guide to set up the encryption, then press Start Encrypting to encrypt the drive containing the Windows 7 backup.
Solutions to Backup Your File Encryption Certificate and Key Issue
The Encrypting File System (EFS) is a Windows built-in tool that encrypts files and folders in NTFS file systems. If you have enabled EFS encryption, you may receive a prompt to "Back up your file encryption certificate and key".
After encrypting a file or folder for the first time, or manually creating a new key with the Cipher command, a window will appear prompting you to back up your file encryption certificate and key. To ensure protection, click on "Back up now (recommended)" in this window.
If you're seeing a prompt to decrypt files or folders, but you didn't use EFS to encrypt them, it might be due to third-party software or malware enabling EFS encryption. You can either find and decrypt the files or delete the certificate if you don't find any encrypted files.
Way 1: Decrypt the encrypted files in Windows 7
Step 1. Type cmd in the search box and select Run as administrator.
Step 2. Type the following command To find all encrypted files (including the hidden files), press Enter.
cipher /u /h > %UserProfile%\Desktop\Encrypted-Files.txt
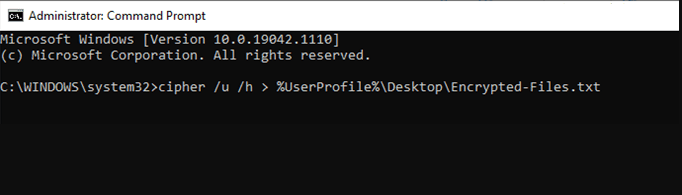
Step 3. Navigate to your desktop, open the "Encrypted-Files.txt" in Notepad, and view the list of encrypted files.
Step 4. Right-click the encrypted file or folder and change its File ownership to Personal, which will remove the padlock and allow for easy backup without notifications. This change in ownership will enable you to access and manage the file without the encryption restrictions. You can then safely backup the file without encountering the encryption notification.
Way 2: Delete certificate key to undo this prompt
Step 1. Open the Certificate Management window by typing "certmgr.msc" into the search box and pressing Enter.
Step 2. To delete a certificate, go to the Personal menu, select Certificates, choose the certificate you want to delete, and click Delete. Repeat this process for the Trusted People section.
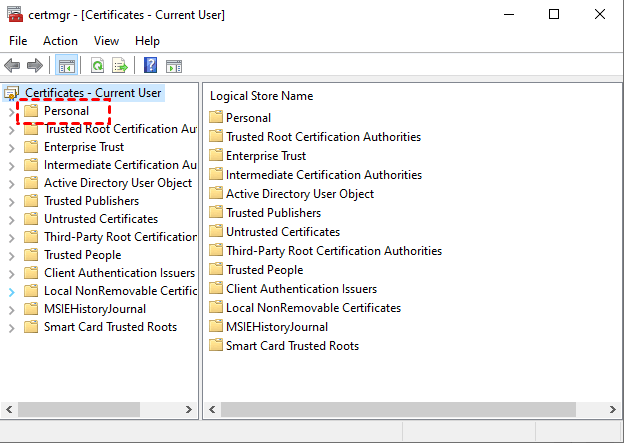
Step 3. After that, reboot the computer to take effect.
Summary
Although Microsoft doesn't provide a way to encrypt Windows 7 backups, you can still achieve this using alternative workarounds. One option is to use a third-party tool that not only encrypts backup images but also offers additional features such as scheduling backups, backup schemes, and more. This approach provides a convenient and comprehensive solution for encrypting backups.
You can use this software to upgrade your HDD to a faster SSD, sync files in real-time, and transfer system and data quickly, making it a useful tool for frequent file modifications.
Related Articles
- Windows Server 2008/2012/2016 Backup Encryption Guide
You can set Windows Server 2008/2008 R2/2012/2012 R2/2016/2019/2022 backup encryption using BitLocker or third-party backup software - Qiling Disk Master. - How to Stop Backup in Progress in Windows 7 Effortlessly
Learn how to Stop Backup in Progress in Windows 7 Effortlessly with clear steps, key checks, and practical tips. - How to Fix Backup and Restore Windows 7 Not Working
This article provides users with two solutions to Backup and Restore Windows 7 not working and offers an alternative. Go to anchor jump and click on what you want to see. - Professional Bootable Backup Software for Windows 11/10/7 [Free Download]
Follow a list of Windows bootable backup software for backing up and restoring data on a non-booting computer. Qiling bootable backup software is overall the most popular download option. - Step-by-Step Guide to Samsung Laptop Windows 7 Recovery
This guide explains Step-by-Step Guide to Samsung Laptop Windows 7 Recovery with clear steps, key checks, and practical tips. - Need to Find Setup Information File Location in Windows 7? Fixed!
Learn how to need to Find Setup Information File Location in Windows 7 safely, including what to check before formatting, wiping, or deleting data.
Products
Articles & Tutorials
- Data Recovery
- Data Backup
- File Recovery
- File Backup
- File synchronize
- System Backup and Restore
- Disk and Partition Clone
- Technical articles
- Disk Master Help
- Windows Deleted File and Disk Recovery Tutorials
- Windows File and Data Recovery Tutorials
- More Windows Tutorials for Install, Security, Files, and PC Tips
- Windows Boot, Repair, and Recovery Environment Tutorials
- Windows Backup Tutorials
- Windows Restore Tutorials
- Windows Clone and Migration Tutorials
- Windows Server Backup, Recovery, and Management Tutorials
- Windows Disk, Partition, and Storage Management Tutorials