[Free Guide]: Use Diskpart Assign Drive Letter in Windows 11, 10, 8, 7
Why use Diskpart to assign a drive letter?
Windows assigns drive letters to available drives, such as internal hard drives, optical drives, SD cards, and external USB drives, using alphabetical identifiers, with each letter used only once on a computer.
Assigning a drive letter is a common task when a drive letter is missing or needs to be changed. Users may want to assign a new drive letter due to various reasons, such as the original drive letter being unavailable or needing to be changed. A computer-experienced user can use Diskpart to quickly assign a drive letter, while others may prefer using Disk Management or another easier method to achieve the same result. This article aims to provide a comprehensive guide on how to assign a drive letter using different methods.
Step-by-step: Assign drive letter by Windows built-in tools
Windows OS users know they have two amazing tools for managing disks and partitions - Disk Management and Diskpart, which provide a user-friendly interface and powerful command-line interface respectively for creating, deleting, formatting, and managing disk partitions.
The Disk Management tool in Windows offers a user-friendly graphical interface to manage disks with a single click, while Diskpart provides a command-line interface to quickly manage disks or partitions from the command prompt, allowing for easy assignment of drive letters.
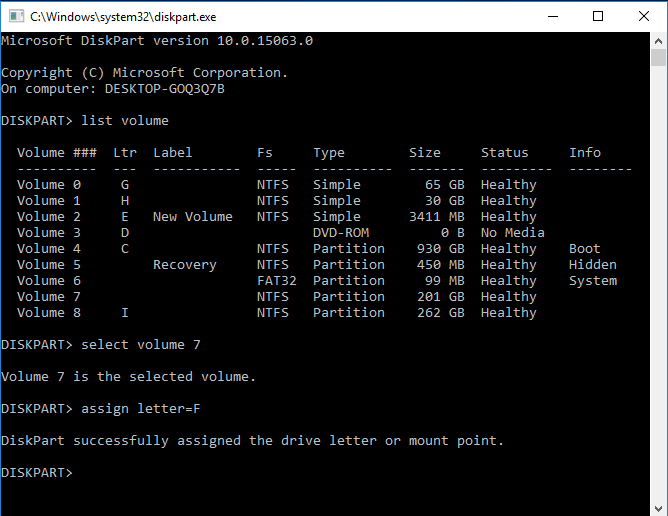
│ Use Diskpart to assign drive letter
Diskpart is a Windows built-To manage your hard drive using Command Prompt Diskpart, you can use various commands to perform tasks such as formatting a disk partition, creating a partition, deleting a partition, and assigning a drive letter. To assign a drive letter to a partition using Diskpart, you can follow these steps: First, open Command Prompt as an administrator. Then, type "diskpart" and press Enter to open the Diskpart tool. Next, type "list disk" and press Enter to list all the disks on your system.
Step 1. Press "Windows + R". Then, type "diskpart" and press Enter.
Step 2. Type in "list volume" and press Enter. Now, you can see all volumes on PC.
Step 3. Type in "select volume 7" and press Enter(here take volume 7 as an example).
Step 4. Finally, type in"assign letter=F" and press Enter.
To remove the drive letter, type "remove letter=X" (where X is the drive letter you want to remove).
To assign a drive letter to a new drive, you can create a partition first, then type "assign letter=" followed by the desired letter to that partition. Alternatively, if a hidden volume exists, assigning a drive letter to it will unhide it.
│ Assign drive letter via Disk Management
In addition to Diskpart, Disk Management may be another good choice to assign a drive letter.
Step 1. Press "Win + R" to open the "Run" window and type diskmgmt.msc in the box.
Step 2. Right-click the drive you want to assign, and select change Drive Letter and Paths in the pop-up window.

Step 3. Click Change to summon the next window.

To remove the drive letter of your partition, select the partition you want to modify, then click the "Remove" button next to "Drive letter". Follow the on-screen instructions to complete the process.
Step 4. After that, you should choose the new drive letter from the drop list, and then, click OK.

Now, do you understand how to use Disk Management and Diskpart assign drive letter?
Sometimes, you can't assign a drive letter to a drive because Disk Management and Diskpart only support assigning drive letters to drives with FAT or NTFS file systems. If the drive has a different file system, you can format it to NTFS or FAT, or use another method to assign a drive letter.
Diskpart assign drive letter alternative
While Disk Management and Diskpart have their limitations, there is a simpler alternative that can make up for their shortcomings.
Qiling Disk Master Standard is a free partition manager that allows users to assign drive letters with a user-friendly interface, making it simpler than Diskpart. It supports assigning drive letters on any file system and offers more complete functions for flexible disk management.
Step 1. Launch Qiling Disk Master, it will show you all storage devices in the main interface. You can see the removable drive doesn't have a drive letter. To assign a drive letter, right click the drive, select Change Drive Letter-> Drive Letter.

Step 2. Then, Waiting to change the drive letter.
Conclusion
To assign a drive letter using Diskpart, you can use the "assign letter" command, but it's recommended for users with computer background. For normal users, Qiling Disk Master Standard is a better choice, and upgrading to Qiling Disk Master Professional offers additional features like allocating free space and moving installed apps.
Don't change the system drive letter as it will prevent the system from booting.
FAQs about how to use Diskpart to assign drive letter
Can I remove a drive letter assignment using Diskpart?
To remove a drive letter assignment, use the "remove" command followed by the drive letter you want to remove, for example: "remove letter=E".
Are there any restrictions on the drive letters I can assign using Diskpart?
Drive letters A and B are typically used for floppy disk drives. Any available drive letter from C to Z can be assigned to a partition or volume, as long as it's not already in use.
Do I need to be careful when using Diskpart to avoid data loss?
Be cautious when using Diskpart, especially when deleting partitions or making significant changes to disk configurations, to avoid accidental data loss. Select the correct volume and drive letter to ensure accuracy.
Can I assign drive letter on a hidden drive?
Be very cautious when assigning a drive letter to a hidden drive or volume, as it might contain system or recovery files.
To access a hidden volume on your Windows computer, press the Windows key, type "cmd" or "Command Prompt," right-click it, and choose "Run as administrator". In the Command Prompt window, type "diskpart" and press Enter, then type "list volume" and press Enter to see all volumes, including hidden ones. Select the hidden volume by typing "select volume X" (replacing "X" with the volume number or letter), and then assign a drive letter to it by typing "assign letter=Y" (replacing "Y" with the desired drive letter). Once you've completed these steps, you can exit Diskpart.
Related Articles
- [Guide]: How to Run Hard Drive Test in Windows 10
Do you know how to perform a hard drive test in Windows 11, 10, 8, and 7? You can find the answer from this article. - How to Unpartition Hard Drive on Windows 10 And 11
How to unpartition hard drive on Windows 10, 8, 7, as well as Windows 11? You can delete all partition on the hard drive to merge partitions back into a single unallocated space. - Easily Merge C and D drive in Windows 10 without Losing Data
You can learn how to merge C and D drive in Windows 11/10/8/7 with several clicks by using the partition manager Qiling Disk Master. - 3 Ways to Resize Partition Windows 10 without Losing Data
How to resize partition Windows 10 without data loss? In this article, 3 ways are listed to help you extend or shrink partition on Windows 10 for free. - How to Transfer Files from PC to PC Using OneDrive
This post covers the step-To transfer files from one PC to another using OneDrive, follow these steps: first, sign in to OneDrive on both PCs with the same Microsoft account; next, move the files you want to transfer to the OneDrive folder on the source PC; then, on the destination PC, open OneDrive and navigate to the folder where you want the files to be transferred; finally, click the “Sync” button to sync the files from the source PC to the destination PC. If OneDrive is not syncing, try restarting the OneDrive sync client, checking your internet connection, or updating OneDrive to the latest version. Alternatively, you can use a PC data transfer tool to transfer files from one PC to another, which can be a more straightforward and efficient method, especially for larger file transfers. - How do I Transfer Line to New Computer/Phone
If you're confused about transferring your Line app data to a PC or a new phone, there's a simple and fast way to do it. You can easily transfer your Line chat history by following a straightforward method. No need to worry about the right way to transfer your data, just follow the steps and you'll be done in no time.