How to Remove GPT Protective Partition without Data Loss
What is GPT protective partition?
The GPT protected partition, also known as the GUID partition table, is a partition that appears in Disk Management but is actually protected and cannot be modified or accessed. When you right-click on it, all options are grayed out, preventing any operations or actions from being taken on it. This means you cannot even open or view the contents of this partition.
The reasons for the GPT protective partition are as follows:
✦ Windows (PE) does not support GPT partition, so if you connect a GPT disk to an earlier version of Windows, it will be protected.
✦ GPT disk partition protection due to irregular operation.
✦ The GPT (GUID Partition Table) protected partition was manually created due to certain specific reasons.
How to remove GPT protective partition with Diskpart
To make a GPT protective partition operational, you can delete it through Diskpart, regardless of the reason it was created.
To convert a GPT disk to MBR using Diskpart, first, open Command Prompt as Administrator, then type "diskpart" and press Enter. Next, type "list disk" and press Enter to identify the disk you want to convert. Type "select disk #", where # is the number of the disk you want to convert, and press Enter.
│Part 1. Find the disk number of the GPT protective partition
Step 1. To open the Disk Management console, press the Windows key + R to open the Run box, type in "diskmgmt.msc", and press Enter.

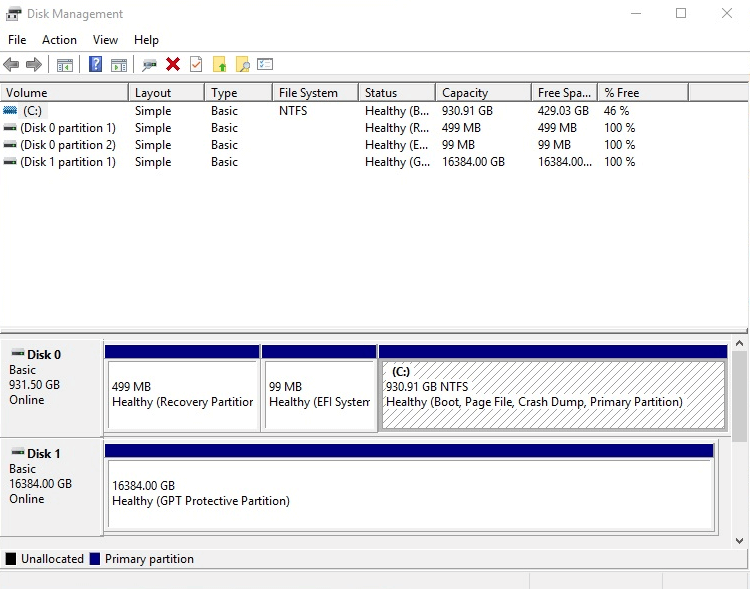
Step 2. To find the disk marked as GPT Protective Partition in Disk Management, open Disk Management and locate the disk with this designation, remembering its disk number for future reference.
│Part 2. Remove GPT protective partition in Windows 7/8/10/11
Step 1. Press "Windows + R" to open the Run dialog box, type "diskpart" in the search box, and press Enter.
Step 2. Type the following commands in order and press Enter after each one.
● list disk
● select disk 1(1 refers to the disk marked as GPT Protective Partition.)
● clean
● convert mbr
● exit

- ★Tips:
- If the process is successful, only unallocated space will be left on the disk, and the disk will not be usable until partitions are created.
- Sometimes, you may encounter an error message like "the disk you specified cannot be converted to MBR" or "please select an empty GPT disk to convert" when trying to convert a disk to MBR format.
Convert GPT protective partition to MBR via the reliable converter
Using Diskpart to delete a GPT protective partition can be done, but the Clean command that follows will result in data loss. Additionally, Diskpart may not always be successful in converting a disk to MBR format.
To remove a GPT protective partition without losing data, use a tool like Qiling Disk Master Professional, which can convert a disk between MBR and GPT without deleting partitions, allowing you to delete the GPT protective partition with ease.
This tool can convert GPT to MBR and vice versa, allowing for Windows 11 updates by changing the disk partition style from GPT to MBR or from MBR to GPT. It can be downloaded as a demo to see its functionality.
Step 1. Open Qiling Disk Master, right-click the disk you want to change to MBR, and choose to Convert to MBR. Alternatively, click the disk and select Convert to MBR from the right column.

Step 2. Waiting to convert selected partition to MBR.
The process of removing a GPT protective partition involves converting it into an MBR partition. This can be done using two reliable methods, with the choice of method depending on the actual situation. If the task needs to be performed on a Windows Server, a tool called Qiling Disk Master Server is required.
Related Articles
- How to Solve Convert to Basic Disk Greyed Out Question?
When you use Disk Management, you'll find the option Convert to Basic Disk is greyed out. How to convert dynamic disk to basic? Here you can find the solution. - How to: Change Partition Style to GPT or MBR without Data Loss
How to change partition style from MBR to GPT or from GPT to MBR? You can learn 2 different and effective ways to change the partition style of a hard drive to GPT/MBR in this post. - How to Remove GPT Protective Partition without Data Loss
You can learn what is GPT protective partition from this article and how to solve related problems of GPT protective partition step by step. - [Fixed] The Selected Disk Has an MBR Partition Table
Encounter the error message 'The selected disk has an MBR partition table On EFI system, Windows can only be installed to GPT disks'? Learn how to fix it here. - Solved: Conversion from FAT32 to NTFS is not available in Windows
Learn how to fix “Conversion from FAT32 to NTFS, volume is not available” issue caused by different factors with different solutions in Windows 7, 8, 10. - 3 Methods: Convert MBR to GPT without Deleting Your Partitions
Learn 3 ways to convert MBR to GPT without deleting partitions, so you can keep existing data while moving to the GPT partition style.