[Stepwise] How to Burn Windows 11 ISO to USB?
Can I burn Windows ISO to USB?
You can use the built-in Windows tool, Rufus, to create a bootable USB drive from your Windows 11 ISO image. To do this, download and run Rufus, select your USB drive as the target device, choose the ISO image as the bootable device, and follow the prompts to complete the process. Alternatively, you can also use a third-party tool like Etcher or PowerISO. If you're on a Mac, you can use the built-in Disk Utility or a third-party tool like TransMac to create a bootable USB drive. If you're on a Linux system, you can use the built-in dd command or a tool like Etcher to create a bootable USB drive.
Windows 11 is the latest operating system from Microsoft, and users have reported a positive experience due to its favorable features and versatile functions. If you're interested in enjoying the Windows 11 operating system, you may have searched extensively online for information on how to make it work for you.
As the demonstration from Microsoft official, you have three choices:
▣ If your computer meets the minimum system requirements for Windows 11, you can directly upgrade to Windows 11.
▣ You can install Windows 11 by using the Windows creation media tool to create a Windows 11 installation media, which can help you bypass the system requirements.
▣ To create a portable Windows 11 bootable USB flash drive, you can burn the Win 11 ISO to a USB drive, allowing you to run Windows 11 on any device without reinstalling. This enables you to enjoy Windows 11 on any device without the need for a separate installation.
Benefits of burning Windows 11 ISO to USB
Compared to upgrading to Windows 11 directly and installing from installation media, burning the Win 11 ISO to USB has two main advantages.
✎ To enjoy Windows 11 more easily. You don't need to upgrade your computer to meet the Windows 11 system requirements, and you can still experience the Windows 11 operating system.
✎ To make a portable Windows 11 USB. The Surface Laptop 4 has a 13.5-inch PixelSense touchscreen display that is perfect for working on the go.
How to burn Windows 11 ISO to USB step by step?
To create a bootable Windows 11 USB drive, you need to use a tool like Rufus or PowerISO to burn the ISO file onto the USB. This process involves selecting the correct settings and options to ensure the USB drive is properly formatted and configured to boot Windows 11. It's essential to follow the correct steps and be cautious when making changes to avoid creating a faulty USB or failing to make it bootable.
To create a Windows 11 boot USB, you need to download the Windows 11 ISO file from the official Microsoft website and then use a reliable tool to burn the ISO file to a USB drive. This process typically involves selecting the USB drive as the target device and following the tool's instructions to complete the burning process. The resulting USB drive can then be used to boot a computer and install Windows 11.
Part 1. Download Windows 11 ISO
If you don't have the Windows 11 ISO file downloaded, you can obtain it from Microsoft's official website.
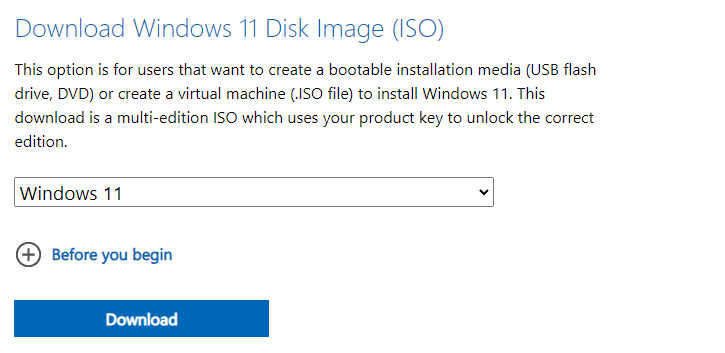
1. To download Windows 11, go to the Microsoft download page for Windows 11, select "Windows 11 (multi-edition ISO)" from the drop-down menu, and follow the prompts to download the ISO file.
2. Next, click the Download button and choose a language for the Windows installation, then click Confirm to begin the download.
Part 2. Burn Windows 11 ISO to USB
Microsoft has made it easier to create a bootable Windows USB using the Windows To Go feature, but it only supports Windows 10. If you need to create a bootable USB for Windows 11, a more practical tool called Qiling Disk Master Standard can be used to burn the Win 11 ISO to a USB drive with ease.
This software is compatible with Windows 11/10/8/8.1/7, requires a 13GB USB capacity, and allows download of a freeware to burn a Windows 11 ISO to USB.
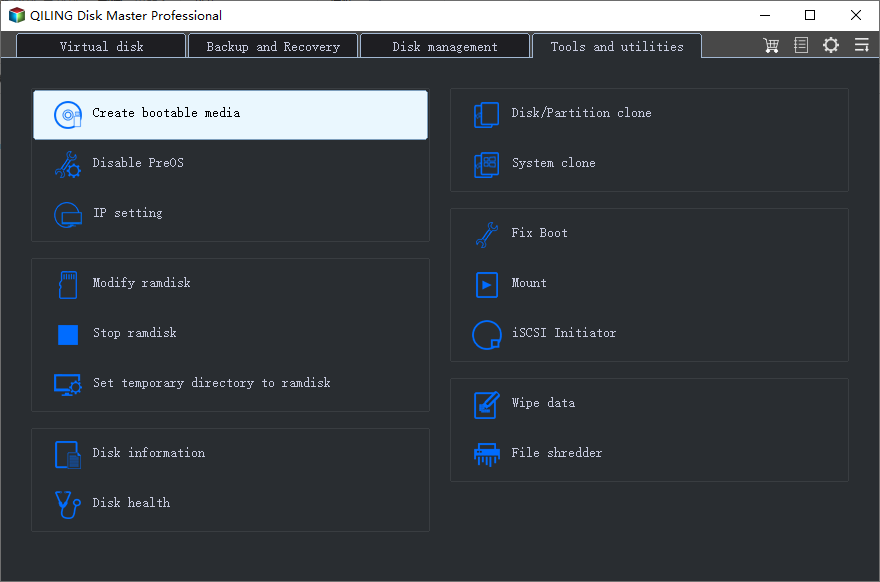
Step 1. Install and launch Qiling Disk Master. Then click "Tools"> "Create bootable media" feature.
Step 2. Choose the option "Export ISO file". Click the folder icon to save ISO manually.
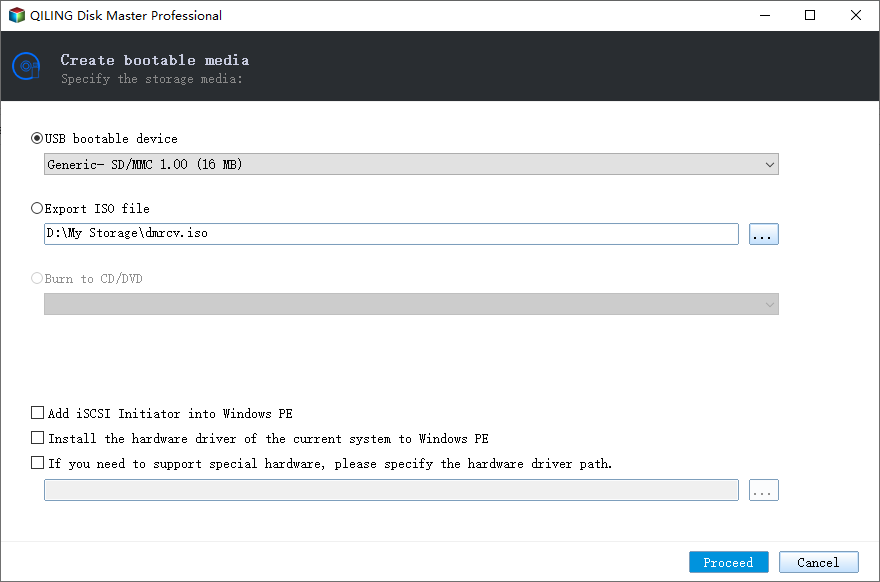
Step 3. Select a USB drive as target and click "Proceed".
How to boot from the Windows 11 USB?
After everything is done, insert the USB drive into the computer you want to use Windows 11 on. Then, enter the BIOS settings, change the boot order to prioritize the USB drive, and finally, you can boot from the bootable Windows 11 USB.
Step 1. To set up Windows 11 To Go on a USB drive, connect the drive to your device. Boot the computer and press a key (usually F10, F2, F12, F1, or DEL) to enter the BIOS/UEFI Setup, where you can configure the USB drive as the first boot device.
Step 2. Insert the Windows 11 USB drive, select it in the boot menu, and press Enter. You can then start the Windows tour.

Final words
With Qiling Disk Master Standard, you can easily create a portable Windows 11 bootable USB by burning the ISO to a USB. If you want to create a Windows To Go with your current system, you can upgrade to Qiling Disk Master Professional, which also offers advanced features like migrating your OS to an SSD, allocating free space between partitions, checking SSD speed, wiping your hard drive clean, and more.
Related Articles
- 2 Free Ways to Burn or Copy ISO to USB in Windows 11/10/8/7
On this page, we aim to tell how to burn ISO to USB in Windows 11, 10, 8, 7 via 2 free methods. And then you can get a bootable USB drive. - Best Free Windows 11 USB Creator: Create Bootable Windows 11 USB Easily
The best free Windows 11 USB creator demonstrated in this post would be your best helper to create a portable Windows 11 USB drive. With it, you can enjoy Windows 11 operating system on any devices without reinstalling OS on it. - Splitting Image File to Smaller Ones to Fit on Disk Space
Splitting an image file into multiple smaller files helps to fit in different storage devices like USB, CD, FAT32 partition, etc. Qiling Disk Master can make it. - Hard Disk Partition Management with Windows PE Bootable Rescue CD/USB
Creating a bootable CD/USB based on Windows PE might be the best way to manage your disk and partition when your OS failed to boot. - How to Install Windows 11 from USB without losing data?
How to install Windows 11 from USB without data loss? In this post, you'll not only learn the right steps to get it done, but also, you'll learn to make a portable and bootable Windows 11 USB stick so that you can carry it around. - How to Make Exact Copy of Hard Drive in Windows 11 (2 Ways)
You can learn 2 easy ways of making exact copy of hard drive in Windows 11 and how to boot your PC from the new hard drive. Please read on.