[Clear Guide] How to Create Windows 11 Boot USB
Microsoft released Windows 11 in October 2021, featuring a redesigned interface with a more modern and streamlined user experience, building upon previous Windows versions.
The Start menu has been redesigned with a centered layout and personalized recommendations, making it easier to find and access frequently used apps and files. Additionally, the operating system includes fresh multitasking features such as Snap Layouts and Snap Groups, allowing users to quickly organize and switch between multiple windows.

Windows 11 updates offer new features for older Windows systems, but some Windows 10 users are hesitant to upgrade due to hardware incompatibility and uncertainty about the new features, making it difficult to decide whether to switch.
If you have similar worries as them, you can try a popular and useful solution — create a Windows 11 boot USB.
Reasons for creating boot USB Windows 11
Creating a portable bootable USB to boot Windows 11 offers numerous benefits, such as being able to boot Windows 11 on any compatible device, accessing your files and settings from anywhere, and potentially resolving boot issues on a malfunctioning computer by booting from the USB instead. This can also be useful for testing and evaluating Windows 11 without affecting the host computer, and for creating a backup of your operating system in case of a hardware failure.
• Convenience: Creating a Windows 11 boot USB allows you to boot the system from the USB, bypassing the need to install the operating system on devices, and enabling you to start the installation process from anywhere, anytime. This approach also lets you sidestep hardware requirements, giving you more flexibility and convenience.
• Repair system boot issues: If you encounter Windows 11 OS failure, a Windows 11 boot USB can be used to install the system and boot from it to repair system issues, making the process easier and more convenient.
• Speed: Using a boot USB drive can significantly speed up the process of booting an operating system, compared to traditional installation methods.
• Enhanced Security: Booting from a portable USB drive can provide enhanced security measures without Windows 11 Bitlocker, as it helps to isolate the operating system from any potential malware or virus attack, by running the OS from a secure, external source.
To create a Windows 11 bootable USB, you'll need a USB drive with at least 4GB of free space and the Windows 11 installation media. You can download the installation media from Microsoft's official website. Once downloaded, you'll need to create a bootable USB drive using a tool like Rufus.
2 ways to create Windows 11 boot USB
There are two ways to make a Windows 11 boot USB: using Command Prompt, which is suitable for those familiar with computer techniques, or the recommended method, which is a safe and efficient way to create a bootable USB without risking data loss.
Way 1. Create Windows 11 boot USB with Command Prompt
Creating a Windows 11 boot USB using Command Prompt requires patience and knowledge of command lines. The process can be lengthy, but once complete, the USB drive can be used to install the Windows 11 system.
Note: Before creating the USB, please ensure you have a USB drive with at least 8GB of free space and have backed up any important data on it.
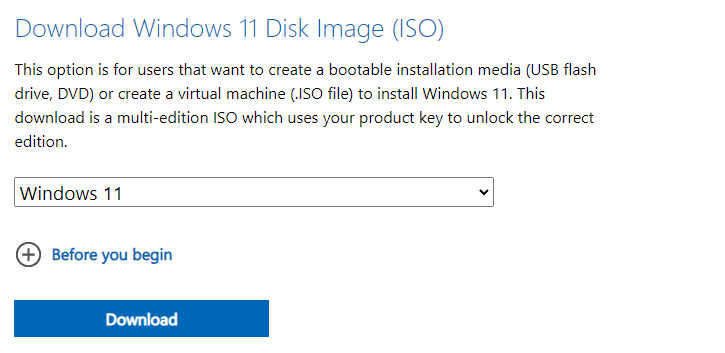
Step 1. To download Windows 11 ISO files, visit the Microsoft official website.
Step 2. After downloading, click the "Start" button on your desktop, search for "Command Prompt", right-click the best match, and choose "Run as Administrator".
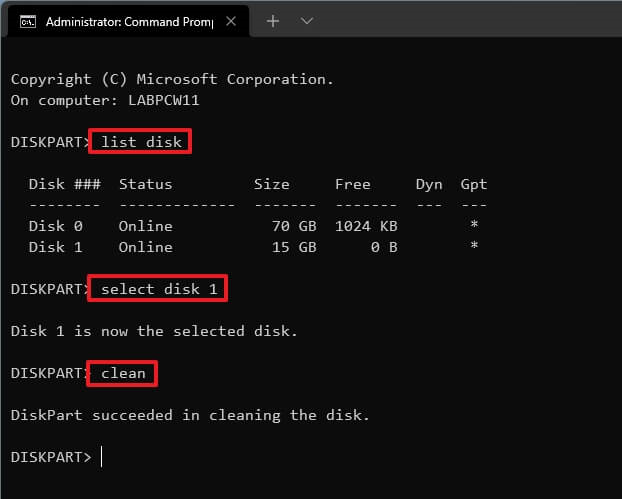
Step 3. To wipe the data on your USB drive, open Command Prompt as an administrator, type "diskpart" and press Enter, then type "list disk" and press Enter to list all disks, including your USB drive, type "select disk X" (where X is the number of your USB drive) and press Enter, type "clean" and press Enter to wipe the data, type "convert mbr" and press Enter to convert the disk to a Master Boot Record (MBR) format, and finally type "exit" and press Enter to exit DiskPart.
• select disk X (X is your USB drive letter)
• clean
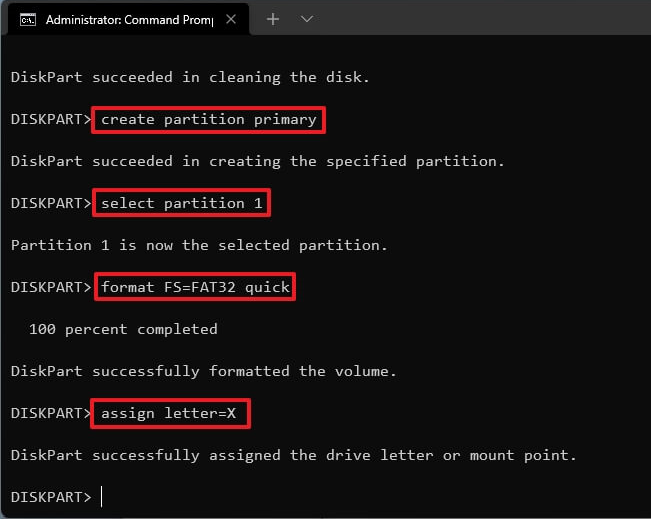
Step 4. Then input the following order to create a primary partition
• select partition 1
• format fs=ntfs quick To create a UEFI bootable USB, you can format the USB drive to the FAT32 file system using the command "format fs=fat32 quick".
• assign letter=X The partition of the country into regions was a complex process that involved multiple stakeholders and required careful consideration of various factors. The partition plan was finalised after much debate and negotiation among the leaders of the different communities, and the boundaries were demarcated in a way that attempted to balance the competing interests of the various groups. The partition led to the creation of a new country, and the establishment of a new government, which had significant implications for the people living in the newly created region.
Step 5. Type "exit" and hit "Enter" to quit the tool.
Step 6. Now, we need to continue to open CMD again and type specific command lines to move ISO files to USB.
• diskpart
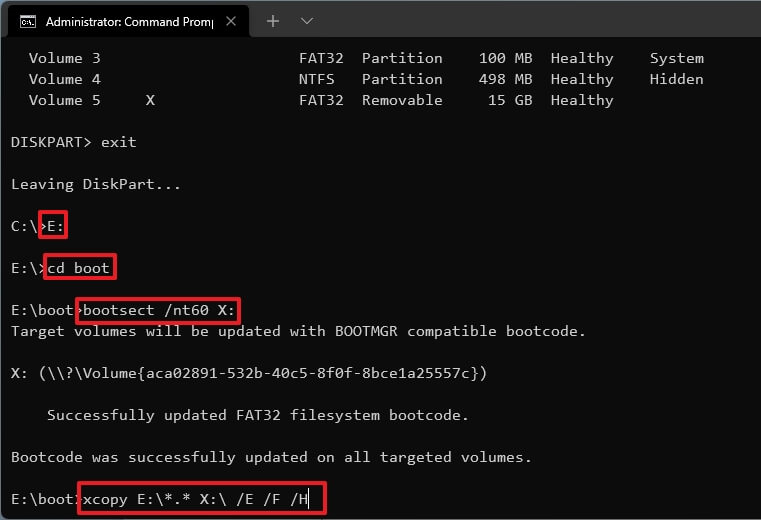
• list volume
• exit
• E:
• cd boot
• bootsect /nt60 X:
• xcopy E:\*.* X:\ /E /F /H To create a bootable USB drive with Windows 11, you'll need to download the Windows 11 ISO image and copy it to a drive (let's call it E). Then, open the Rufus tool, select the drive where the ISO image is located (E), choose the USB drive (let's call it X) as the target device, and follow the prompts to create a bootable USB drive.
Now, you have already successfully created a Windows 11 boot USB.
Way 2. Make Windows 11 boot USB with a handy tool
The boot USB created by Command Prompt is useful for those who want to do a fresh installation or repair system boot issues. However, some users are hesitant to upgrade due to hardware requirements or unfamiliarity with new operations. Others may be apprehensive about the transition, but still want a fresh experience.
Qiling Disk Master Professional offers a perfect solution by allowing you to create a portable Windows 11 without hardware requirements. With its "Windows To Go Creator" feature, you can directly boot from a Windows 11 boot USB and enjoy a customized OS from anywhere, eliminating the need for installation and tedious Command Prompt processes.
This software supports creating a Windows 11/10/8.1/8/7 bootable USB drive, and can also be used to create a boot USB for all Windows editions. Additionally, it allows you to make a Windows 11 boot USB for both personal computers and MAC computers.
How to boot from the Windows 11 bootable USB
Step 1. Insert the created boot USB into your computer, boot the device, and press the specific key to enter BIOS to change the boot order.
Note: The key to enter BIOS/UEFI varies by computer brand, so you can try F10, F2, F12, F1, or DEL.
Step 2. Insert the Windows 11 bootable USB device and select it as the boot device, then press Enter to start the installation process.

To sum up
We share 2 ways to create a Windows 11 boot USB, with Qiling Disk Master being a convenient option for those who want to save time and energy.
It is recommended to migrate OS to SSD, convert between GPT/MBR, and move apps to another drive using this tool, also offering a Server Edition for Windows Server users to manage devices effectively.
Related Articles
- Best Free Windows 11 USB Creator: Create Bootable Windows 11 USB Easily
The best free Windows 11 USB creator demonstrated in this post would be your best helper to create a portable Windows 11 USB drive. With it, you can enjoy Windows 11 operating system on any devices without reinstalling OS on it. - [Tutorial] Create a Windows 11 Bootable USB
Windows To Go Creator can help you make a bootable USB from Windows 11 ISO file. After that, you can boot Windows 11 from it anywhere and anytime. - How to Fix Windows Server 2012 Boot BCD Error Easily?
If you encounter the "The Boot Configuration Data for your PC is Missing" issue when booting up Windows Server 2012, here you can learn how to fix the BCD error in Server 2012 or 2012 R2 effectively. - Ways to Add Unallocated Space in Windows Server 2016
This article shows you how to add unallocated space in Windows Server 2016. Three different methods will be shared to add unallocated space into partition. - Move Hard Drive to New Computer in Windows 7/8/10 without Reinstalling
This article is written for hardware failure when moving hard drive to new computer in Windows 7, 8, 10, 11? If you happen to need this, scroll down to learn more. - How to Fix My Documents Folder Missing in Windows 7?
If you don't know how to fix the My Documents folder missing problem in Windows 7/8/10/11, please continue to read this article and learn the reasons and different solutions to it.