Best Free Windows 11 USB Creator: Create Bootable Windows 11 USB Easily
How do I create a bootable USB drive for Windows 11?
Many users are upgrading to Windows 11, but some are being held back by strict system requirements.
Creating a bootable Windows 11 USB drive is a great idea, allowing you to use Windows 11 on any device without needing to install it on your personal computer. This way, you can still access Windows 11 anytime and anywhere, making it a convenient option for those who want to use the operating system on multiple devices.
To create a bootable Windows 11 USB, you can use the Windows 11 USB creator called "Windows To Go", but it only supports the Enterprise Edition of Windows 8/8.1 and Windows 10. For Windows 11, you can use a third-party tool like Rufus or a USB creator tool from Microsoft, such as the Windows 11 Installation Media Creation Tool, to create a bootable USB drive. This will allow you to install Windows 11 on a new computer or upgrade an existing one.
Choose the best free Windows 11 USB creator: Qiling Disk Master
Microsoft's built-in Windows To Go feature cannot create a bootable Windows 11 USB, but a free and powerful tool called Qiling Disk Master Standard has a feature called "Windows To Go Creator" that can easily create a bootable Windows 11 USB, making it a convenient solution.
- The software supports creating a bootable USB for Windows 11, 10, 8.1, 8, and 7, and can handle all editions of Windows.
- You can use this function to create Windows To Go for both personal and Mac computers.
- It's available using both system disc/ISO file and the current system to create Windows To Go USB.
Download this professional Windows 11 USB creator tool to create a Win 11 bootable USB drive, allowing you to enjoy Windows 11 on any device without the need for installation.
Before you start:
- Prepare a USB drive of at least 13GB in size, preferably using a faster USB 3.0 drive.
- All data on the USB will be completely erased, please back up necessary data beforehand.
- Download Windows 11 ISO file from the official website.
Stepwise to create a bootable Windows 11 USB
To create a Windows 11 bootable USB drive, you'll need to download the Windows 11 installation media from Microsoft's official website and a tool like Rufus or Microsoft's own Media Creation Tool. Once you have these tools, you can follow the detailed steps outlined below to create a bootable USB drive.
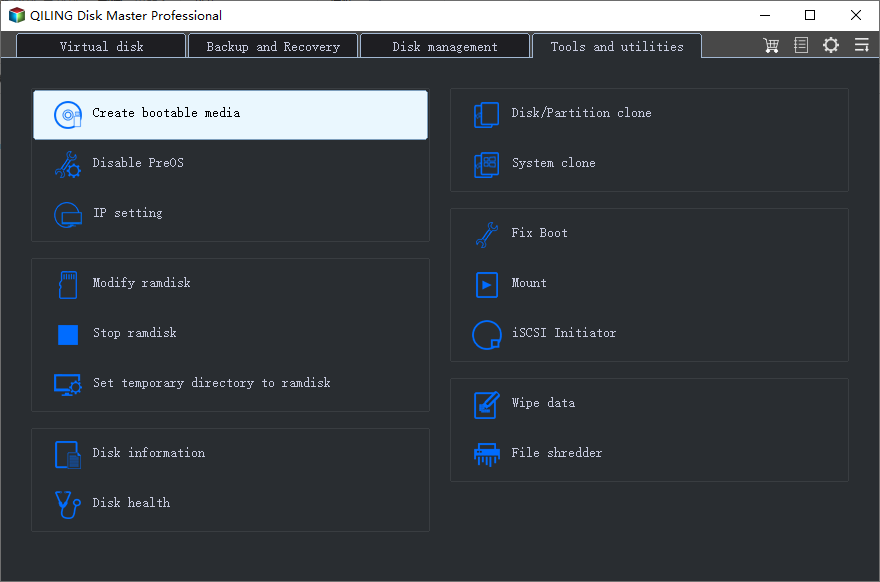
Step 1. Install and launch Qiling Disk Master. Then click "Tools"> "Create bootable media" feature.
Step 2. Choose the option "Export ISO file". Click the folder icon to save ISO manually.
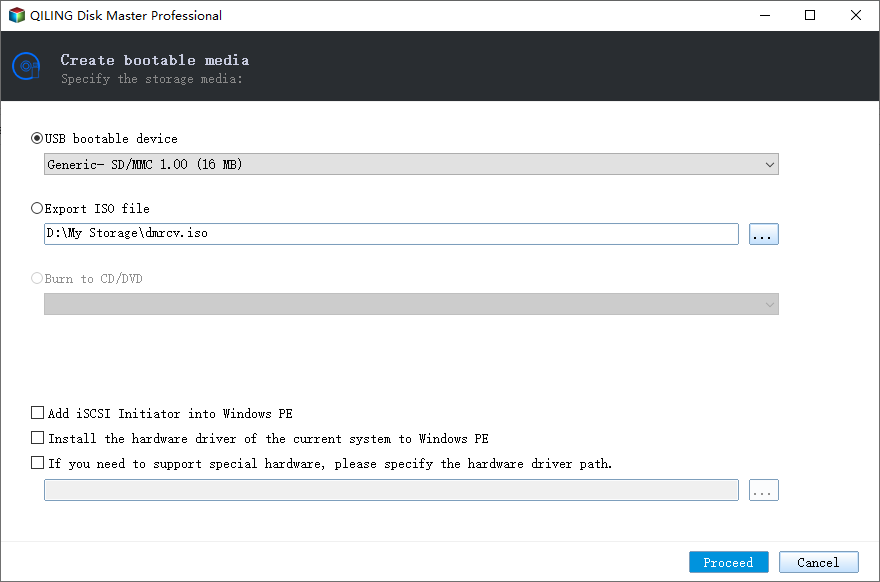
Step 3. Select a USB drive as target and click "Proceed".
To create a Windows 11 bootable USB using the Windows 11 USB creator tool, the process is relatively straightforward and can be completed in a few steps. If you are using Windows Server 2008, 2012, 2016, 2019, or 2022, you can use the Server Edition instead.
How to boot from the bootable Windows 11 USB?
If you're having trouble booting Windows 11 from a Windows 11 To Go USB drive, don't worry - we've got a step-by-step guide to help you through it. Just follow these simple instructions to get your Windows 11 installation up and running from your USB drive.
Step 1. To boot Windows 11 from a To Go USB drive, connect the USB drive to your device and enter the BIOS/UEFI Setup by pressing a specific key, usually during boot-up.
Note: The key to access the boot menu varies from computer to computer, you could try pressing F10, F2, F12, F1, or DEL.
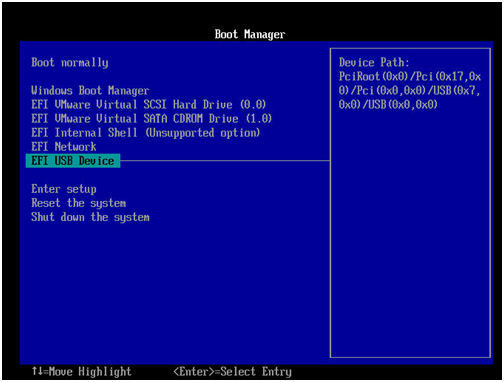
Step 2. Select the USB Device and hit the "Enter" key to boot from the Windows 11 bootable USB.
You may want to know: How to Install Windows 11 from USB
Conclusion
To create a bootable Windows 11 USB drive, you can use the Windows 11 USB creator, but using Qiling Disk Master Professional can make the process much easier. Once you have created the bootable USB, you can insert it into the target PC and boot from it, allowing you to access the Windows 11 environment without having to install it on the PC.
Qiling software offers additional features such as migrating an OS to an SSD for improved performance, cloning a disk to another for upgrades, and wiping a hard drive before selling, among others.
Related Articles
- Is UEFI Required for Windows 11 Installation?
This guide explains Is UEFI Required for Windows 11 Installation with clear steps, key checks, and practical tips. - How to Resize/Move Partition Windows 11 without losing data?
Learn how to Resize/Move Partition Windows 11 without losing data with clear steps, key checks, and practical tips. - Convert Primary to Logical Windows 10 without Data Loss
How to convert primary to logical Windows 10 when there're already 4 primary partitions on a disk. This time, the most useful tool will be introduced. - How to Create A System Image Backup on Windows Server 2003?
Learn how to Create A System Image Backup on Windows Server 2003 with clear steps, key checks, and practical tips. - Windows Server Backup Delete Old Backups Automatically
This guide explains Windows Server Backup Delete Old Backups Automatically with clear steps, key checks, and practical tips.
Products
Articles & Tutorials
- Data Recovery
- Data Backup
- File Recovery
- File Backup
- File synchronize
- System Backup and Restore
- Disk and Partition Clone
- Technical articles
- Disk Master Help
- Windows Deleted File and Disk Recovery Tutorials
- Windows File and Data Recovery Tutorials
- More Windows Tutorials for Install, Security, Files, and PC Tips
- Windows Boot, Repair, and Recovery Environment Tutorials
- Windows Backup Tutorials
- Windows Restore Tutorials
- Windows Clone and Migration Tutorials
- Windows Server Backup, Recovery, and Management Tutorials
- Windows Disk, Partition, and Storage Management Tutorials