Virtual Drive Encryption vs. Full-Disk Encryption
The main difference is what you must remember to put inside the protected area. An encrypted virtual drive protects a selected set of files stored in its container. Full-volume encryption protects a chosen physical or logical volume while it is locked, including files you may not have noticed on that volume. Both approaches have limits once you unlock and use them.
Where each protection boundary starts
Encrypted virtual drive: A tool such as QILING Safe Disk stores protected files in a password-protected .fvd container. Mounting presents the image as a drive letter. Only files copied into that mounted drive are within its encryption boundary; the host disk, temporary exports, and files outside the image are not automatically covered.
Full-volume encryption: BitLocker can protect a selected Windows system or data volume, and BitLocker To Go covers a removable drive. It is appropriate when the main risk is loss of the device that holds the whole volume. Microsoft's BitLocker FAQ describes its volume and removable-media coverage. A separate data partition is a volume too, so confirm exactly which volumes are protected.
While unlocked: Both methods allow normal file access after unlocking. Neither automatically blocks a malicious program running with your access, a person using your unlocked session, or a file you copied out to an unencrypted location. The protection boundary matters most when the container is unmounted or the volume is locked.
Match the method to the risk
Lost laptop: Protecting only one virtual drive may leave Downloads, browser data, swap files, and other local content on the laptop outside it. A supported system-volume encryption setup is a better starting point for broad at-rest protection, with a container added only for selected projects.
Lost USB stick: A container on the USB stick protects the files placed inside that container; other USB files remain visible. If every file on the stick must be protected, choose a removable-volume method such as BitLocker To Go where supported.
Selected confidential project: A container can give the project its own password and one image file to back up or transfer. Its convenience depends on having compatible software on each receiving computer and a tested way to open it there.
Shared or managed PC: Ask whether a local application may install a driver, whether BitLocker is controlled by organizational policy, and where recovery information may be stored. Do not silently change encryption settings on a managed device.
A practical layered setup
Step 1. List the data at risk and its locations: system drive, USB drive, cloud-synced folders, backups, and exported copies. Decide whether you need whole-device coverage, project separation, or both.
Step 2. If the entire Windows laptop volume needs at-rest protection, check its Windows edition and enable an approved volume-encryption method with a safely stored recovery key. Verify the actual protection status; a sign-in password alone is not disk encryption.
Step 3. If a particular project also needs a separate protected space, follow the Safe Disk container tutorial. Place only the intended files inside it. Close and unmount the drive after use, then copy the closed image to independent backup storage.
Step 4. Test a restore and unlock on a second approved machine before retiring the old storage. Keep each recovery key or password distinct, and record which one belongs to which protected volume or image.
Recommended product: Safe Disk for a separate project drive
For the project-specific part of this setup, QILING Safe Disk Standard creates a password-protected .fvd container and mounts it as a drive in Windows. Use it when you need a dedicated encrypted workspace. It does not encrypt the laptop's other files; keep whole-volume encryption for that separate requirement.
Step 1. Make an independent copy of the project files. Install and open Safe Disk, choose its create-image function, and select a host-drive folder with enough free space for the new container and future additions.
Step 2. Name the new image with an .fvd extension, set its virtual disk size, and enter and confirm a unique password. Review the settings and click Create. If the program offers formatting, apply it only while creating this new empty image.
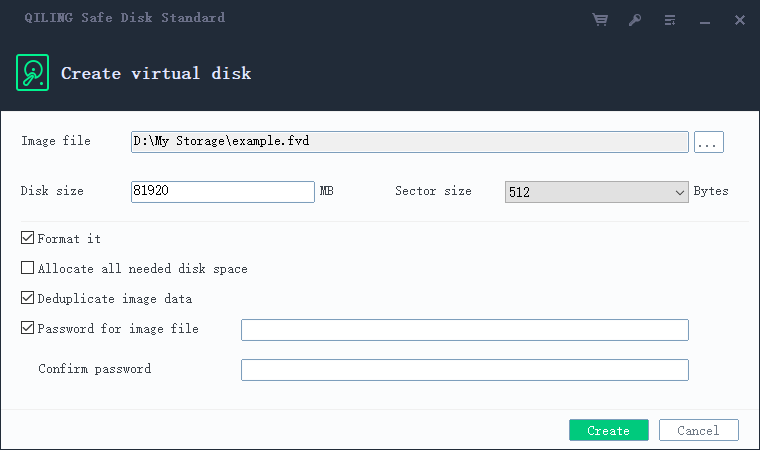
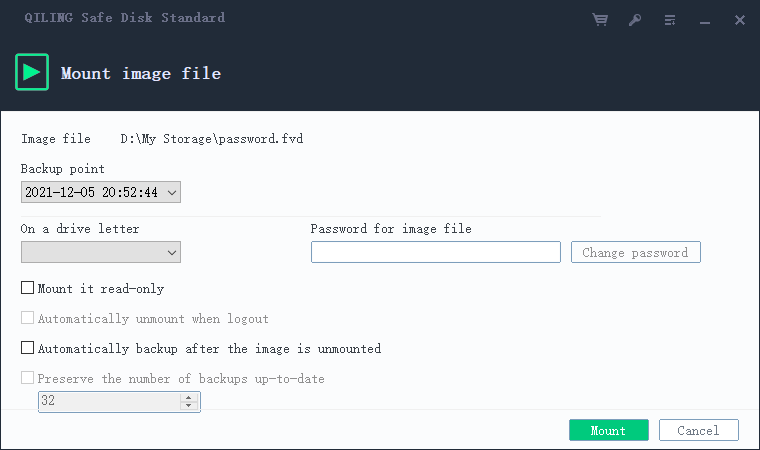
Step 3. Select the newly created image, choose a free drive letter, enter its password, and click Mount. Use read-only mode only when you need to inspect files without changing them.
Step 4. Open the mounted drive in File Explorer. Copy one test file inside and reopen it, then copy the rest of the intended project files. Check that files outside the image remain outside Safe Disk's protection boundary.
Step 5. Close open project files, choose Unmount, and make sure the virtual drive letter disappears. Back up the closed .fvd file separately and test mounting the backup before depending on it.
Questions to settle before deployment
Does an encrypted container replace full-disk encryption? No. It can cover a selected set of files, but does not cover the host drive by itself.
Can the two methods coexist? Yes, provided the device, Windows edition, and organization policy allow them. Layering protection adds recovery complexity, so maintain separate tested backups and credentials.
Is a virtual hard disk automatically encrypted? No. A plain VHDX is a storage file; it needs its own encryption layer such as BitLocker on a supported edition. The VHDX guide explains that setup.
Related Articles
- Encrypted Container vs. BitLocker
Compare Safe Disk, BitLocker data volumes, and BitLocker To Go for specific file and device needs. - Password-Protect USB Files
Use a container for selected USB documents and test it on another Windows PC. - Back Up Encrypted Files Before a Windows Reset
Export the keys that encrypted files depend on before rebuilding Windows. - Qiling Safe Disk vs. VeraCrypt: Encrypted Containers
Compare container formats, mounting, and portability before choosing one.
Products
Articles & Tutorials
- Data Recovery
- Data Backup
- File Recovery
- File Backup
- File synchronize
- System Backup and Restore
- Disk and Partition Clone
- Technical articles
- Disk Master Help
- Windows Deleted File and Disk Recovery Tutorials
- Windows File and Data Recovery Tutorials
- More Windows Tutorials for Install, Security, Files, and PC Tips
- Windows Boot, Repair, and Recovery Environment Tutorials
- Windows Backup Tutorials
- Windows Restore Tutorials
- Windows Clone and Migration Tutorials
- Windows Server Backup, Recovery, and Management Tutorials
- Windows Disk, Partition, and Storage Management Tutorials