3 Ways to Fix Windows 11/10 Photo App Not Seeing/Recognizing/Finding iPhone
Transferring photos and videos from iPhone to Windows 11/10 has been made easier with the Windows PC Photo App, a built-in feature on Windows 10/11 PCs. However, if the app is not recognizing or seeing your iPhone, preventing you from sharing photos between your devices, try the following solutions to fix the issue.
- Quick Navigation
- Part 1. How to Fix Windows 11/10 Photo App Not Seeing iPhone
- Part 2. How to Solve Windows PC Photo App Not Importing from iPhone
- Part 3. Tips: How to recover Deleted or lost Photos on iPhone
Part 1. How to Fix Windows 11/10 Photo App Not Seeing iPhone
Solution 1. Trust Computer on iPhone
Although well-When you connect your iPhone to a Windows 10 computer, you'll see a prompt asking you to "Trust this computer". To access your iPhone data, tap "Trust" when this prompt appears, allowing the Windows 10 photo app to recognize your iPhone.

Solution 2. Check if Apple Mobile Device support is Installed, Restart or Reinstall it
Apple Mobile Device Support is a software that helps computers automatically detect iPhones connected to them. If it's not installed, it may prevent the Windows 11/10 photo app from finding the iPhone.
- To check if the issue is related to a specific program, enter Appwiz.cpl in the start search and press the enter key to proceed to Programs and Features.
- To fix Apple Mobile Device Support, right-click on it and select the repair option, following on-screen directions and pressing the next button until the process is completed.

If Apple Mobile Device Support is not running properly, try restarting it to resolve the issue.
To restart the Windows Search service, open the Services window by typing Services.msc in the start search and press enter. Right-click on Windows Search and select the "Restart" option.
If the Windows PC app doesn't recognize your iPhone, try installing Apple Mobile Device Support to see if that resolves the issue.
#Try updating apple mobile device support
When a new hardware device, such as an iPhone connected via Apple data cable, is connected to a Windows 11/10 computer with internet access, the operating system automatically installs the necessary drivers. After the device is recognized and ready to use, navigate to the Settings app, then to Apps & features, where you'll find the Apple Mobile Device Support app installed.
#Using iTunes executable file
If Apple Mobile Support isn't automatically installed on your Windows PC when you connect your iPhone, you can try installing it directly from the iTunes executable file, bypassing the need to use iTunes itself.
- Download iTunes executable file most recent version from Apple's website.
- Locate the folder containing the iTunes executable file in File Explorer, then right-click on it and select "Open with" to choose a file extractor to open it with.
- In the file extractor, select AppleApplicationSupport and AppleMobileDeviceSupport.
- Click the Extract button and choose the desired location to extract the files to.
- Once you've installed the necessary updates, restart your Windows PC. Then, go to Apps and locate Apple Mobile Device Support. This will allow your Windows 11/10 photo app to recognize your iPhone.

Manually installing Windows Apple Mobile Device Support without iTunes on Windows 10 can be done in two ways. Sometimes, installed apps may automatically install these drivers, but not always, making it essential to know these procedures. These steps ensure that the necessary drivers are installed, even if an app doesn't install them on its own.
Solution 3. Reset and Repair Windows PC Photo App
If the Windows photo app is not recognizing your iPhone, it might be due to the app not functioning properly. In this case, resetting and repairing your Windows PC can help the app detect your iPhone.
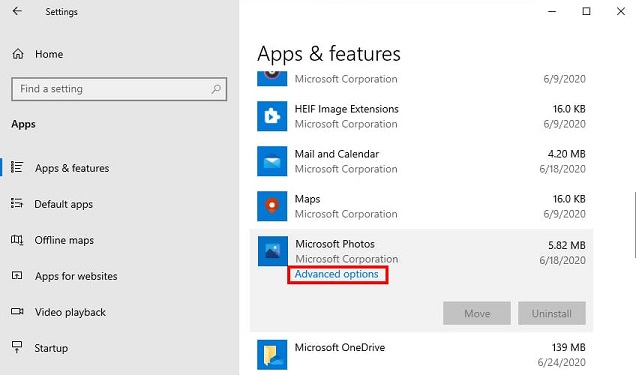
- Open the Windows 11/10 settings menu and select Apps.
- Scroll down the page, locate Microsoft Photos and click on Advanced options.
- To resolve the issue of Windows 10's Photo App not recognizing an iPhone, click on the "Repair" button to allow Windows to automatically detect and fix any problems that might be preventing the app from recognizing the iPhone. This should enable the Photo App to successfully connect with the iPhone.
Part 2. How to Solve Windows PC Photo App Not Importing from iPhone
Solution 1. Perform a windows 10 Photo app update
Sometimes, bugs from previous versions of the photo app may cause Windows 11/10 photo app not detecting iPhone. A simple app update may resolve the issue, which can be done by checking for updates in the Microsoft Store.
- To access the Microsoft Store app's settings, go to the three-dotted menu icon at the top right corner, click on it, and proceed to Downloads and updates.
- If you find an update for the photo app, click get updates on the screen that appears, and start the download. If the download is pending, click on the three-dotted menu icon to its right and click on Download now.
Solution 2. Sync photos to iCloud
To upload photos to iCloud, turn on iCloud Photos on your iPhone by going to Settings > [your name] > iCloud > Photos, then toggle the switch to turn it on. This will allow you to make a copy of all your photos to iCloud and keep them in sync across all your devices.
- Using your iPhone, go to the settings app.
- Scroll down and tap on photos.
- Go to Settings > [your name] > iCloud > Photos, and toggle the switch to the right to turn on iCloud Photos. If it's already on, you won't see the toggle switch, and you'll see a "Photos" label with a green color, indicating it's enabled.
After syncing photos to iCloud, you can download photos directly from iCloud.com to your computer, which can help resolve the issue of the Windows 10 photo app not importing photos from your iPhone.
Solution 3. System Restore
If you've recently encountered a problem and it didn't occur earlier, a system restore to a time before the issue started can be a suitable fix. To do this, you'll need to follow the steps to restore your system to a previous point in time, effectively rolling back any changes made since then. This can resolve the problem by reverting your system to a state where everything was working correctly.
- Searches for restore in the start menu and clicks "Create a restore point".
- To proceed, go to the next window and follow the instructions to system restore until you reach the step where you can select a restore point.
- Choose the photo app that worked best for you, ideally one that didn't have any issues, and follow the instructions to continue the process.
Part 3. Tips: How to recover Deleted or lost Photos on iPhone
Losing photos on an iPhone can be a significant issue, as it means losing cherished memories. Fortunately, there are ways to recover deleted photos from an iPhone, and users can try one of the methods to retrieve their lost images.
Solution 1. Through the recently deleted photo folder
To recover deleted photos, go to the Photos app, navigate to the "Recently Deleted" album, and look for the photos you want to recover. If the photos are still within the 30-day time frame, you can select them and tap "Recover" to restore them to your camera roll. If the photos are older than 30 days, they will be permanently deleted and cannot be recovered.
- Open the iPhone Photos app.
- Go to the Music app, scroll down the list of other albums and select "Recently Deleted".
- Tap on Select at the top-right part of the screen.
- Choose the lost but found or deleted photos.
- Tap recover on the low-right corner of the screen.
- To restore the pictures from the recently deleted photo folder to your iPhone, you can go to the Photos app, tap on the "Albums" tab, scroll down to the "Media Types" section, and select "Recently Deleted". From there, you can tap on the "Edit" button and then select the pictures you want to restore.
Solution 2. Using iCloud to restore the deleted or lost pictures
This method may work if you had backed up your photos before they were lost or deleted, but it's not a guarantee. If you do use this method, be aware that it will restore all of your backed-up information to your iPhone, including any current photos. To avoid this, it's a good idea to back up your current iPhone version first, so you can restore it later if needed.
- To recover deleted photos on your phone, start by carrying out a factory reset, which will erase all data on the device. Then, restore your phone from a backup that you are certain contains the lost or deleted photos.
- To recover lost photos, start by reviewing the photos on your phone, and if they're not found, restore an older version of your phone's data to see if the photos were backed up.
- If you've found the photos but are unhappy with the old versions on your phone, you can transfer them to another device or email them, then restore the latest backup of your phone.
Solution 3. Using Qiling iPhone Data Recovery Software
The iPhone Data Recovery software is an all-in-one solution for recovering data on iPhone, iPad, and iPod touch. It allows for efficient data recovery from iTunes and iCloud backups, making it possible to extract data even in scenarios where it has been lost due to a virus attack, system crash, accidental deletion, jailbreak, or being stuck at the Apple logo. With this software, you can recover any form of data, including photos, that have been lost or accidentally deleted.
- To use the Qiling tool, you will need to have the latest version of iTunes installed on your computer, which can be downloaded from the official Apple website.
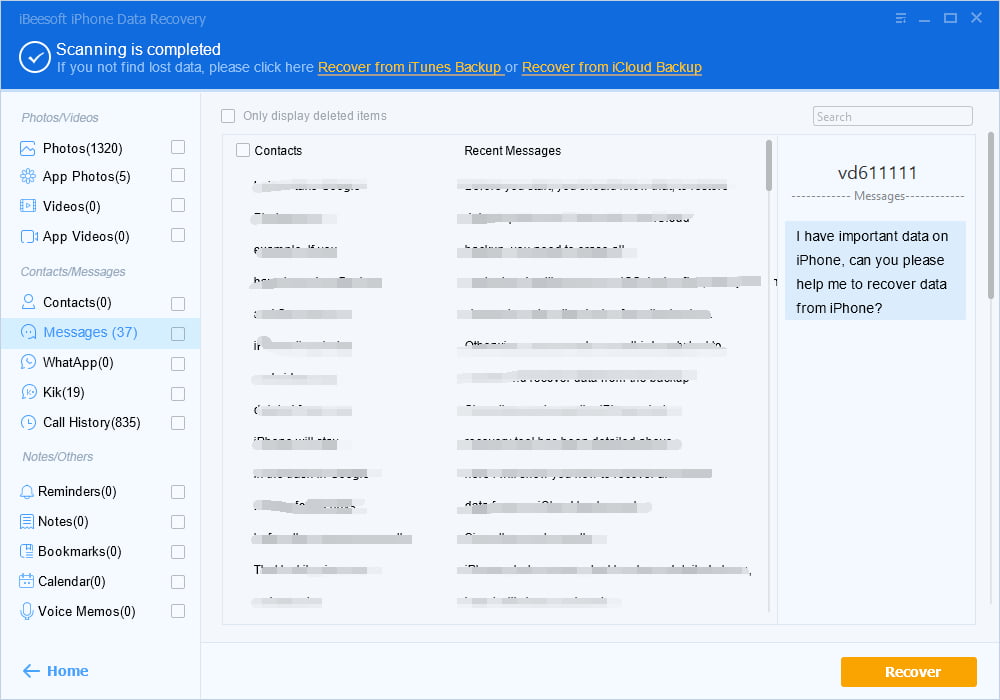
- Download and install an iPhone data recovery software on your computer, then connect your iPhone to your computer using a properly functioning cable. Select "Recover from iOS Device" in the software, which will automatically detect your iPhone. Ensure the "Trust this Computer" option is enabled and click "Start" to recover permanently deleted photos from your iPhone.
- Once the scanning process is complete, the software will categorize all files, allowing you to select the images category and browse through to find lost or deleted photos. As you preview the images, select the ones you want to recover and click "Recover" to save them back to your computer.

Related Articles
- How to Enter Safe Mode in Windows 10
- How to Fix Photo App Not Working in Windows 10
- [Solved] Deleted File Not Showing in Recycle Bin
- How to Fix iTunes/Software/Computer Can't Recognize iPhone
- Windows 7 Enterprise End of Life: How to Upgrade to Windows 10
You will get clear ideas about Windows 7 enterprise end of life and how to prepare for the extended support end. Please scroll down to learn more. - Windows 7 Maximum Disk Size Problem | Fix It Right Now!
You will learn more about Windows 7 maximum disk size and fix it step by step. Sroll down to get the details.