Guide on How to Partition a Hard Drive
To partition a large hard drive, use Windows Disk Management, macOS Disk Utility, or a third-party partition manager. These tools let you divide one drive into multiple partitions, each with its own file system and storage capacity. If you need to resize, merge, split, or move partitions more flexibly, partitioning software such as Qiling Partition Master or MiniTool Partition Wizard can help.
Quick Links:
1. How to partition a hard drive?
2. Resize partition for one hard drive
3. Create partition on hard drive
4. Delete partition on hard drive
5. Format partition on hard drive
6. Why partition a hard drive
7. Partition a hard drive summary
What is Disk Partition?
A partition is an independent part of a hard drive that allows for separate storage of data and operating systems. Typically, a single disk has two partitions: one for the operating system and another for storing data and files. This setup ensures that if one partition experiences issues, the other remains unaffected. Additionally, you can create multiple partitions to categorize and store data, making it easier to manage and organize your files. Partitioning a hard disk is often necessary when purchasing a new drive, allowing you to store data separately from the operating system.
How to Partition a Hard Drive?
Partitioning a hard drive involves common operations such as creating, deleting, formatting, and adjusting partition size. Users familiar with computer operations can easily partition their hard drive using the built-in Disk Management feature. However, for those without experience or who have been using their computer for a long time, this method may not be ideal, as it poses a risk of data loss if something goes wrong.
Here will be introduced a featured software - Qiling Disk Master (PA) Pro, the outstanding Windows partition manager. It can be downloaded for free.
One: Resize Partition for Hard Drive
Resize Partition, also called repartitioning or adjusting partition size, lets you extend or shrink existing partitions on a disk. For example, Qiling Disk Master (PA) Pro can extend the C: drive, shrink the D: drive, and resize BitLocker partitions without data loss. This is useful on older systems such as Windows XP, 2000, and 2003, which have limited built-in resizing options. Newer systems like Windows Vista, 7, 8, and Server 2008 include better disk management features, but they still have restrictions.
To extend the C: partition from 16.37GB to 46.62GB and reduce the D: partition from 69.53GB to 39.28GB, follow these steps:
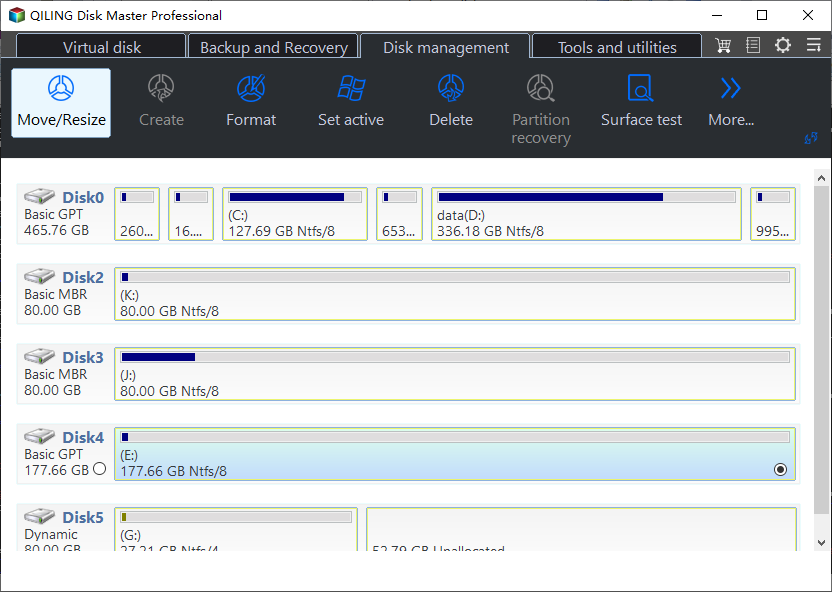
Step 1: Right click on disk 3 and select "Resize/Move Partition" menu.
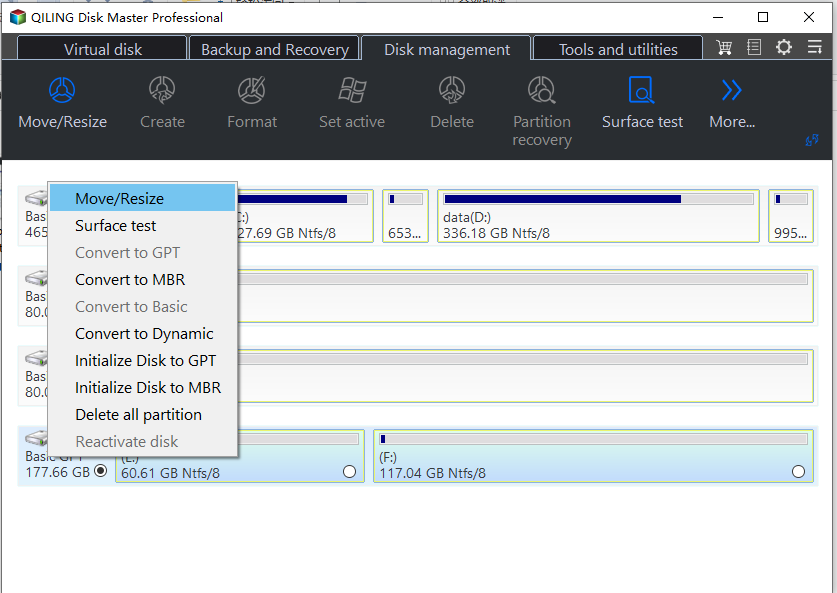
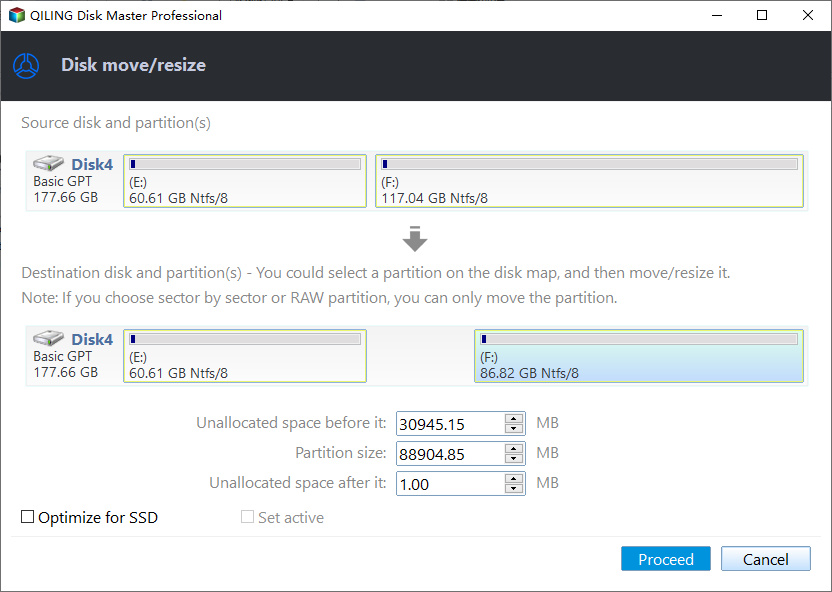
To free up space, I will shrink the volume to 86.82GB and move the F: drive to the right, keeping the unallocated space behind the E: drive.
Step 2: Drag rightwards double-headed arrow to expand E: partition to add unallocated space (90.83GB).
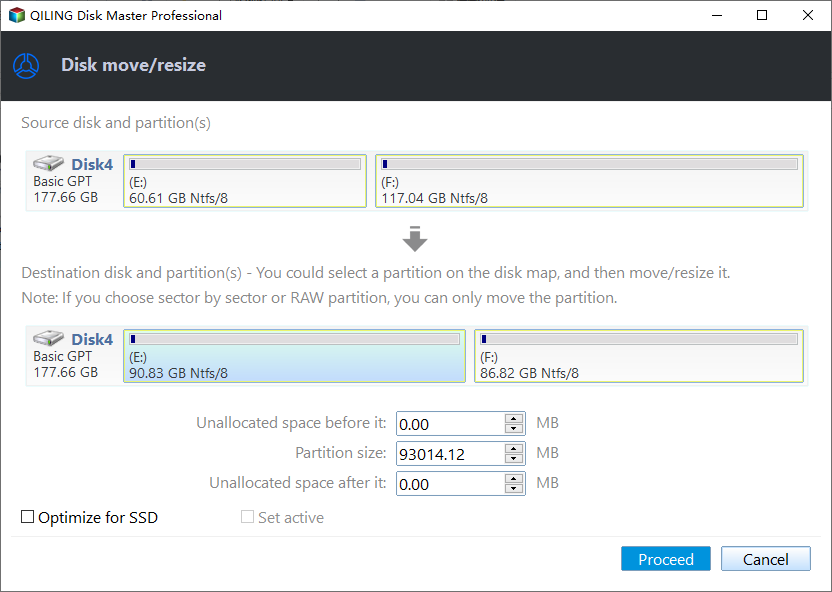
Step 3: Finished resizing, get the following layout, click "Proceed" button to operate all procedures.
Two: Create Partition on a Hard Drive
Creating a new partition is straightforward when unallocated space is available. You can use Windows Disk Management for basic partition creation or Qiling Disk Master (PA) Pro for more flexible operations. If all disk space is already allocated, Qiling Disk Master Pro can shrink or move existing partitions to create usable free space.
1. Create Partition in Windows 7
The operations on Windows of Microsoft are nearly the same as the operations on Windows 7.
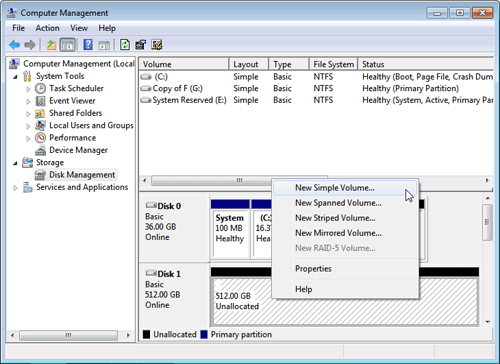
To access the disk management tool, click on "My Computer" on your Windows desktop, then select "Manage" from the context menu. This will open the Computer Management window.
To create a new partition on the unallocated space, select "New Simple Volume" and a New Partition Wizard will guide you through the process step by step. This will allow you to create a new partition on the selected space.
2. Create Partition with Qiling Disk Master (PA) Pro
To quickly create a partition, refer to the articles that provide guidance on using Qiling Disk Master (PA) Pro.
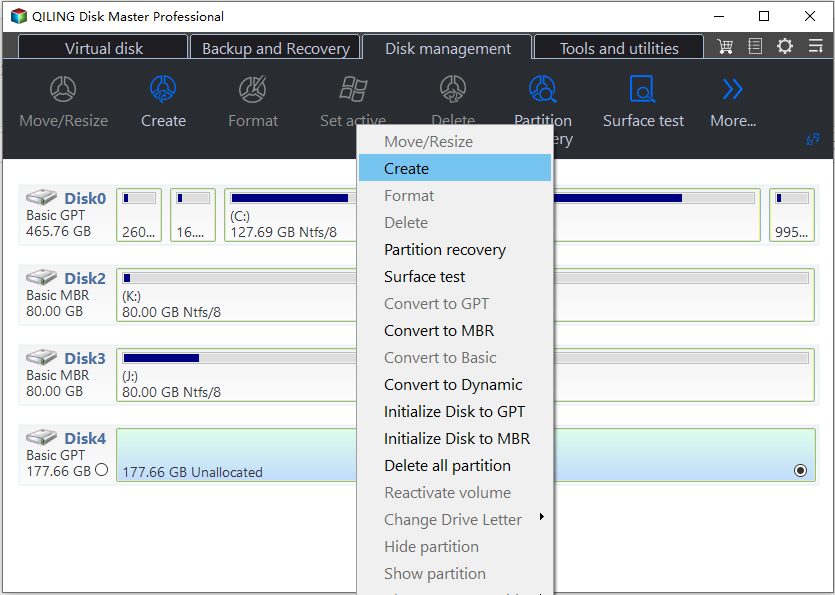
To create a new partition, start up the disk management tool, right-click on the unallocated space, and select "Create Partition" from the pop-up menu. This will open a new window where you can configure the partition settings.
1. **Model Type**: Choose the type of model you want to use for the task.
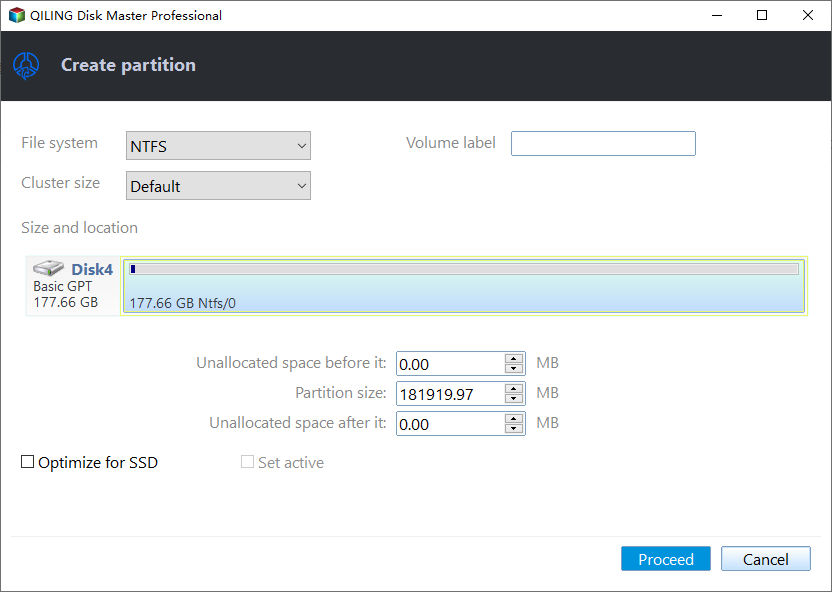
After completing the process, click "Proceed" to initiate the operation. This will result in a new drive appearing in "My computer" shortly thereafter.
Three: Delete Partition on a Hard Drive
To free up space on your computer, you can delete an unwanted partition using Disk Management, which will allow you to remove it without erasing any data. However, if you want to permanently delete the data and prevent any potential recovery, consider using Qiling Disk Master instead.
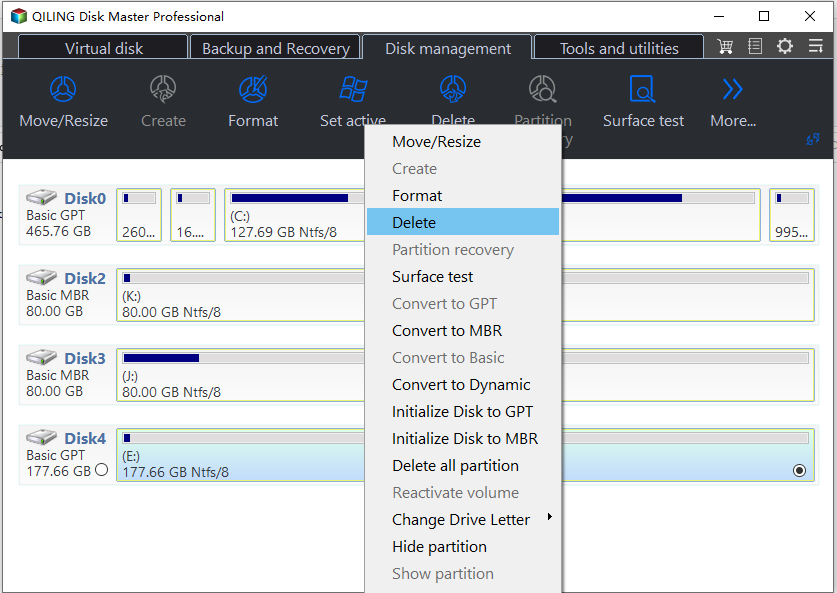
To delete an unwanted partition, right-click on it and select "Delete Partition" from the context menu, which will open a new window.
Note:
1. The new window provides two options: "Delete partition" and "Delete partition and wipe all data". You can choose the one that suits your requirements.
2. Due to system operations, the system and/or boot partition cannot be deleted, unless using the "Clear Disk" feature in Qiling Disk Master.
Four: Format Partition Operation
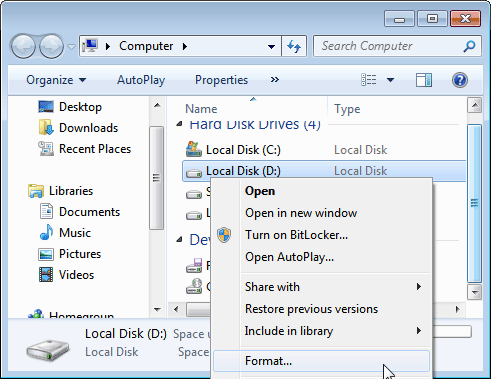
When you need to change your file system or quickly wipe data, formatting a partition is the way to go. However, be careful as this process will erase all data on the partition. To format a partition, open your computer, select the drive you want to format, right-click on it and select "Format". For example, if you want to format drive D:, you can simply follow these steps. Qiling Disk Master makes this process a breeze.
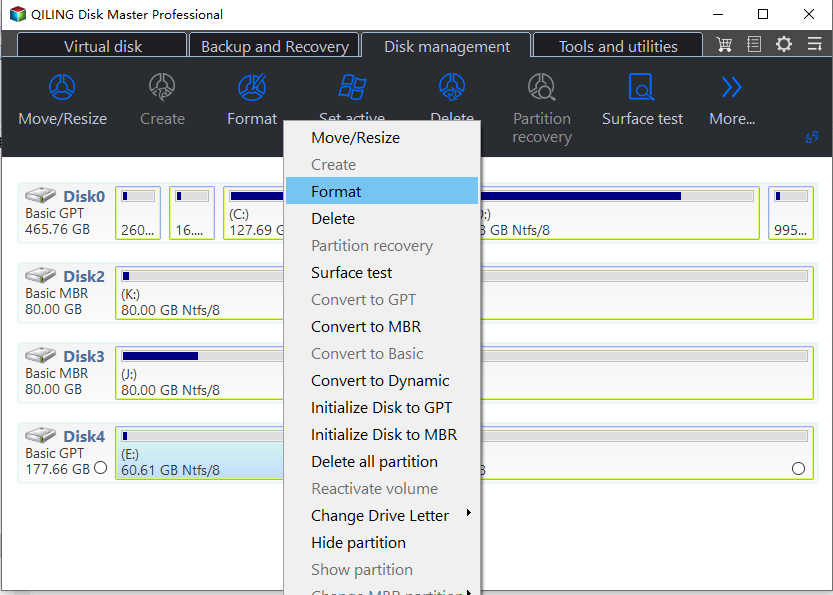
Launch Qiling Disk Master, right-click the target partition in the main window, and select "Format Partition" from the drop-down menu to open a new window.
Note:
1. Partition Label: Type a name if you like.
2. NTFS or FAT32: Choose NTFS or FAT32.
3. Cluster size: Change cluster size is not recommended here.
Why Partition a Hard Drive?
This part will give you some reasons:
- To make partitions independent, they should not be broken when one partition is destroyed. This approach also makes it easier to manage data and file groups.
- To ensure data safety, encrypt the partition that contains all your cryptographic data, rather than encrypting all partitions, to maintain efficiency in accessing other partitions. This approach allows for the protection of sensitive data without compromising system performance. (Note: system partitions cannot be encrypted for normal OS operation).
- For office workers and others who store files and programs, creating separate partitions for similar programs or games can be highly beneficial. This practice allows for easy classification and organization of files, making work more efficient and streamlined. By labeling each partition with a distinct name, users can quickly locate and access the desired files, reducing time wasted on searching and improving overall productivity.
- To dual boot or multi-boot operating systems like Windows XP and Windows 7, it's necessary to create separate partitions for each OS. This allows the systems to coexist on the same computer without interfering with each other. The process typically involves resizing the existing partition to make space for the new OS, creating a new partition for the new OS, and then installing the new OS on that partition.
Summary on Partition a Hard Drive
Partitioning a hard drive helps organize data, separate system files from personal files, and prepare space for different uses. For basic tasks such as creating, deleting, or formatting partitions, Windows Disk Management may be enough. If the built-in tool cannot meet your needs, Qiling Disk Master Pro provides more complete partition management options.
 Free Download Qiling Disk Master Pro to Try (size: 26.9MB)
 Buy Qiling Disk Master Pro Now (only US$ 39.00)
Related Articles
- How to Merge Partitions to A Bigger One
- Allocate Free Space from One Partition to Another
- Repartition a hard drive without formartting partition
- How to partition a hard dirve Windows 7
- Partition external hard drive
- How to Partition SSD From BIOS [2024 New Guide]
Use this guide for How to Merge Partitions to A Bigger One Allocate Free Space from One Partition to Another Repartition a hard drive without formartting partition How to partition a hard dirve Windows 7 Partition external hard.
Products
Articles & Tutorials
- Data Recovery
- Data Backup
- File Recovery
- File Backup
- File synchronize
- System Backup and Restore
- Disk and Partition Clone
- Technical articles
- Disk Master Help
- Windows Deleted File and Disk Recovery Tutorials
- Windows File and Data Recovery Tutorials
- More Windows Tutorials for Install, Security, Files, and PC Tips
- Windows Boot, Repair, and Recovery Environment Tutorials
- Windows Backup Tutorials
- Windows Restore Tutorials
- Windows Clone and Migration Tutorials
- Windows Server Backup, Recovery, and Management Tutorials
- Windows Disk, Partition, and Storage Management Tutorials