[2 Ways] How to Move Apps in Windows 11 Without Losing Data
Oh, how do I move program from C to D in Windows 11?
To free up space on your C drive, you can move some of your apps to the D drive. This process is called "moving apps" or "relocating apps." You can use the built-in feature in Windows 11 called "Move to D" or use a third-party tool. Moving apps will not affect their functionality, and they will continue to run properly after the move. However, some apps might require a restart to update their configuration. Be sure to check the app's requirements and follow the instructions provided by the app developer. Additionally, some apps might not be compatible with the move, so it's essential to test them after the relocation.
Why we move apps to different storage?

The default download location for Windows 11 is the C drive. If not changed, apps will be saved there, potentially running out of space and causing the PC to slow down or even crash.
But Microsoft requires Windows 11 to have 64GB of free space on the system drive, which annoys many Windows 11 users. But don't worry, I will show you how to move apps in Windows 11 without data loss in this post.
How to move apps in Windows 11 easily and safely
When moving apps, you can't simply copy and paste from one hard drive to another because the apps are tied to the registry during installation, and copying only transfers surface files, not the registry and path, which is necessary for the app to work properly.
To transfer apps to different storage, the easiest and safest way is to use Qiling Disk Master Professional, which has a built-in App Mover feature that allows users to move installed programs from one drive to another without reinstalling. This software has various functions to solve many problems with hard disks and partitions, making it a powerful tool for managing storage.
If you're having trouble moving apps on Windows 10 or 11, you can try using Qiling Disk Master Professional, which can make the process much easier. Alternatively, you can try moving apps without using third-party software by following specific steps.
How do I move Windows Store apps in Windows 11?
For Windows Store apps, you can move them using the built-in "Apps & features" tool in Windows 10 and 11, but this option is only available for apps obtained from the Microsoft Store.
Step 1. Press "Windows + I" to open Settings.
Step 2. To view a list of installed apps on your system, click on "Apps" in the Start menu, followed by "Apps & features".
Step 3. Click the three vertical dots to choose "Move"
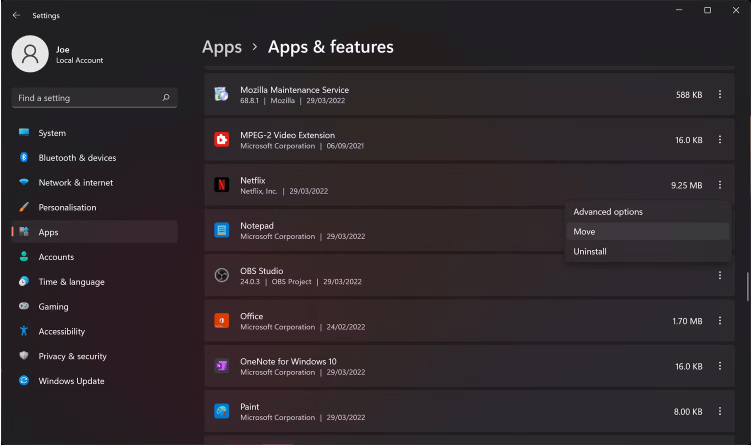
Step 4. Select the new destination drive and click "Move" again.
How to change the default installation path of apps on Windows 10 and 11
If you want to change the installation path of the app before downloading it, you can refer to the following steps:
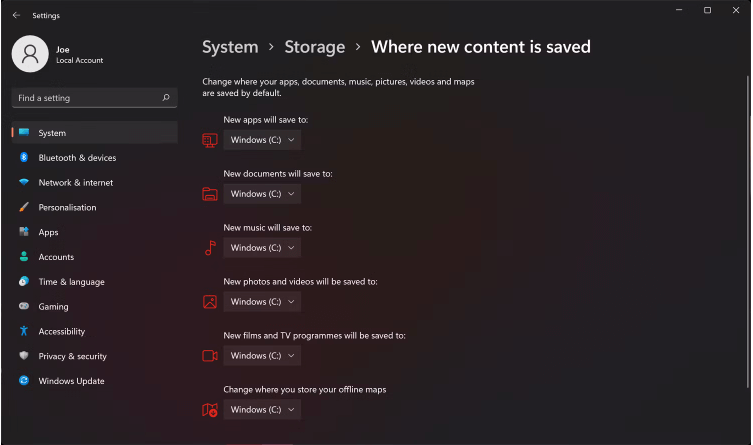
Step 1. Press the "Windows + I" to open Settings.
Step 2. To change where new content is saved, go to System > Storage, then click Advanced storage settings, and select Where new content is saved.
Step 3. Change the new saved path for apps.
Wrap things up
Moving apps in Windows 11 can be done in two ways: using Windows' built-in feature or a professional third-party software like Qiling Disk Master Professional. The latter option is less restrictive and safer, offering a more flexible way to move programs.
The software has advanced features beyond the move program, including allocating free space from one drive to another, cloning a disk to a larger one, migrating the OS to an SSD, and deleting large files by type to save space on the PC.
If you're a Windows Server user, please switch to Qiling Disk Master Server, which is specifically designed for Windows Server users.
Related Articles
- Safely Move Installed Programs to Another Drive in Windows 10
This article shows how to move installed programs to another drive in Windows 11/10/8/7 and ensure them run successfully. - How to Move Apps to External Storage on Windows 11 Without Data Loss
How to move apps to external storage on Windows 11 when the internal drive almost full for freeing up space? Here is a detailed guidance that move installed program to another drive without reinstalling. - 10 Tips for SSD Optimization in Windows 7 - Part 1
One can optimize ssd in Windows 7. Here we have 10 tips about SSD optimization. The first part is about the preparations of SSD optimization. - 10 Tips for SSD Optimization SSD in Windows 7 - Part 2
One can optimize ssd Windows 7 in ways. Here we have 10 tips about SSD optimization. The second part is about the paging files and defragmentation on SSD. - 3 Ways: Set up OneDrive Automatic Backup Windows 11
In this post, you can learn three simple ways to set up OneDrive automatic backup on Windows 11. Follow the graphical tutorial to easily complete the task. - Stepwise Guide to Run PC Health Check for Windows 11 Upgrade
This tutorial provides a step-by-step guide on how to run the PC Health Check app for a Windows 11 upgrade. For a proper upgrade process, you can also refer to the instructions on upgrading to Windows 11, which can be found elsewhere.