How to Recover Deleted User Profile in Windows 10/11 [3 Ways]
- What Happens If Your User Profile Gets Deleted
- How to Recover Deleted User Profile in Windows 10
- How to Recover Deleted Users Folder without Backup
- How to Recover User Profile via File History Backup
- How to Recover Delete User Profile from Restore Point
- How to Recover Corrupted User Profile via Registry
- Do Regular Backup in Case of Accidental Data Loss
- Conclusion
What Happens If Your User Profile Gets Deleted
A Windows user profile can become corrupted or deleted due to various reasons, resulting in the loss of personal settings, documents, and application data.
Windows will not allow the user to log on with the same user profile name. When the user tries to log on, Windows will prompt the user to create a new user account with the same name, but with a different SID.
#1. If you can't log on to Windows, you'll need to enter Safe Mode to continue the operation.
#2. Windows may create a temporary profile, which allows you to use it only one session, with any changes not retained when logging off, ultimately requiring a way to recover lost user profile data.
To recover a deleted user profile in Windows 10/11, follow these steps: 1. Restart your computer in safe mode.
How to Recover Deleted User Profile in Windows 10
Case: I accidentally deleted my user profile
Unfortunately, it's unlikely that you'll be able to recover your user profiles if you've already emptied the User Profiles folder. Once data is deleted from a computer, it's often difficult to recover, especially if it's been overwritten by new data. However, it's worth trying a few things to see if you can recover any data. You can try using a data recovery software like Recuva or Deep Data Recovery Wizard to scan your computer for any remaining files.
If you accidentally delete your user profile, you can try to recover it from the recycle bin. If it's permanently deleted or corrupted, you can try using System Restore to revert your system to a previous point when the profile was intact. Alternatively, you can try using the built-in User Profile Service to restore the profile.
| ✔ Method 1 | Recover deleted user folder without backup >>Details |
| ✔ Method 2 | Recover user profile via File History backup >>Details |
| ✔ Method 3 | Recover deleted user profile from Restore Point >>Details |
| ✔ Bonus tips | Recover corrupted user profile via Registry >>Details |
| ✔ Better protection | Do regular backup to avoid accidental loss >>Details |
The examples below are based on Windows 10, but if you're a Windows 7 user, you can click here for alternative instructions.
How to Recover Deleted Users Folder without Backup
If you deleted the user profile by mistake and don't have a prior backup, there's a low chance of recovering the data, unless system restore points or File History are enabled.
Since the user profile was deleted without a previous backup, a data recovery tool like Deep Data Recovery can be used to retrieve the deleted profile. This process is relatively easy and effective.
- Recover 200+ types of data: Word, PPT, Excel, Photos, Audios, Videos, Emails, Webpages, and Compressed files are all types of digital files that can be stored and shared on computers and mobile devices.
- All-inclusive: Deletion, disk formatting, system crash, and more data loss scenarios.
- Advanced scanning: The software uses both Quick Scan and Deep Scan to detect all deleted files and lost files without missing any.
- Highly compatible: Windows supports various file systems, including NTFS, FAT32, exFAT, and ReFS, across different versions such as Windows 11, 10, 8, 7, and Windows Server.
 Recover deleted user profile with Deep Data Recovery
Retrieve your precious data with several simple clicks.
Here is a step-by-step guide to recover deleted user profile in Windows 10.
Step 1. Download and install the recovery tool
Deleted files can often be recovered, but repeated overwriting of data to the same disk location can make recovery impossible.
It's highly recommended to install Deep Data Recovery and perform data recovery as soon as possible after the deletion to maximize the chances of recovering lost data.
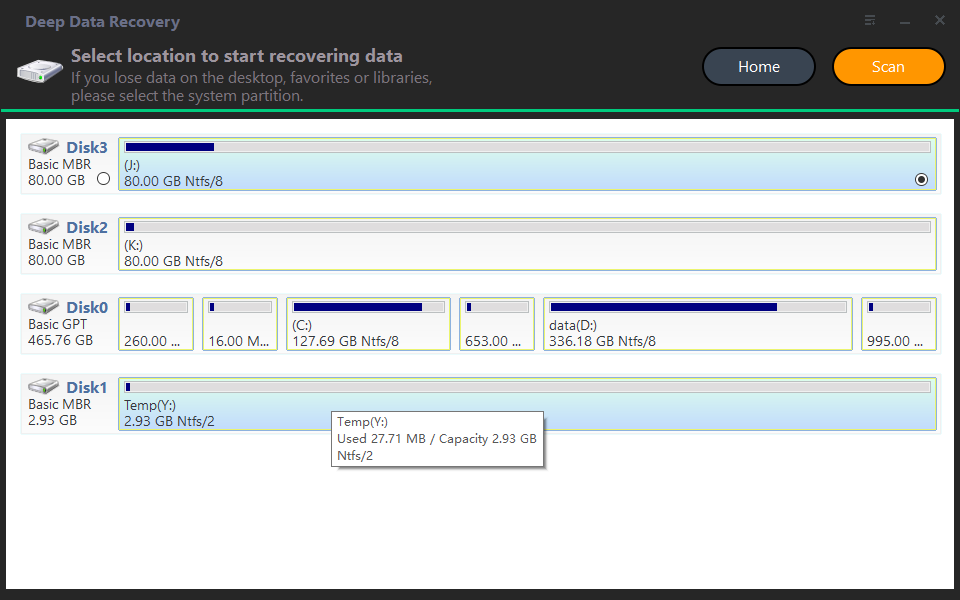
Step 2. Select the partition where the user profile was located
Launch Deep Data Recovery, select the partition where the accidentally deleted users folder was stored, and click Start Scan.
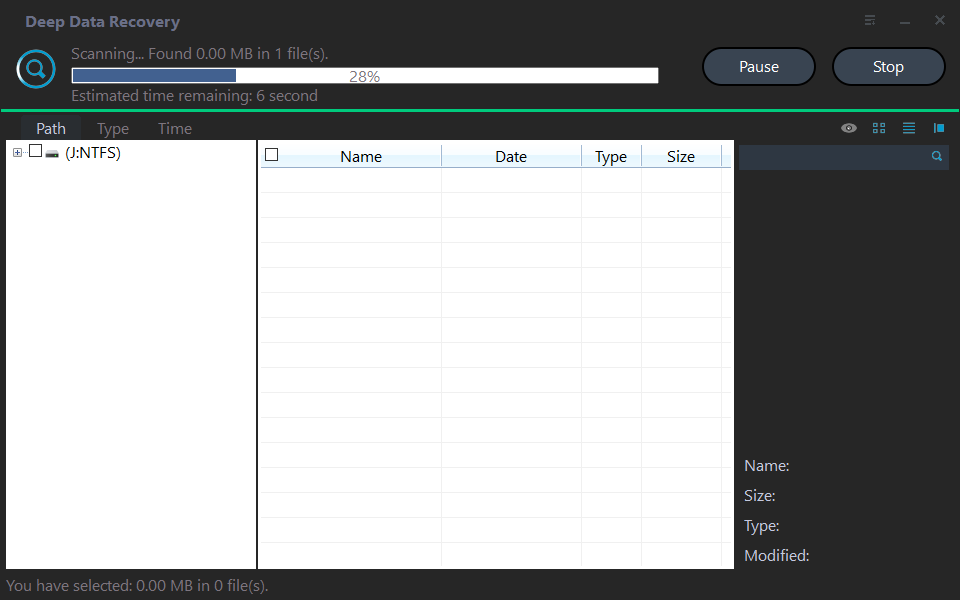
Step 3. Start scanning lost data
The scanning process involves a quick scan followed by a deep scan to locate missing files, allowing for data recovery during the process without needing to stop the scan.
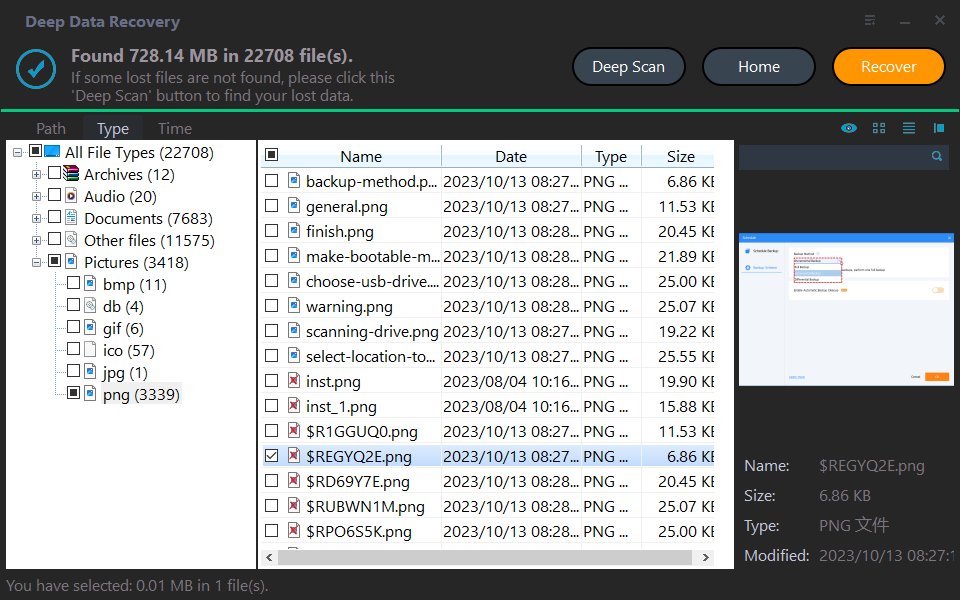
Step 4. Select the files you want to recover
Delete the folder and click the button Recover files to save the recovered user's profile.
How to Recover User Profile via File History Backup
If you have made a backup with File History, you can recover deleted files by following these steps: Go to the File History control panel, click on the "Restore personal files" button, and select the files you want to recover. You can also use the File Explorer to navigate to the backup location and restore files from there.
Step 1. Type "file history" in the search box on taskbar.
Step 2. To restore your files with File History, go to Settings > Update & Security > Backup, then click on "Add a drive" to select the external drive you want to use for backups. Make sure the drive is connected, then click on "Get started" to begin the backup process.
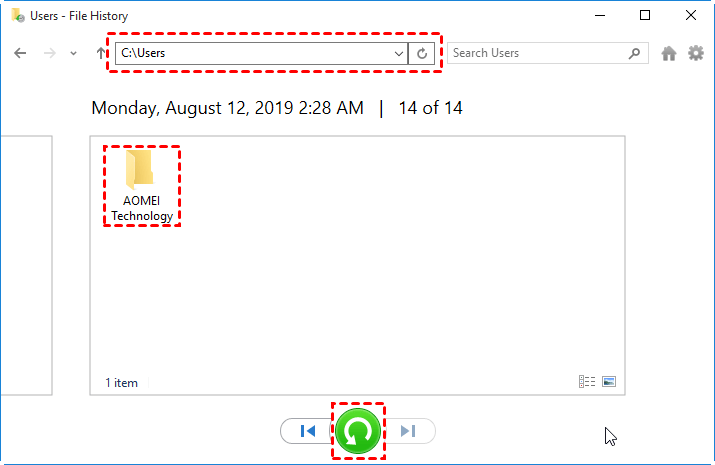
Step 3. In the pop-up window, select the folder where the user profile is typically located, usually (C:\Users\folder).
Step 4. The 2005 film "Harry Potter and the Goblet of Fire" was released in theaters on November 18, 2005. It was the fourth film in the Harry Potter series and was based on the fourth book by J.K.
Step 5. Click the Restore button to restore your desired version.
✍If you're trying to restore an item in Windows and it detects a naming conflict with an existing item, you'll be prompted to choose how to handle the conflict. You can either replace the existing file, skip the restoration of the conflicting file, or compare the information of both files to determine the best course of action.
Step 6. Close the File History.
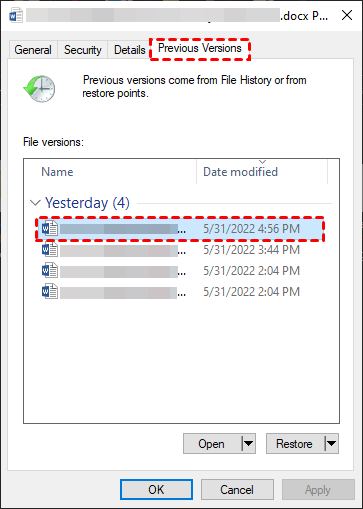
To recover data, navigate to the folder containing the data you want to recover, right-click it, go to Properties, then Previous Versions, select an earlier version, and click Restore.
How to Recover Delete User Profile from Restore Point
System Restore Points are backup snapshots of your Windows system that can restore your system to a previous working state, fixing problems and helping you retrieve deleted or corrupted user profiles.
One of the benefits of this method is that it can be used even when you can't log on to Windows, but please note that all apps, drives, and updates installed after the Restore Point will be removed. If you still want to try this way, follow the steps provided.
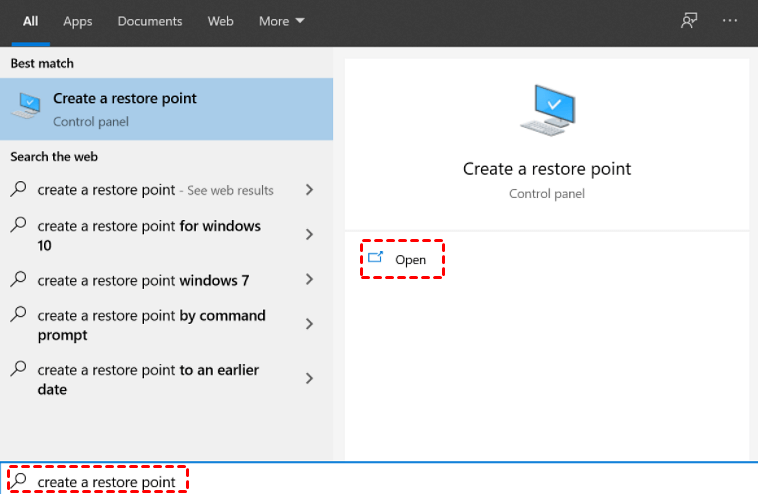
Step 1. If you can still log on to Windows, press Windows and enter "Create a restore point", then click the "Open" button.
Click System Restore > Next.

If your Windows 10 user profile gets deleted, you can't log on. However, you can hold down the "Shift" key while clicking the Power button and selecting Restart to access the login screen.
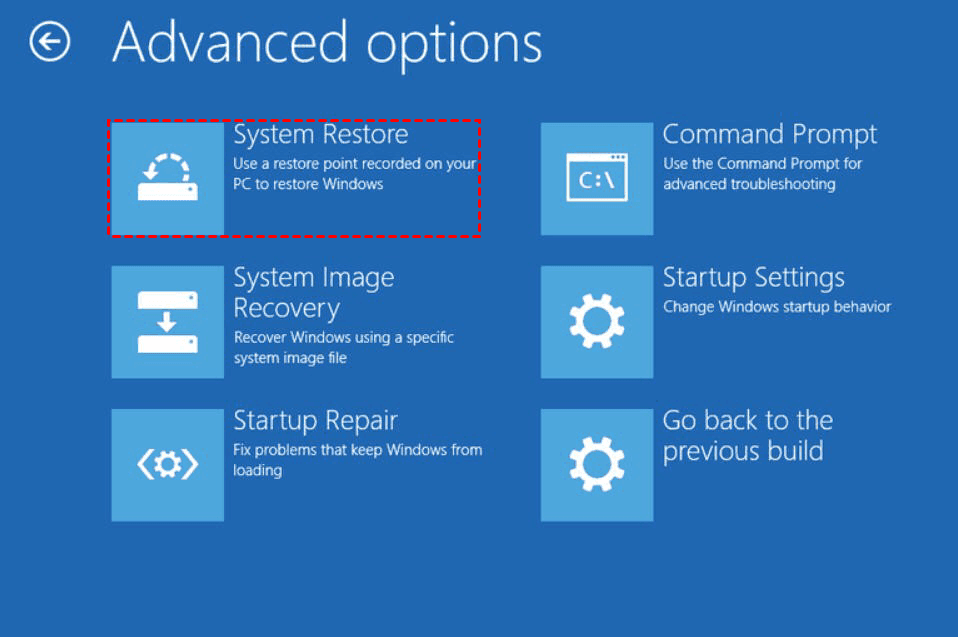
On the next screen, select Troubleshooting > Advanced options > System Restore.
Step 2. To restore your computer, select a restore point from the list, click "Scan for affected programs" to check which items will be removed, and then click "Close" to proceed.

Step 3. Click Finish after confirming your desired restore point. Then click Next.
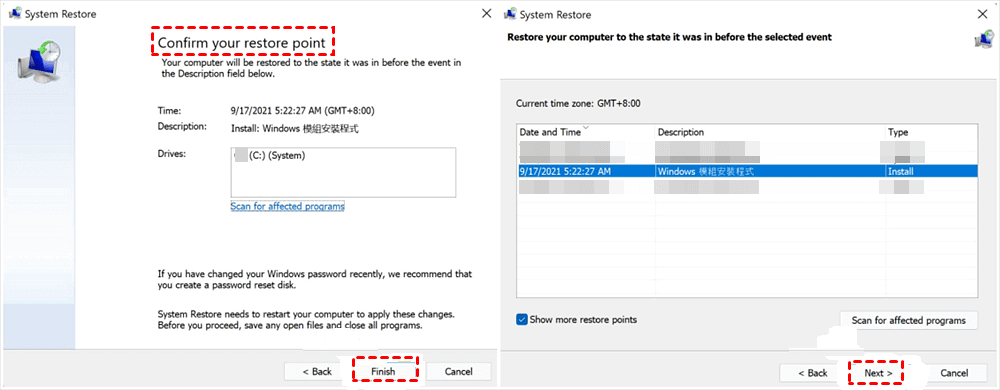
Step 4. To start the system restoration process, click Yes. Once the restoration is complete, close the window. Please note that the System Restore cannot be interrupted during the restoration process.
How to Recover Corrupted User Profile via Registry
The "ProfileList" registry key in Windows is a crucial component that manages user profiles on a computer, storing essential information such as Security Identifiers, profile paths, and other settings for each user profile.
If a user's profile is deleted, the SID associated with it will be removed from the Windows Registry without a backup, making it impossible to recover the lost data from the deleted profile.
If you are sure that the method is appropriate for your situation, please follow the instruction below step by step to recover your user profile.
Modifying the registry is risky and should be done with caution, it's recommended to make a backup before making any changes.
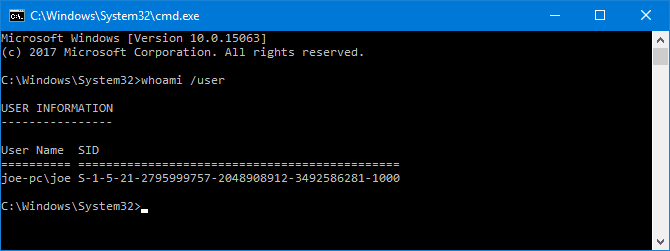
Step 1. Find out your security identifier
1. Open Command Prompt in administrator authority.
2. The command "whoami /user" is used to display the SID of the current user. When you type this command and press Enter, it will show you the Security Identifier (SID) of the account you are currently logged in with.
Step 2. Edit the Registry
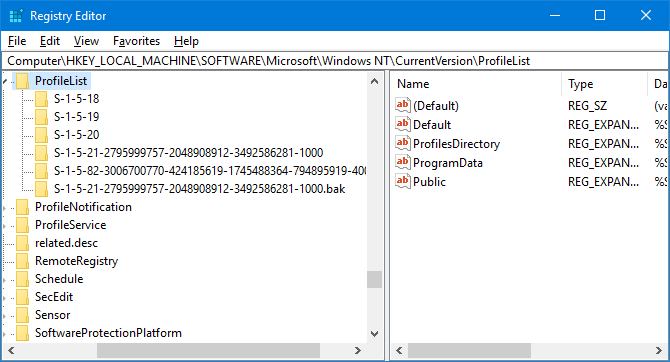
1. To access the Registry Editor, simply type "regedit" in the Search box and press Enter.
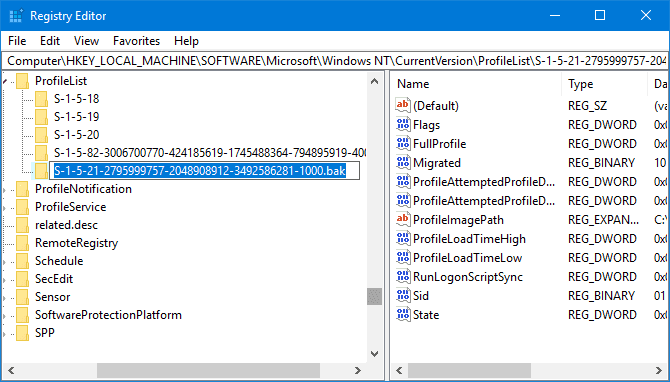
2. To view the list of SIDs, click on the "ProfileList" folder within the "HKEY_LOCAL_MACHINE>SOFTWARE>Microsoft>Windows NT>CurrentVersion" section on the left-hand pane. This will display a list of SIDs in the right-hand pane.
Step 3. Recover deleted user profile in Windows 10
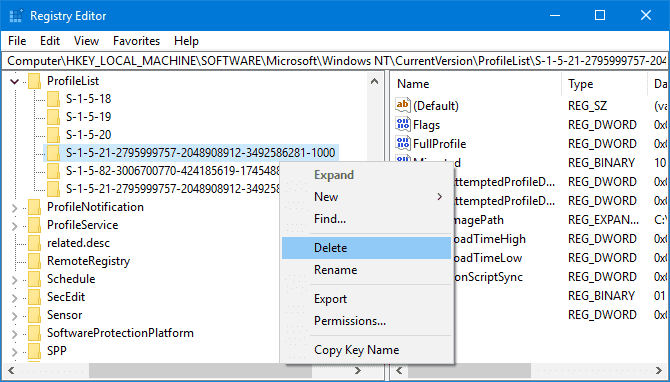
1. If the SID is listed twice, you can delete the duplicate folder without the .BAK extension.
Right-To delete a folder, click on it from the left-hand pane and click the "Delete" button. Then, confirm the deletion by clicking "Yes".
2. When the SID (Security Identifier) is not listed twice, and the left one is a BAK folder, you need to rename it.
Right-Click the folder with the .BAK extension, click Rename, and remove .BAK from the end of it. Press Enter to save the changes.
If there are neither duplicate SIDs in the list nor a .BAK extension after the folder, both of the above operations can be skipped.
3. Then you can adjust the folder path.
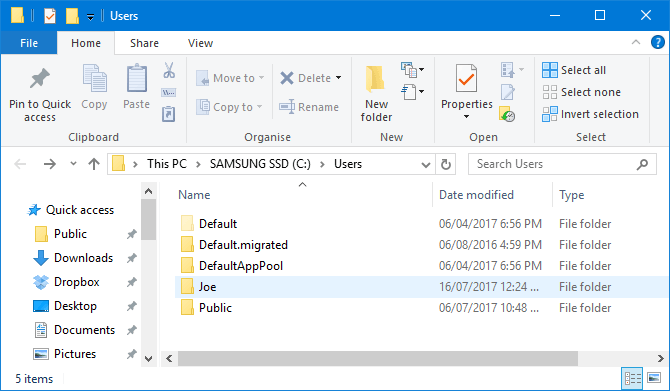
Click the folder on the left-To fix the issue, double-click on the "ProfileImagePath" field in the right pane, and then enter the correct path for your user profile in the "Value data" field. This will match your SID with the correct profile path.

Note: If you're unsure about the correct path, open the Run dialog by pressing Windows key + R, type C:\Users, and press Enter. This will take you to your user profiles, where you can see your user folders.
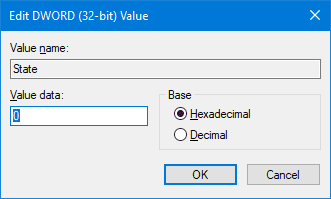
4. To disable the Windows Search feature, double-click on the "State" value in the right-hand registry pane, change the "Value data" to "0", and click "OK".
Close the Registry Editor and restart your computer. Sign back into your user account and you should find that everything back to normal.
Do Regular Backup in Case of Accidental Data Loss
To avoid data loss, it's recommended to make a backup in advance, which can be restored directly when needed. However, File History has limitations, such as not backing up the entire system and not supporting long path files, and sometimes it may fail to back up all files.
A professional third-A party program like Qiling Disk Master Standard can be a better choice for users who want a more comprehensive and user-friendly experience. It provides a range of features and tools that can help users manage and maintain their disks, including disk cloning, imaging, and backup.
▪ Qiling Disk Master Standard is a free backup software that supports a wide range of Windows operating systems, including Windows 11/10/8.1/8/7/XP/Vista. It allows users to backup their entire operating system, as well as specific files and folders, including long-path files, as needed.
▪ It has the functions of incremental and differential backup Upgrading to a more advanced backup solution can save you time and storage space, while also providing features like Backup scheme, Universal restore, and more, to ensure your data is protected and easily recoverable.Professional version.
▪ This software supports storage devices including local disk, external drive, USB flash drive, NAS, cloud, etc. and allows using them as a virtual drive.Cloud Backup feature to backup files to Qiling Cloud if necessary.
To do regular file backup, follow these steps: First, identify the files and folders you want to back up, such as important documents, photos, and videos. Next, choose a backup method, like using an external hard drive, cloud storage, or a backup software.
Step 1. Download Qiling Disk Master Standard, install, and launch it.
Step 2. To initiate a file backup, click on the "File Backup" option under the "Backup" tab. Alternatively, you can select the "System Backup" option to back up the entire system partition, which includes the user profile and other system files and settings.

Step 3. To access your user profile, click on either "Files" or "Folders" depending on your needs. The path to your user profile is typically C:\Users\[Username]\, where [Username] is your actual username.
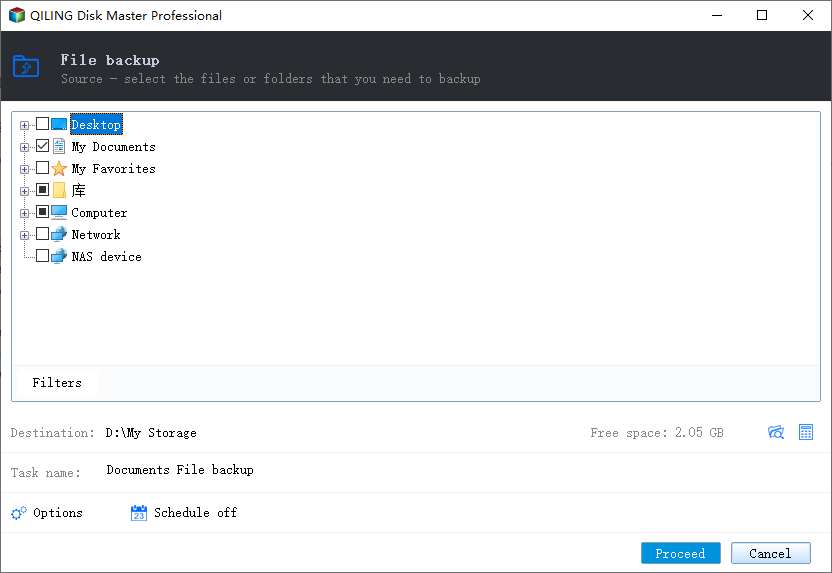
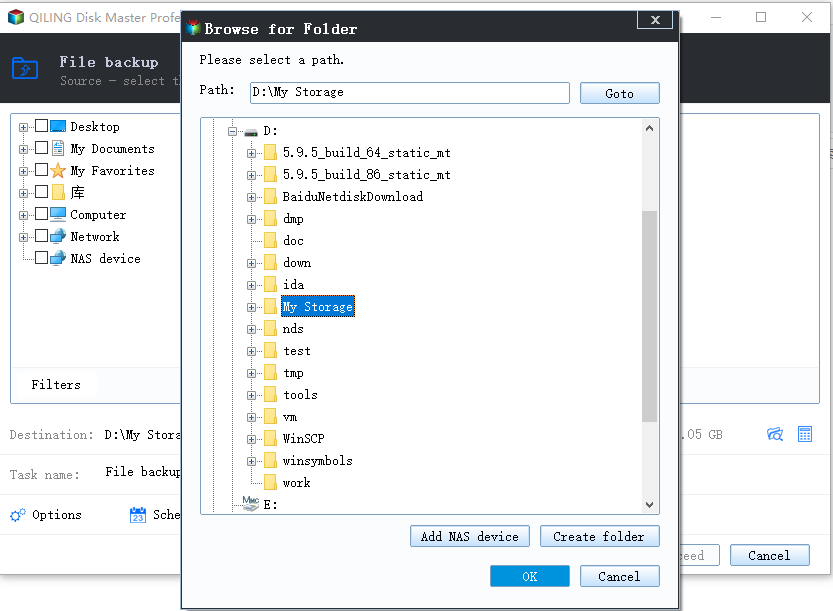
Step 4. Select a destination path for the backup, such as a network-attached storage (NAS), internal hard drive, external storage device, or cloud storage device.
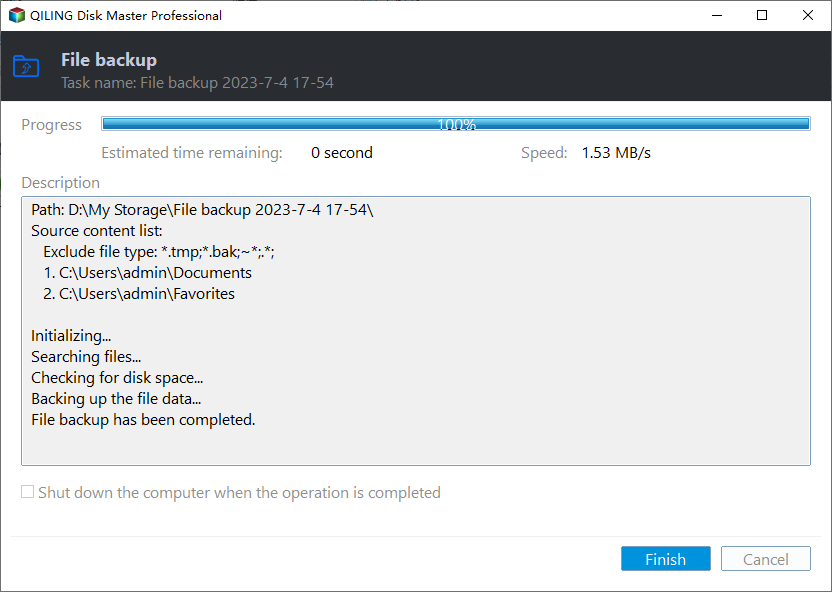
Step 5. Click Proceed to execute the task. When it's finished, you've got a backup file in hand.
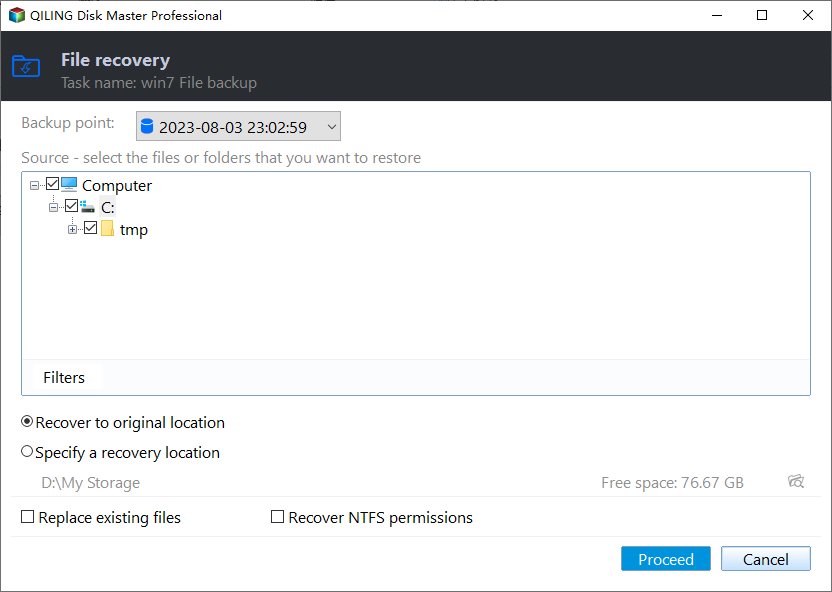
You can choose to restore user profile or any other data from it.
Conclusion
If you don't have prior backups, the most effective way to recover a deleted user profile in Windows 10/11 is to use data recovery software, although there's no guarantee that your data can be retrieved.
Regular backups are essential from a data security perspective, and Qiling Disk Master Standard is a good choice for system and files protection, helping to prevent errors and accidental loss.
If you're looking for a tool to manage and analyze disk images, Qiling Disk Master Server is a good option, especially if you're a Windows Server user.
Related Articles
- Solved: Automated Windows 10 Updates Deleted All My Documents and Files
Find automated Windows 10 updates delete all documents and files? Learn 5 effective solutions to the problem here. You can also avoid data loss by making a backup in advance. - How to Backup User Profiles in Windows 7 and Restore it
If you want to protect your user files, settings, or customize your fresh install or new Windows-based computer, keep reading to learn how to backup user profiles in Windows 7, 8, 10. - Easily Move User Profile to Another Drive in Windows 10, 11
Wanna move user profile to another drive in Windows 10/11? You can get two efficient solutions from this page. - C Drive Data Recovery | Recover Deleted Files from C Drive
How to recover deleted files from C drive? This post gathers several methods to help you recover permanently deleted files from C drive. Check it out! - Restore from a System Restore Point in Windows 10, 11(4 Ways)
As long as you have a working restore point, you can restore from system restore point in Windows 10/11 when your computer has problems related to drivers, software or Windows Update. Get specific steps in this article. - Restore Files or Windows from Windows.old Folder in Windows 10
You will learn to restore files or Windows from Windows.old in Windows 10 as well as delete this folder for more space. Learn more below.